 Belgium
 Canada
 Germany
 Italy
Italy France
 Spain
Spain United Kingdom
 Exchange Mailbox Protection
The BackupAssist Exchange Mailbox Add-on is used to achieve brick-level backups of your Exchange Server. The add-on extracts Exchange mail data to separate PST files, providing a simple and fast mail protection solution.
Licensing
Exchange Mailbox Protection (licenced as the Exchange Mailbox Add-on) is fully supported, but has been superseded by Exchange Granular Restore (licenced as the Exchange Granular Restore Add-on). This new solution uses System Protection, File Protection and File Archiving backups to restore mail items.
The Exchange Granular Restore Add-on automatically includes the Exchange Mailbox Add-on:
- Existing customers with an Exchange Mailbox Add-on licence automatically receive the Exchange Granular Restore Add-on licence.
- New customers can purchase the Exchange Granular Restore Add-on license.
The Exchange Granular Restore Add-on is the recommended tool for protecting mail items in Exchange 2013, 2010 and 2007. It uses standard backups and cannot be used with backups created by Exchange Mailbox Protection (Exchange Mail Add-on).
For license key activation / deactivation instructions, visit our Licensing BackupAssist page.
Online Whitepaper
Download the whitepaper as a PDF
Comparison of Exchange Backup Types
Who needs the Exchange Mailbox Add-on?
|
Where to use the add-on |
Where not to use the add-on |
|
To restore a complete exchange server. Instead, restore the entire Information Store using your Exchange VSS backup. See the Exchange Server Protection whitepaper for more information . |
|
Supported platforms for this add-on: Microsoft Exchange Server 2007 and 2010. |
|
Advantages and disadvantages of the different PST formats
This table shows what features are supported by the different mail file formats
|
Format features |
Unicode PST
|
ANSI PST
|
|
Public folder backup (1) |
|
|
|
PST file size limit (2) |
50GB |
2GB |
|
International character support |
|
|
|
Legacy support (3) |
|
|
|
Microsoft Outlook required |
|
|
|
Mailbox rights set on Exchange 2007/2010
|
|
|
|
Support for 64-bit
|
|
|
1) Public folder backup: Exchange public folders are publicly accessible repositories that store email messages, calendars, contact and that everyone on the network can access through Outlook. If public folder backups are supported they will be stored in your mailbox backup directory as a PST file named _PublicFolders_.pst
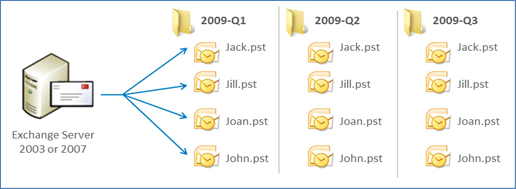
2) PST file size limit: PST files in ANSI format have a file size limit of 2 gigabytes. Once a PST file reaches to 2GB in size, BackupAssist will automatically rename it with a numbered suffix and create a new PST file to store new mailbox data. This process is repeated each time a PST file reaches 2GB in size. To overcome this limitation, you can select a grouping method to store your mailbox backups within separate folders for each month, quarter or year. Each PST file will be smaller in size, as it contains only mail data from the grouping period selected. PST files in Unicode format have a 50GB size limit for Exchange 2010 and 20GB for Exchange 2007.
Comparison Matrix
|
Product |
Restore options |
Information Store backups |
Public folders and private user mailboxes |
|
BackupAssist |
Fully restore your Exchange Server |
|
|
|
BackupAssist & Exchange Mailbox add-on |
Individual item restore and basic archiving |
|
|
Key Features and Benefits
The following table highlights the key features and benefits of the Exchange Mailbox add-on:
|
Feature |
Benefits |
|
Brick-level backup of Exchange data |
Achieve automated brick-level backups of Exchange data to back up user's individual mailboxes. |
|
Simple and rapid restoration of Exchange data |
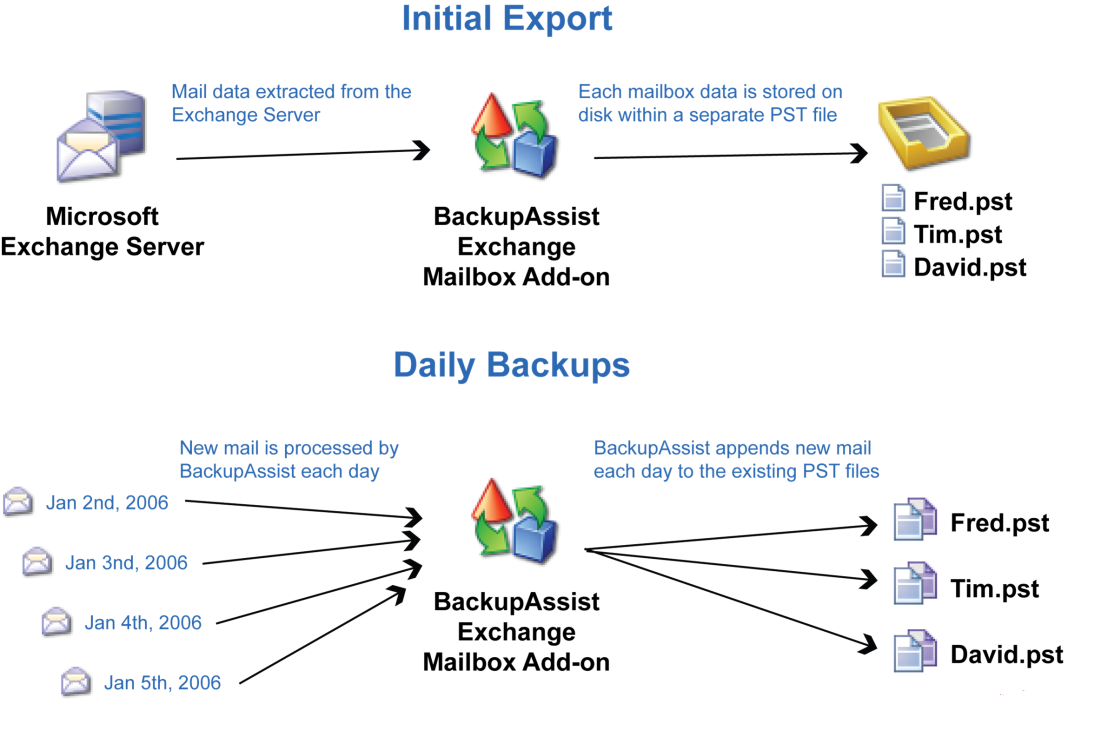
After an initial export of existing mail data to separate PST files (one per mailbox), BackupAssist will automatically schedule daily exports that merge or append new mail data into these files. This is similar to a daily incremental and is much faster than traditional backup methods. |
|
Simple and rapid restoration of Exchange data |
A separate PST file is created for each Exchange user's mailbox, making for a simple and rapid restoration of user's individual or group emails, calendars, tasks, notes, contacts or entire mailboxes. |
|
No proprietary formats |
PST is a standard file format, and users can open the files easily in Outlook. Email data is not locked within a proprietary format. |
|
Easy grouping and storage of emails |
PST files of mail data can be easily stored within separate folders and sorted by year, quarter or month. This is useful for compliance and in legal scenarios where forensic archiving is required. |
|
Extra protection for deleted items |
Mailbox backups go beyond the standard 'snapshot' backup. Each separate PST file is the cumulative total of all emails sent and received over a given time period. This prevents problems arising when a user discovers they deleted an email weeks or even months later. |
|
A range of recovery options |
Manual recovery: individual users can open PST files in Outlook and drag-and-drop items back into the relevant folders. |
|
Works on 32 bit & 64 bit machines |
BackupAssist can be installed on 64 or 32 bit machines. The same setup process is followed for all versions of Exchange and Windows. |
|
Public Folder backup |
BackupAssist can backup Public Folders to their own PST file. |
How Exchange Mailbox Protection Works
Grouping mailbox data

Groupings of mail data based on time periods
A grouping method can be selected to determine how your mail data is stored on disk, with options to store mail data within separate folders according to different time periods. PST files can be grouped by month, quarter, year or simply stored as a single set. The grouping method option makes it easier to locate mail data from specific dates. The following diagram illustrates how mail data is stored:
Changes to user's mail being backed up to exported mail files.
Mail data export
The Exchange Mailbox add-on performs brick-level backups of users' mailboxes to separate PST files. We recommended that you perform an initial manual export of your selected mailboxes. After this export, BackupAssist will merge new mail data to existing PST files according to your backup schedule. The below diagram provides an overview of how the add-on works:
Backup time periods
PST file backups by time period
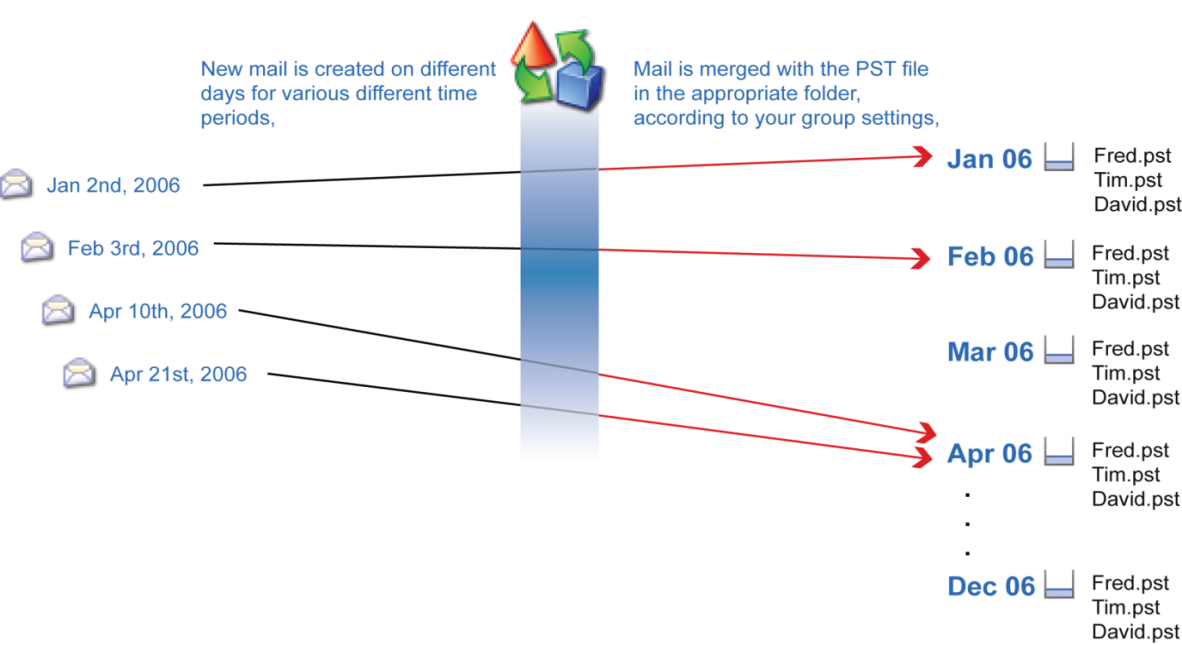
Each user's PST file is the cumulative total of all emails sent or received over a given time period, and not just a 'snapshot' of each individual user's mailbox at a particular point in time. Doing this prevents problems when a user requires an email that they deleted weeks or months ago, but only has a recent backup of their mailbox.
For example:
1. An email is received on the 1st of May 2012.
2. The user deletes this email on the 3rd of May 2012.
3. On the 5th of June 2012, the user needs to retrieve this previously deleted email.
With BackupAssist's Exchange Mailbox add-on, the original email would be backed up in the relevant year, quarter, month, or single folder, depending on your group settings, as a separate PST file on the night of the 1st of May. Even though the user deleted the email on the 3rd of May, the PST file would still contain the original message.
When you need to recover the email, you can open the relevant user's PST file and the original email will be available. The following diagram demonstrates how the sorting process works, assuming that the mail data is being sorted by month:
New mail items being merged into PST files and backed up
Mailbox backup automation
Many backup solutions require the use of scripts to create and configure custom backups. BackupAssist automates the creation of customized backups by using a backup creation wizard.
Benefits over PowerShell
|
PowerShell limitation / requirement |
How BackupAssist overcomes this |
|
Needs to be run on a separate 32-bit machine; cannot be run on the Exchange Server |
Can be run on a 64-bit or 32-bit machine, and can be run on the Exchange Server |
|
Requires the Exchange Server 2007 Management Tools (32-bit) |
No management tools required |
|
Requires Outlook 2007 |
BackupAssist does not require Outlook however, if Outlook is installed, Unicode PST features are available |
|
Requires PowerShell scripting |
Fully automatic assignment of permissions and exporting of mailboxes, all in a simple UI |
|
Requires manual scheduling |
Automatic scheduling thanks to BackupAssist scheduler |
|
No automatic reporting |
Automatic reporting keeps admin informed of results |
|
Does not support public folders |
BackupAssist supports public folder exporting to PST! |
Exchange Mailbox Protection Configurations
Requirements explained
Exchange Server MAPI client
The Exchange Messaging API (MAPI) client provides a COM-like API that BackupAssist uses to access the contents of messaging stores on an Exchange Server. BackupAssist provides a built-in facility to automatically install the MAPI client, but this can also be downloaded and installed manually from Microsoft. The Exchange MAPI client can be installed on nearly any Windows operating system, but cannot be installed if Microsoft Outlook is already present on your server.
If you are running a Windows Server 2008 / SBS 2008 or later operating system, you must either install the Exchange MAPI to backup to PST in ANSI format, or install Microsoft Outlook to backup to PST in Unicode format. The latest version of Exchange 2007 MAPI can be obtained using the "Upgrade" feature in the BackupAssist Console.
Microsoft Outlook
Microsoft Outlook (any modern 32bit version of Outlook - 2007 or 2010 [ 64bit versions not supported]), must be installed on the machine running BackupAssist if you want to create PST mailbox backups in Unicode format.
PST file formats
BackupAssist supports different methods for the creation of PST file backups for Exchange mailboxes. Each type of file has its own advantages and disadvantages, and applications that must be installed so mailbox backups can be performed.
PST format advantages, disadvantages and requirements .
|
PST format |
Advantages & Disadvantages |
Requirements |
|
ANSI PST using Exchange |
Advantages:
Disadvantages:
|
Exchange Server MAPI Client (1) |
|
Unicode PST using Outlook |
Advantages:
Disadvantages:
|
Microsoft Outlook (4)
Review this Microsoft article before using the Unicode functionality
|
Numbers explained below:
1) Recommended format: Unicode PST is the recommended format when backing up Exchange 2007/2010 mailboxes.
2) Public folder backup support: Exchange Server public folders are publicly accessible repositories that store emails, calendars and contacts that all users can access with Outlook. If your mailbox backup configuration supports public folder backups, you can configure BackupAssist to backup public folders with each user's private mailbox. The Public Folder backup will be stored in your Exchange mailbox backup directory as a file named _PublicFolders_.pst.
3) PST file size limit: PST files in the ANSI format have a size limit of 2 gigabytes (GB). Once a PST file grows beyond 2GB, it becomes corrupt and unreadable. See Microsoft article Q288283 and Q830336. You can overcome this limitation by selecting a grouping method in Set up Destination step, when creating a backup job. This option stores mail data in separate folders for each month, meaning each PST file will be smaller. You can also store your PST mailbox backups in the Unicode format, which has no file size limit.
4) International character support: PST files in Unicode format provide support for international characters, including non-Latin alphabets.
5) Requires Microsoft Outlook: The machine running BackupAssist must have Microsoft Outlook installed to create PST files in Unicode format.
Available PST file configurations
The following table outlines the Exchange Mailbox Backup configurations possible with BackupAssist v8, including the options that each configuration supports:
|
Configuration |
Options supported |
|
ANSI PST using Exchange |
With Exchange MAPI client installed |
|
Operating systems supported: 32-bit and 64-bit versions of Windows 7 & 8, Server 2008/R2, 2012/R2 & SBS 2008, 2011.
|
|
|
Unicode PST using Outlook |
With Microsoft Outlook 2007 / 2010 installed |
|
Operating systems supported: 32-bit and 64-bit versions of Windows 7, 8 & Server 2008/R2, 2012/R2 & SBS 2008, 2011.
|
* Most Exchange 2007 and Exchange 2010 setups do not require you to enable the option to set mailbox rights automatically for mailbox backups to run correctly. This option should only be enabled when advised by the BackupAssist Technical Support team.
BackupAssist Settings
When creating a backup job, there are some global settings that should be configured in BackupAssist. If they are not configured, you will be prompted to complete them during the creation of your first backup. It is recommended that this is done in advance.
BackupAssist's settings can be entered and modified using the selections available in the Settings tab. Clicking on the Settings tab will display the selections as icons. Four of these are used when creating new a backup job and each one is described below:
Backup user identity
Backup jobs require an administrator account with read access to the data source, and full read-write access to the backup's destination. It is recommended that a dedicated backup account is created for this purpose. The account's details are entered here and your backup jobs will be launched using these credentials. The account's permissions will be validated both when the backup user identity is entered and when the job is executed. If no account is specified or the account has insufficient permissions, the backup job will fail and note the error in the backup report.
Before setting up mailbox backups in BackupAssist, we recommend that you make sure that you are using a dedicated backup user identity that has permission to access your Exchange Server. Refer to our Exchange user identity article
Please also refer to the resource, Backup User Identity for Exchange mailbox backups when planning an Exchange Mailbox solution.
Email server settings
This menu item is used to enter the details of the SMTP server used by BackupAssist to send email notifications. The SMTP server must be configured if you want to have an email Notifications step included when you create a backup job.
Email address list
This menu item is used to define and store the email addresses of potential notification recipients. The list will be used to populate the recipient selection screen when configuring an email notification for a backup job. Any email addresses entered during the creation of a new notification are automatically added to the Email address list.
Network paths
This option allows you to enter access credentials for networks, domains and drives that the default account (specified in the Backup user identity) does not have access to. Enter or browse to the location and add it to the Path list. The Edit option will allow you to enter an authentication account, specifically for that path. When you create a backup job to a remote location, that location will be automatically added here.
Having multiple connections to a resource using the same logon credentials can generate a Windows error, such as the BA260 NAS error. It is therefore recommended that you avoid having mapped shares on the computer running BackupAssist that are the same as the paths configured in BackupAssist.
Client Access Server Backups
With Microsoft Exchange Server 2010, Microsoft has allowed administrators to separate Exchange Server roles onto individual servers to achieve better load balancing and resiliency.
A key role relevant to backup software is the introduction of the Client Access Server (CAS) role, which changes the way client software communicates with mailboxes on a Microsoft Exchange Server 2010 installation. Whilst roles were introduced in Exchange Server 2007, they did not affect the way BackupAssist operated.
The Client Access Server handles the first point of contact between client software and the Exchange Server. If the CAS role is moved to a separate server from that which houses the mailboxes, then the BackupAssist job must be configured appropriately.
A backup job configuration is shown in the example below. Two Exchange Servers, EXCH01 and EXCH02, plus a Workgroup PC. EXCH01 has the CAS role and host the public folders, whereas EXCH02 will host the mailboxes only. BackupAssist will be installed on the Workgroup PC.
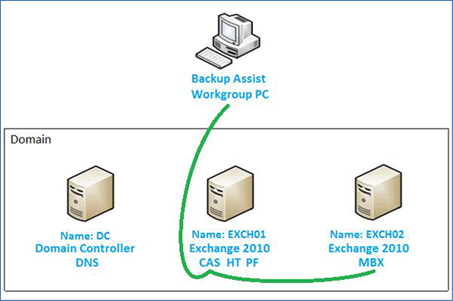
Figure 5 BackupAssist configured to use the Client Access Server (CAS)
Roles
- CAS Client Access Server DNS Domain Name System
- HT Hub Transport MBX Mailbox
- PF Public Folders
If all roles are installed on a single Microsoft Windows Server, as is the case with a default Microsoft Windows Small Business Server (SBS) 2011 installation, then the Client Access Server does not need to be explicitly set in the BackupAssist job. In order to back up public folders they must be on the same server which has the CAS role installed. Either the CAS role may be installed on the server with the Public Folder database, or the Public Folder database may be moved to the server which has the CAS role installed.
PST Format Selection
During the creation of an Exchange mailbox backup, you will be asked to select a PST format. The selection depends on the type of machine Exchange is installed on. This section provides guidance on the PST selection based on the machine used, and should be referred to in the Set up Destination step of mailbox backup job creation.
Additional information on the different PST formats can be found in the Exchange Mailbox Protection configurations section of this document.
Exchange mail backup - PST type selection
For Windows 7 / 8 & Server 2008/ 12 & SBS 2008/11
· Selecting an appropriate PST format is important, as a PST file in one format cannot be converted to the other.
- Unicode PST using Outlook (recommended)
You should not install Microsoft Outlook if the Exchange MAPI client is already present on the machine; first remove the Exchange MAPI client and then install Outlook.
- ANSI PST using Exchange
To use this option you must have the Exchange MAPI client installed on your machine. The MAPI client cannot be installed if Microsoft Outlook is already present on the machine.
BackupAssist provides a facility to automatically install the Exchange MAPI client:
a. Select ANSI PST using Exchange
b. Click the blue Install help link.
c. A new window will appear. Click the Install button to install the Exchange MAPI client.
d. BackupAssist will download the Exchange MAPI client and install it on your machine.
Creating an Exchange Mailbox Backup
The following instructions describe how to create an Exchange mailbox backup job using the BackupAssist Exchange Mailbox Add-on.
Note: Exchange Granular Restore is the recommended tool for protecting mailboxes and mail items in Exchange 2013, 2010 and 2007. This restore-based solution supersedes the backup-based Exchange Mailbox Protection solution - but both are supported.
Launch BackupAssist and follow the steps outlined below:
1. Select the Backup tab, and click Create a new backup Job
2. Select Exchange Mailbox Protection
If this is the first time you have created a backup job, you will be asked to provide a Backup user identity if one has not been defined. See the section above, BackupAssist settings , for guidance.
3. Selections: Add the Exchange Server to BackupAssist and select the mailboxes as explained below.
a. Specify the backup user identity: The link above Add Exchange Server, will display the user identity that will authenticate with the Exchange Server. We recommend that you make sure that you are using a dedicated identity that has permission to access your Exchange Server.
b. Add Exchange Server: If you are on a server running Exchange, the local Exchange Server will appear for selection.
To add an Exchange Server that is not on your local machine, use the search field to type in the name of the Exchange Server you want to connect to. Any servers that your Backup user identity has access to administer, and are on your domain, will appear in a popup window.
Put a tick on the Exchange Server/s required and select Add
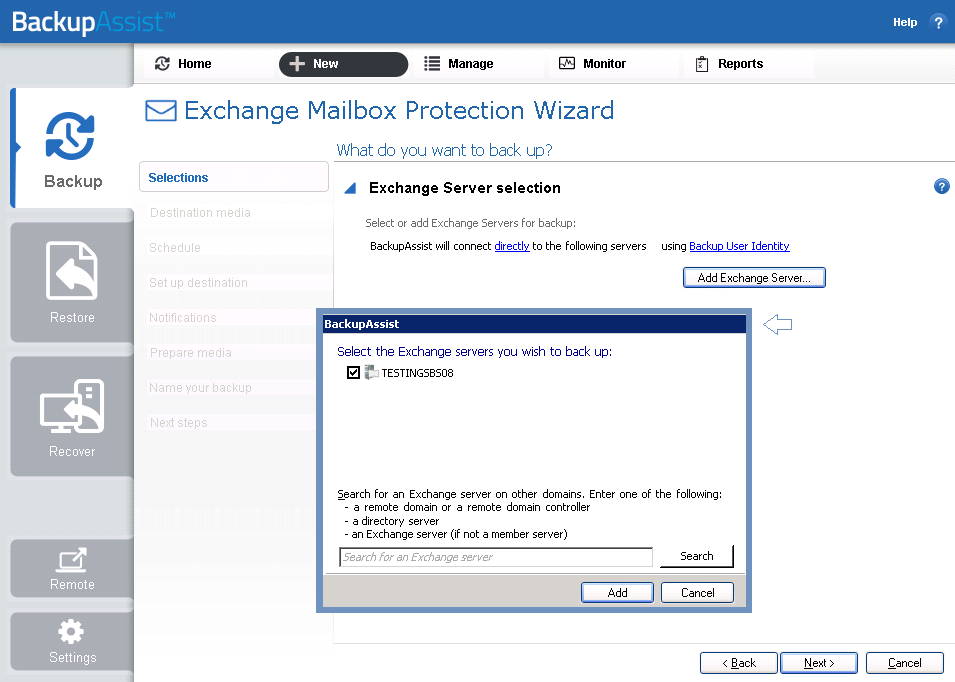
Exchange Mailbox Protection - server selections screen
c. Add Client Access (CAS) Server
The Client Access Server must be added separately when the CAS role is on a separate machine to the mailboxes. To learn more, refer to the section, Client Access Server backups .
- If you want to add a CAS Server, select the link - connect directly
- Change the method of connection from Connect directly to Use Client Access Server
- Enter the name or IP address of the server running the CAS role, and click OK.
- Click Add Exchange Server and select the Exchange Servers to back up.
- Once you have added the Exchange Server/s they will appear on the selections screen.
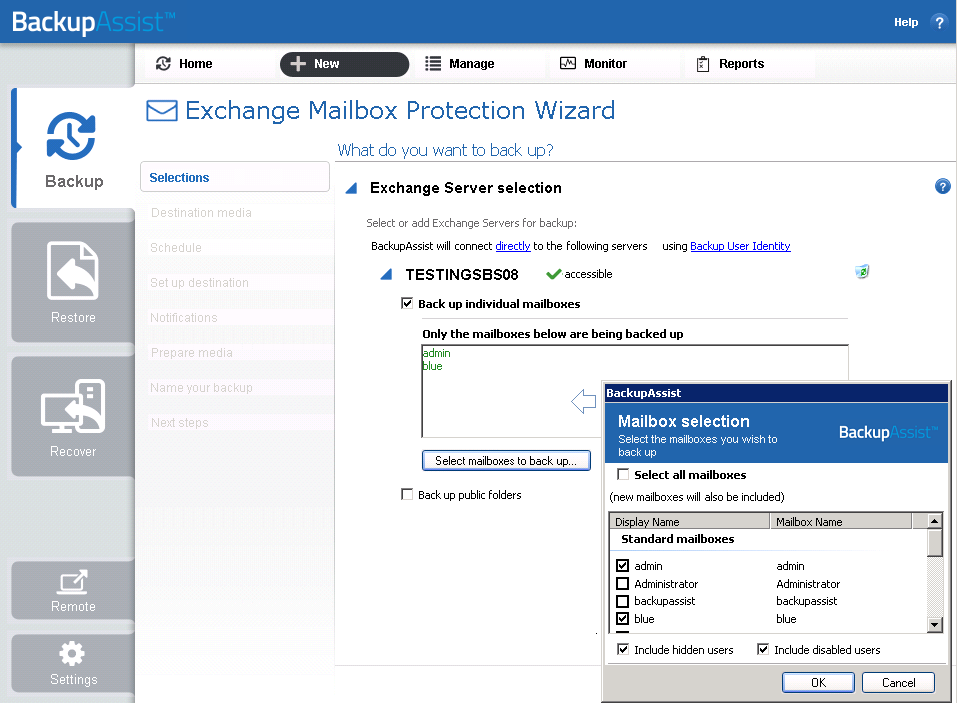
Exchange Mailbox Protection - Server and mailbox selections screen
d. Check the Backup individual mailboxes checkbox for each server that you want to backup.
- A field will appear under each server, which you can add selected mailboxes to.
e. Click Select mailboxes to back up, and a mailbox selection pop-up window will appear, containing all the mailboxes on that server.
f. Tick the mailboxes you want to back up, and click Ok.
- The mailboxes will appear in the selection field under the server.
- BackupAssist will back up all PST files associated with that mailbox.
g. Check the Backup public folders checkbox to back up your Exchange Serves Public Folders.
h. Review your selection and click Next.
4. Destination media: This step is skipped because Exchange only supports local and network paths.
5. Schedule: This screen is used to select when and how you would like the backup job to run, and how long you would like the backup to be retained for.
The schedule Daily is the only scheme available and is selected by default. Exchange Mailbox Protection schedule is modified by the Grouping method selected in the destination screen.
Click Next.
6. Setup destination: This screen is used to configure the location of the local or network share to be used as the backup destination. It is also used to configure how the mailboxes will be backed up to that location.
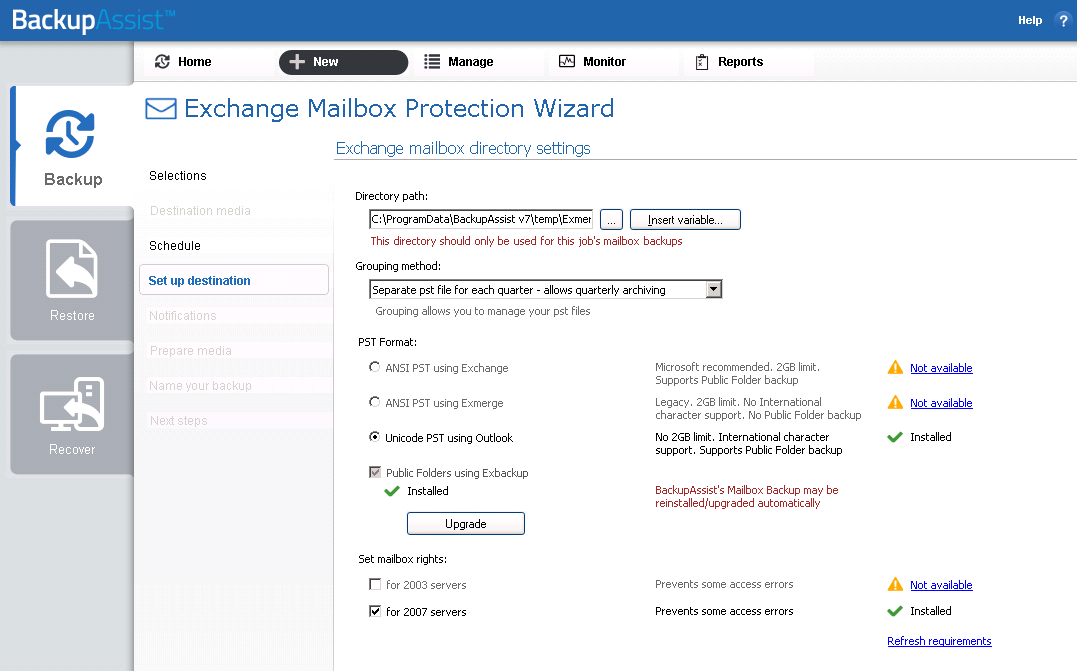
Exchange Mailbox Protection - Setup destination screen
a. Directory path: Enter the backup's directory path.
b. Grouping method: Choose a grouping method from the drop-down menu. Grouping methods determine how mailbox backups are stored and provide options to back up mailboxes in groups according to different time periods. A monthly grouping method is ideal for organizations with a high volume of mail as it is easier to locate email for specific dates.
- To learn more about grouping methods, refer to the section, Grouping mailbox data .
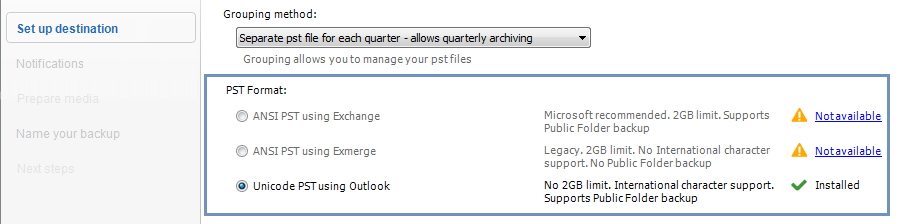
c. PST Format: Selecting an appropriate PST format is important, as a PST file in one format cannot be converted to the other.
- Refer to the preceding sections to determine the best option:
PST format selection for Windows 7, 8, Server 2008/12 & SBS 2008 /11
d. Set mailbox rights. Choose whether BackupAssist should attempt to automatically set mailbox rights on your Exchange Server using the available checkboxes.
For Exchange 2007/2010 Servers: Most Exchange 2007 and 2010 setups do not require this option for mailbox backups to run successfully. This option should only be enabled when advised by the BackupAssist Technical Support team.
e. Once the set destination configurations are finished, click Next.
Mail Server: If you have not configured an SMTP mail server for BackupAssist, you will be prompted to provide those details after the backup destination step has been completed. See the BackupAssist settings section on page 11 for guidance.
7. Notifications: Once a backup job has completed, BackupAssist can send an email to inform selected recipients of the result. This email notification can be enabled during the creation of a backup job, if the mail server has been configured.
To enable email notifications:
a. Select, Add an email report notification.
b. Enter recipients into the Send reports to this email address field.
c. Enter recipients into the Also send reports to this email address field. You can then select the condition under which the email should be sent, using the drop-down box.
After the backup job has been created, you can modify the notifications by adding and removing recipients, setting additional notification conditions and including print and file notification types.
8. Prepare media: This step will be skilled because removable media cannot be used.
9. Name your backup: Provide a name for your backup job, and click Finish.
Your Exchange Mailbox Protection backup job has now been created.
Important: The first mailbox backup will be of the full contents of all selected mailboxes. For that reason, after creating your backup job, we recommend that you perform a manual export of the selected mailboxes. See the section, Exchange Mailbox backup management for more information.
Important: Once a backup job has been created, it should be reviewed and run using the Manage menu. See the section, Exchange Mailbox backup management for more information.
Important: Once the backup has been created, the backup verification process will run. To learn more about this process, visit our online Backup verification page
Restoring Exchange Mailbox Data
If you want to restore mail items using a System Protection, File Protection or File Archiving backup of an Exchange Server, please refer to the Exchange Granular Restore quickstart guide.
This section provides instructions on how to restore Microsoft Exchange mailboxes using backups created with the Exchange Mailbox Add-on.
Mailboxes must be restored independently of other data. If you need to restore other data such as files or applications, as well as Exchange mailbox data, you need to complete this as a separate restore.
To restore Exchange mailboxes and public folders using the BackupAssist Restore Console:
1. Start BackupAssist
2. Select the Restore tab
The Restore tab has a Home page and a Tools menu. The Home page is the default screen and the recommended starting point for performing a restore. The Tools menu should only be used by experienced administrators or users being assisted by technical support.
3. From the Home page, select Exchange.
This will open the Restore > Exchange screen and display the restore types to choose from
4. From the Restore > Exchange screen, select Mailbox Protection Restore (.pst)
The next screen will display all mailbox backups, created using the Exchange mailbox Add-on.
5. Select the Backup to restore from.
The backups can be filtered using the following time period tabs:
- Last 7 days tab, displays backups created in the last 7 days.
- Last 30 days tab, displays backups created in the last 30 days.
- All tab, displays all Exchange Server backups catalogued by BackupAssist.
- Custom tab, displays backups made between the dates specified in show backups between.
Click on the backup you want to restore from.
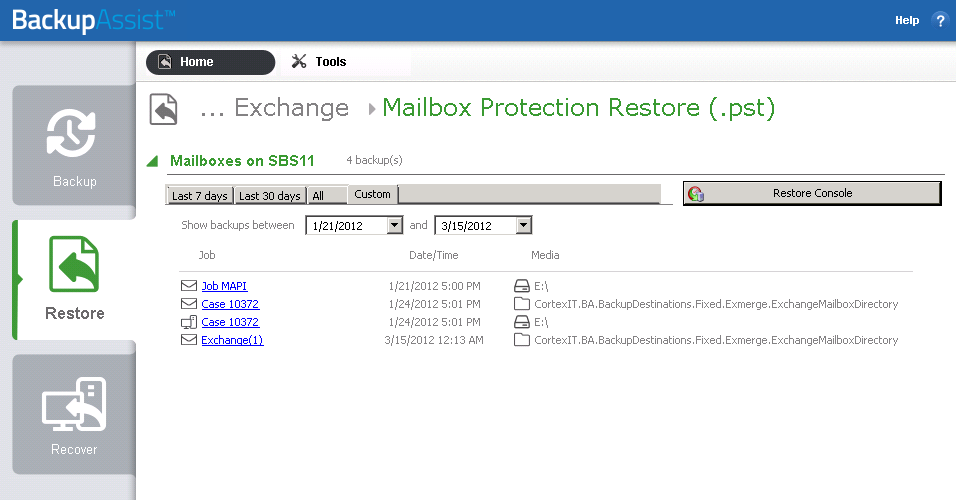
Restore Home page – Exchange Server Restore screen
6. Restore Console - backup and mailbox selection
The Restore Console will open and load that backup.
The Browse tab is used to browse the contents of the backup. You can also select a different backup using the Select a backup to browse drop down box. The backups available will be the ones that were displayed on the Exchange Server Restore screen.
The Browse tab is ideal if you know the backup and date that you want to restore from, or if you want to restore an entire backup set.
a. Select the Browse tab.
b. Use the Select a backup to browse, drop-down box to choose the backup to restore from.
c. Use the calendar to select the date you want to restore from.
d. Using the middle pane, to select the server/s tick box and click on the server name.
e. The mailboxes will appear in the right pane. Select the mailboxes to restore
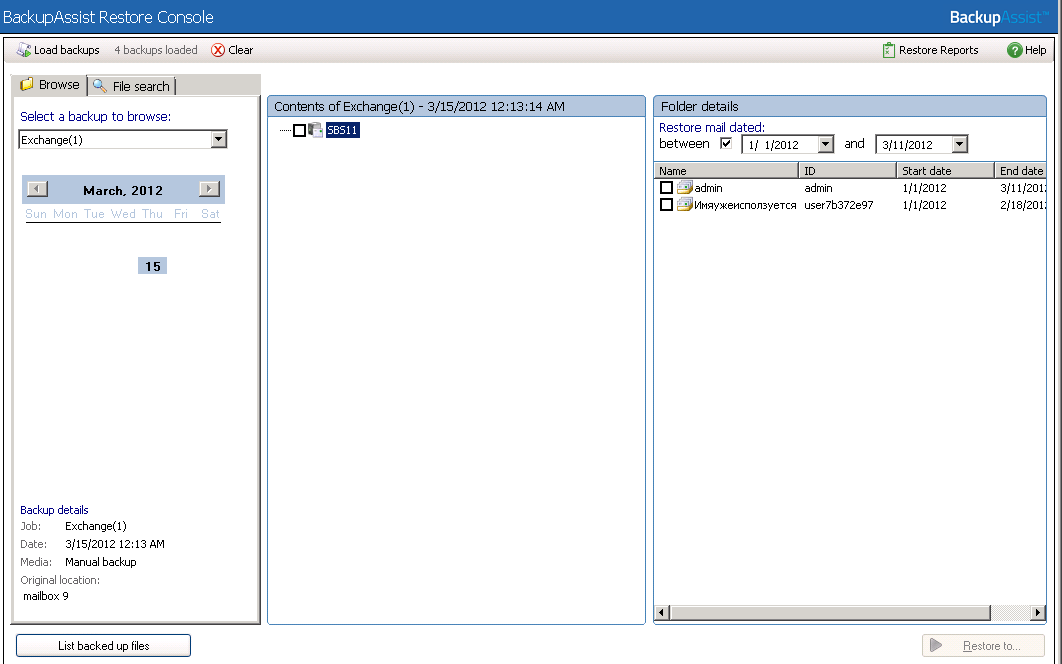
Restore console - server and mailbox selection
f. Use the Restore mail dated fields to select the date range to restore from. BackupAssist will restore all backed up mail in that range, from all PST files associated to that mailbox.
g. Click Restore to at the bottom right of the window.
7. Restore Console - restore destination selection
When you select Restore to, a window will open showing the Restore to destination and the Restore options fields.
a. Review Restore to and make your selection.
- Original location : The mailboxes selected for restore will be copied directly back into the Exchange Server that they were originally exported from.
- Alternate server : The mailboxes selected for restore will be copied to an alternate Exchange Server of your choosing. Click the Select button to choose an alternate server to restore to. If no Exchange Servers are detected, click the Select button to search for one.
- Alternate path : All mailboxes will be restored as separate PST files to a single folder of your choosing. You can have all your mailbox PST backups. You can then open up any of the PST files extracted with Outlook and drag-and-drop the required mail items back a the user's live mailbox. This option is useful if your PST backups are distributed across multiple folders (e.g. you used a grouping period or modified your mailbox backup directory between backup runs).
b. Review Restore options and make your selection.
If you choose to restore your mailboxes to either their original location or an alternate server, you can click the Configure restore button to change how mailboxes are restored. Here you can individually specify which mailbox each PST mailbox backup should overwrite in your Exchange Server. This is useful if an Exchange Server mailbox has been renamed since being backed up, or if you want to overwrite one mailbox with another.
c. Selecting Create a log file listing all processed files, will create a file that lists the success or failure of each file. The log is opened by selecting the log file’s link in the backup report.
d. Queue all backup jobs when a restore is running, is selected by default.
e. Click the Restore button to restore your data. The restore will run from the destination window and a Report link will appear once the restore has finished.
f. Select Done.
Your Exchange mailbox restore has now been completed.
Manually restoring PST files and Public folders in Outlook
Opening PST files
Use this method of mail restoration for simple scenarios where a user has deleted one or more items, and needs to retrieve the information quickly.
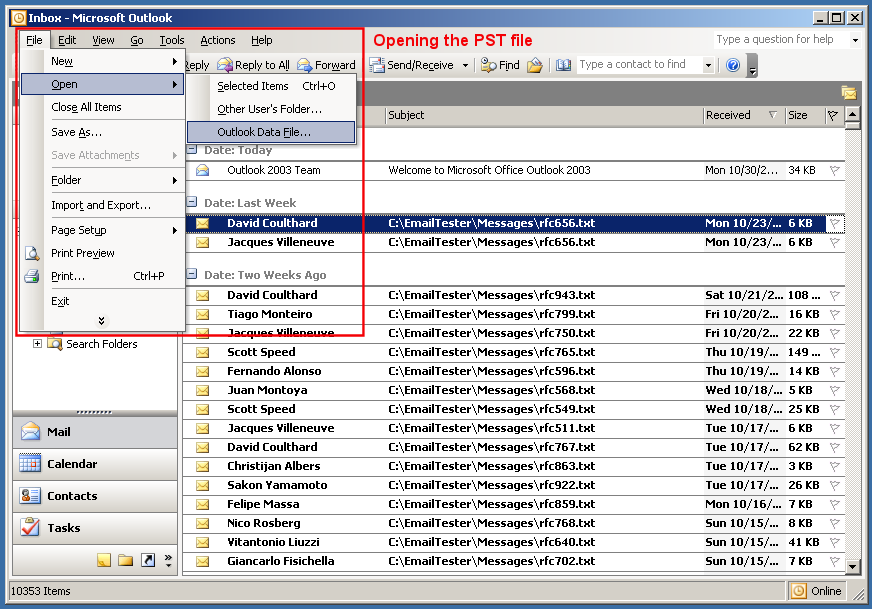
Outlook- file selection
1. Copy the appropriate PST file to a location that is accessible to the relevant user's computer.
E.g.: copy the PST to 'Users Shared Folders', another network share or an external hard drive:
2. From the user's computer, run Outlook and select File menu > Open > Outlook Data File:
3. Browse for the PST file in the location it was copied to in Step 1:
4. From this PST file you can view the email messages and drag-and-drop the mail items back into the original folders:
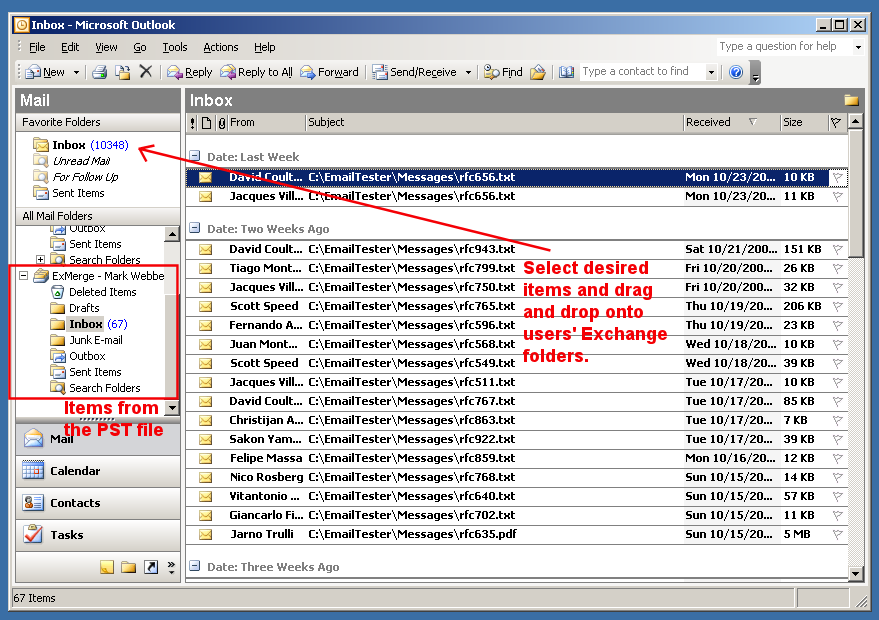
Outlook - folder move
Restoring Public Folders
You can restore public folders directly back into your Exchange Server using the BackupAssist Restore Console (see section 5.2). You can also, however, manually restore public folder items from PST files in Outlook. This method is great for simple scenarios where a user has deleted one or more items from a public folder, and needs to retrieve the information quickly. You can also use this method to restore the contents of an entire public folder.
To manually open and restore a Public Folder PST backup in Microsoft Outlook:
1. Copy the appropriate PST file to a location that an Exchange administrator can access. The computer used to access this file must have Microsoft Outlook installed and be logged into by a member of the same domain as the Exchange Server.
2. Launch Outlook and click Mailbox-[username] under the "Mail Folders" list on the left-hand pane. This will display the "Outlook Today" window.
3. From "Outlook Today", click Customize Outlook Today and then click Choose Folders.
4. In the folder selection, check the public folders you wish to restore your PST backup to. Click OK.
5. Click Save changes on the "Customize Outlook Today" screen.
You should now notice a new link to your Public Folders on the "Outlook Today" page under the "Messages" column. Click the Public Folders link to view the available items.
6. Open the PST containing the Public Folder items you wish to restore. To do this navigate to File > Open > Outlook Data File from the top menu and browse to the location of your Public Folder PST backup.
Outlook - Public Folders
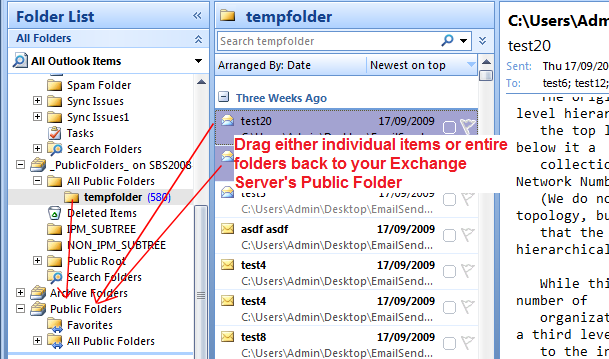
7. You should now have two Public Folder items listed under "All Folders". The first is the backup you have just opened, which you can tell from the server name and archiving period contained in the heading (in the example below: SBS2008-DEV for July-September 2009) . The second is your Exchange Server's Public Folder.
8. To restore your Public Folder data from your backup, simply select mail items or folders from your within your archive folder and then drag-and-drop them back to the Exchange Server's Public Folder:
Exchange Mailbox Backup Management
Once you have created a backup job, you can modify the settings and access advanced configuration options using the Manage menu.
To access the backup management screen:
1. Select the BackupAssist, Backup tab.
2. Select Manage from the top menu. A list of all backup jobs will be displayed.
3. Select the backup job you want to modify, and select Edit.
4. Select the required configuration item on the left. Key configurations are described below.
To learn more about the backup management options, see the Backup tab whitepaper.
Manually running a backup job
After a new Exchange mail backup job has been created, you should perform a manual mailbox data export, and then be manually run the job ensure it works as intended. The instructions for how to perform a manual Exchange mailbox data export are provided below.
After this has been completed:
1. Select the backup job, and select Run.
2. You will be prompted to Rerun a past backup or to Run a future backup now.
3. When the backup job starts, the screen will change to the Monitor view.
4. Once the backup has been completed, select the Report button and review the results.
Exchange Servers
The Exchange Servers screen can be used to:
- Add additional exchange servers to your backup job.
- Select additional mailboxes.
- Enable the backup of public folders if this was not selected when the backup job was created.
Performing a manual Exchange mailbox data export
The first mailbox backup will be of the full contents of all selected mailboxes. For that reason, after creating your Exchange mailbox backup job, we recommend that you perform a manual export of the selected mailboxes. Depending on the size of your Exchange Server and the mailboxes selected, the initial export may take some time to complete. It is best to run this export manually at a time when the server is not being heavily utilized.
1. Select Exchange Servers from the left menu.
2. Scroll to the Mailbox export status and click Perform manual export.
A new window will appear where you can select what periods of mail data you want to export. The periods available for selection are sorted according to the grouping method defined.
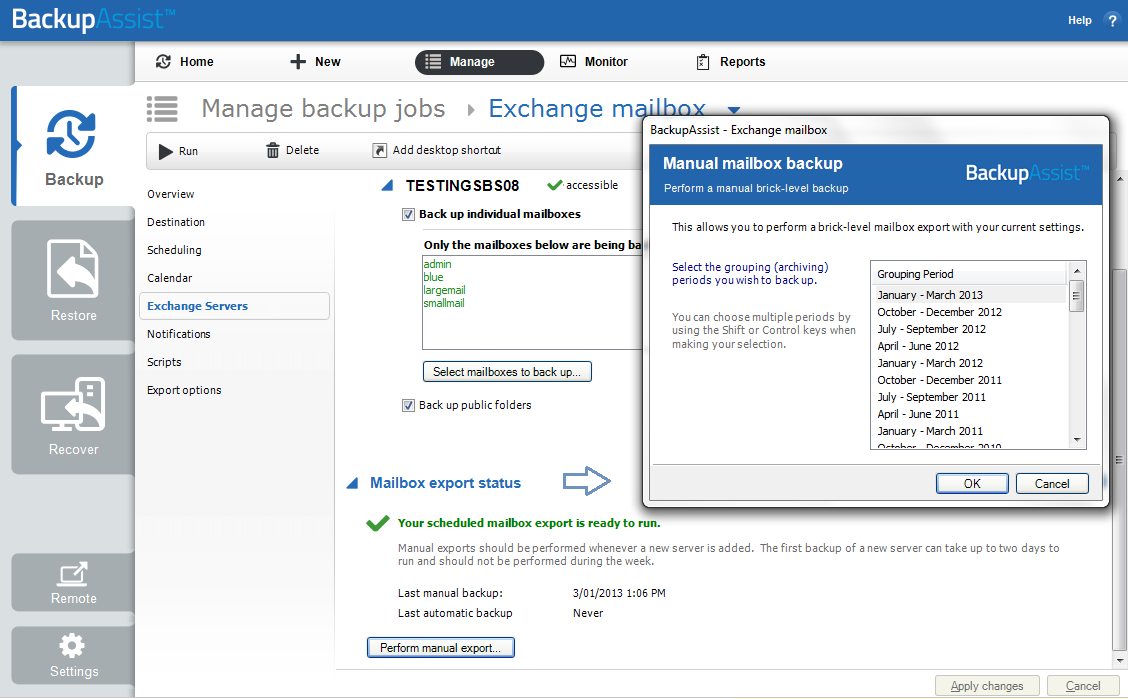
Manage backup - Exchanger Servers mailbox export
If a grouping period is not selected, e-mails within that date range will not be backed up during the manual export. By default, the latest grouping period is the only period selected.
3. Select the data to export.
If you want to export multiple grouping periods, hold down the SHIFT key and select each individual grouping period. To backup all mailbox data on your Exchange Server you will need to select all of the available grouping periods.
4. After you have selected the appropriate periods, click OK to begin exporting mailbox data to PST files in the Exchange mailbox directory.
5. If the mailbox exports fails, click Report to determine what errors occurred.
Once you have completed a successful export of all mailbox data, BackupAssist will keep PST files up to date by automatically scheduling exports each time your backup job is scheduled to run. These automatic exports merge new mail data into the existing PST files.
Export options
The Export options screen can be used to configure advanced options such as:
- Select folders to be excluded during the backup.
- Have folders backed up without date restrictions.
- Delete original messages after they have been exported.
- Specify the Domain Controller if Exmerge is used.
Concurrent backup
This feature allows two backup jobs to run at the same time.
Concurrent backup combinations:
- Two File Archiving backup jobs can run at the same time if both have ‘Enable concurrent backup’ selected.
- An SQL Protection or Mailbox Protection backup job, with ‘Enable concurrent backup’ selected, can run concurrently with a System Protection, File Protection or File Archiving backup job. The File Archiving backup job does not need to have ‘Enable concurrent backup’ selected. (System Protection and File Protection do not have an ‘Enable concurrent backup’ option).
- An SQL Protection and a Mailbox Protection backup job can run at the same time, in any combination, if both have ‘Enable concurrent backup’ selected.
- In all cases, only two backup jobs can run concurrently.
Concurrent backup considerations:
- If two concurrent backups are scheduled to start at the same time, one backup will start first and begin preparing the job. Once the preparation phase has completed, the second backup will start
- If a third scheduled backup job has 'Enable concurrent backup' selected, it will be queued and run once one of the two existing concurrent backup jobs has finished.
Concurrent backup limitations:
- Only two backup jobs can run concurrently.
- Concurrent backups cannot write to the same destination device (e.g. local drive, NAS, RDX etc.).
- If another backup job is already running when the concurrent backups are scheduled to start, then one of the concurrent backups will start if it meets the criteria defined in the concurrent combinations section.
- A backup job cannot run concurrently if it is backing up a Hyper-V environment or an Exchange server using VSS (VSS enabled).

