 Belgium
 Canada
 Germany
 Italy
Italy France
 Spain
Spain United Kingdom
Quickstart guide: Exchange Mailbox Backups
BackupAssist v6
1. Introduction
This quickstart guide is intended to assist new users with setting up mailbox backups using BackupAssist v6's Exchange Mailbox Add-on, which is compatible with Exchange Server 2003, 2007, and 2010.
Mailbox backups are stored as separate PST files, from which you can restore individual emails, calendars, tasks, notes, contacts or entire mailboxes. PST backups can be opened in Microsoft Outlook to recover individual items and for larger volume tasks you can use the BackupAssist Restore Console or standard tools like Exmerge or the Exchange 2007 Import-Mailbox cmdlet to import mailbox data back to your live Exchange Server.
2. Recommended configuration for your Exchange Server
The table below outlines the different configuration options available for mailbox backups in BackupAssist, and specifies the recommended PST format to use for each version of Exchange Server supported.
|
|
Exchange 2003 |
Exchange 2007 |
Exchange 2010 |
|
Option 1
|
PST format: Unicode Requires: Microsoft Outlook |
PST format: Unicode Requires: Microsoft Outlook |
PST format: Unicode Requires: Microsoft Outlook |
|
|
Any 32-bit version (64-bit versions are not supported) of Microsoft Outlook must be installed (2003, 2007 or 2010) on the machine running BackupAssist to create mailbox backups in Unicode format. |
||
|
Ideal for : Companies who have a spare Outlook license and want the benefits of unicode (see next table) |
|||
|
Option 2 |
PST format: ANSI Requires : Exchange MAPI |
PST format: ANSI Requires : Exchange MAPI |
PST format: ANSI Requires : Exchange MAPI |
|
|
The Exchange Messaging API (MAPI) client is used to access to the contents of messaging stores on an Exchange Server. BackupAssist provides a built-in facility to install the MAPI client, but it can also be downloaded manually from Microsoft. The Exchange MAPI client can be installed on nearly any Windows operating system, provided that Microsoft Outlook is not already installed. If you are running a 64-bit operating system, such as Server 2008 or SBS 2008, you must either install the Exchange MAPI client to back up to PST in ANSI format, or install Microsoft Outlook to back up to PST in Unicode format. |
||
|
Ideal for : Companies who do not have a spare Outlook license to install on their server. |
|||
|
Option 3 |
PST format: ANSI Requires: Exchange 2003 Management Tools |
N/A |
N/A |
|
|
The Exchange Server 2003 Management tools need to be installed on the machine running BackupAssist to create mailbox backups in ANSI PST format. The Management tools can be installed using the Exchange Server 2003 installation disc. See ' How to Install the Exchange System Management Tools' for instructions. Note: Exchange 2003 Management Tools cannot be installed on Windows Vista (32-bit or 64-bit) or any 64-bit operating system, such as Server 2008 or SBS 2008. |
||
|
Ideal for : Companies who do not have a spare Outlook license and are running Exchange 2003 and do not want to install further pre-requisites. |
|||
|
Option 4 |
PST format: ANSI Requires : Exchange 2003 Management Tools AND Microsoft ExMerge |
N/A |
N/A |
|
|
The Microsoft Mailbox Merge Wizard (Exmerge) must be installed on the machine running BackupAssist if you want to create PST mailbox backups in ANSI format. BackupAssist provides a facility for automatically downloading and installing Exmerge on your server. Note: Exchange Server 2003 Management Tools must be installed together with Exmerge. |
||
|
Ideal for : Backwards compatibility with previous versions of BackupAssist and for users familiar with Exmerge who want to maintain compatibility with their current environment. |
|||
Advantages / disadvantages of each PST format
|
|
Unicode PST
|
ANSI PST
|
ANSI PST
|
|
Public folder backup |
|
|
|
|
Exchange public folders are publicly accessible repositories that store email messages, calendars, contacts, and so on, that everyone on the network can access through Outlook. If public folder backups are supported they will be stored in your mailbox backup directory as a PST file named _PublicFolders_.pst. |
|||
|
PST file size limit |
50GB* |
2GB |
2GB |
|
PST files in ANSI format have a file size limit of 2 gigabytes (GB). Once a PST file grows to 2GB in size, however, BackupAssist will automatically rename it with a with a numbered suffix and then create a new PST file to store new mailbox data. This process is repeated each time a PST file reaches 2GB in size. Alternatively, to overcome this limitation, you can select a grouping method to store your mailbox backups within separate folders for each month, quarter or year; each PST file will be smaller in size, as it contains only mail data from the grouping period selected. *PST files in Unicode format have a 50GB size limit for Exchange 2010 and 20GB for Exchange 2003 and 2007. |
|||
|
International character support |
|
|
|
|
PST files in Unicode format provide support for international characters, including non-Latin alphabets. |
|||
|
Legacy support |
|
|
|
|
Support for the Microsoft Mailbox Merge Wizard (Exmerge) is included for backwards compatibility with previous versions of BackupAssist. Users familiar with Exmerge can use this setting to maintain compatibility with their current environment(s). |
|||
|
Microsoft Outlook required |
Yes |
No |
No |
|
Mailbox rights set on
|
|
|
|
|
Mailbox rights set on
|
|
|
|
|
Support for 64-bit
|
|
|
|
3. Setup instructions
The BackupAssist backup user identity
Before setting up mailbox backups in BackupAssist, we recommend that you make sure that you are using a backup user identity that has permission to access your Exchange Server. Backups executed by BackupAssist run as a specific Windows user on the machine where the software is installed. BackupAssist simulates a login using a valid Windows username and password and the backup process then runs as if the user had logged in to the machine and performed the backup manually. The access level of the backup user identity can determine what data can be backed up as well as to what destinations. For instructions on configuring a Windows user for performing Exchange mailbox backups refer to http://www.backupassist.com/education/articles/setting-up-a-user-for-exchange-mailbox-backups.html
Setting up mailbox backups in BackupAssist
This section includes instructions for setting up Exchange Mailbox backups using BackupAssist. Instructions are separated according to the operating system on which BackupAssist has been installed on.
Note: you can also embed Exchange mailbox and public folder backups in all BackupAssist jobs (Imaging, File Replication, etc) via the 'Exchange Servers' tab while editing a job. Embedded mailbox backups are executed as part of the backup run and written to the specified backup destination. The instructions below will also assist you with setting up embedded mailbox backups.
A) Instructions for Vista, Windows 7, Server 2008 and 2008 R2, SBS 2008 machines
The following instructions are for users who have installed BackupAssist on Windows Vista, Server 2008, or SBS 2008. To create an Exchange mailbox backup job:
1. Launch BackupAssist, click File > New backup job and select Exchange Mailbox.
2. Select an appropriate schedule and click Next.
3. Input the Directory path where you would like your Exchange Mailbox backups stored and choose a Grouping method from the available drop-down menu.
Note: Grouping methods determine how your mailbox backups are stored on disk, with different options to store mail data within separate folders that are sorted according to different time periods. A "monthly" grouping method is ideal for organisations with a high volume of mail data as it is easier to locate email for specific dates in a recovery scenario. And should malicious damage occur to a mailbox backup, the loss is limited to PSTs for that month only. For more information about grouping methods see page 5 of our Exchange mailbox backup and restore whitepaper.
4. On the same screen, choose an appropriate PST format:
Note : selecting an appropriate PST format is important, as PST files cannot be converted to a different format once created. For more information about PST file formats refer to section 2 above.
-
Unicode PST using Outlook (recommended)
:
To use this option you must have Microsoft Outlook 2003 or later installed on your machine. Note that you should not install Microsoft Outlook if the Exchange MAPI client is already present on the machine; first remove the Exchange MAPI client and then install Outlook. -
ANSI PST using Exchange:
To use this option you must have the Exchange MAPI client installed on your machine. Note that the MAPI client cannot be installed if Microsoft Outlook is already present on the machine.
BackupAssist provides a facility for automatically installing the Exchange MAPI client:
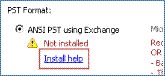
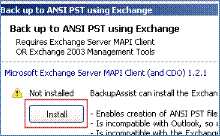
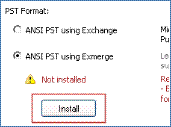
1. Select ANSI PST using Exchange and click the blue Install help link below:

2. A new window should appear. Click the Install button to install the Exchange MAPI client:
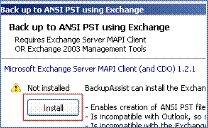
3. BackupAssist will download the Exchange MAPI client and install it on your machine.
-
ANSI PST using Exmerge:
This option is not available on Windows Vista, Server 2008/R2, or SBS 2008, as Exmerge requires the Exchange Server 2003 Management tools, which cannot be installed on these environments.
5. On the same screen, choose whether BackupAssist should attempt to automatically set mailbox rights on your Exchange server using the available checkboxes:
-
For 2003 servers:
This option is not available on Windows Vista, Server 2008, or SBS 2008, as it requires the Exchange Server 2003 Management tools, which cannot be installed on these environments. -
For 2007/2010 servers:
Most Exchange 2007 and Exchange 2010 setups do not require this option to have mailbox backups run successfully. This option should only be enabled when advised by the BackupAssist Technical Support team, usually for when issues relating to the Backup User Identity not being an Exchange Domain Administrator.
6. Click Next and then click Add Exchange Server to select the Exchange server(s) from which you want to backup mailboxes.
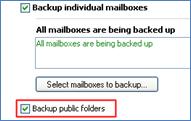
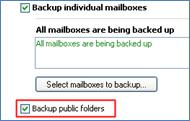
7. Check the Backup individual mailboxes checkbox for each Exchange server from which you want to backup individual mailboxes.
8. Check the Backup public folders checkbox to have your Exchange server public folders backed up:
9. Click Next, name your backup job, and then click Finish.
10. To modify mailbox backup settings click Edit and select the appropriate job. From the left menu:
- Click Destination to change the mailbox directory path, grouping method, and PST file format.
- Click Exchange Servers to configure which Exchange servers to backup mailboxes from and whether public folders should be backed up.
- Click Export options to configure more advanced mailbox backup options.
11. After creating your Exchange mailbox backup job, we recommend that you perform a manual export of the selected mailboxes. Depending on the size of your Exchange server and the mailboxes you have selected, the initial export may take some time to complete, so it is best to run this export manually, at a time when the server is not being heavily utilized. After this initial export, BackupAssist will automatically export mail data according to the rotation scheme you have defined. These automatic exports merge new mail data into the existing PST files. To perform the manual export:
1. Select Exchange Servers from the left menu and within the Mailbox export status section click Perform manual export.
2. A new window will appear where you can select what periods of mail data you would like to export. The periods available for selection are sorted according to your grouping method.
Note : if you had selected the "separate PST for each month" grouping method and chose to export "May 2006" mail, only mail data created during May of 2006 would be exported, and not any mail sent or received prior to this.
3. After you have selected the appropriate periods click OK to begin exporting mailbox data to PST files in the exchange mailbox directory.
B) Instructions for Windows 2000, XP, Server 2003, SBS 2003 machines
The following instructions are for users who have installed BackupAssist on Windows 2000, XP, Server 2003, or SBS 2003. To create an Exchange mailbox backup job:
1. Launch BackupAssist, click File > New backup job and select Exchange Mailbox
2. Select an appropriate schedule and click Next.
3. Input the Directory path where you would like your Exchange Mailbox backups to be stored, and choose a Grouping method from the available drop-down menu.
Note: Grouping methods determine how your mailbox backups are stored on disk, with different options to store mail data within separate folders that are sorted according to different time periods. A "monthly" grouping method is ideal for organisations with a high volume of mail data as it is easier to locate email for specific dates in a recovery scenario. And should malicious damage occur to a mailbox backup, the loss is limited to PSTs for that month only. For more information about grouping methods see page 5 of our Exchange mailbox backup and restore whitepaper.
4. On the same screen, choose an appropriate PST format:
Note : selecting an appropriate PST format is important, as a PST file in one format cannot be converted to the other. For more information about each PST file format refer to section 2 above.
-
ANSI PST using Exchange:
To use this option you must have either the Exchange MAPI client OR the Exchange 2003 Management Tools installed on your machine. Note the following:
o The Exchange MAPI client cannot be installed if Microsoft Outlook is already present on the machine. The Exchange 2003 Management Tools, however, can be installed on a machine where Outlook is installed.
o You cannot install both the Exchange MAPI client AND the Exchange 2003 Management Tools - you must install one or the other.
o While BackupAssist provides a facility for automatically installing the Exchange MAPI client, we recommend that you install the Exchange 2003 Management Tools, particularly if you are backing up mailboxes from an Exchange 2003 server. See the Microsoft TechNet article ' How to Install the Exchange System Management Tools' for instructions on how to install the Management Tools.
If installing the Exchange 2003 Management Tools is not possible, BackupAssist can automatically install the Exchange MAPI client for you as follows:
1. Select ANSI PST using Exchange and then click the blue Install help link:
2. A new window should appear. Click the Install button to install the MAPI client:
3. BackupAssist will download the Exchange MAPI client and install it on your machine.
-
ANSI PST using Exmerge:
To use this option you must have both the Exchange 2003 Management Tools and Exmerge installed on your machine.
Note: if the Exchange MAPI client is already present on your machine you will need to first uninstall it before being able to install the Exchange 2003 Management Tools.
See the Microsoft TechNet article ' How to Install the Exchange System Management Tools' for instructions on how to install the Exchange 2003 Management Tools. Once the Management Tools are installed, BackupAssist can automatically install Exmerge for you as follows:
1. Select the ANSI PST using Exmerge radio button and then click the Install button below:
2. BackupAssist will download and install Exmerge on your machine.
-
Unicode PST using Outlook:
To use this option you must have Microsoft Outlook 2003 or later installed on your machine. Note that you cannot install Microsoft Outlook if the Exchange MAPI client is already present on the machine; first remove the Exchange MAPI client and then install Outlook.
5. On the same screen, choose whether BackupAssist should attempt to automatically set mailbox rights on your Exchange server(s) using the available checkboxes:
-
For 2003 servers:
Select this option if you want BackupAssist to grant the backup user identity (Settings > Backup user identity) access to the Exchange mailboxes that have been selected for backup. This option is recommended if you are experiencing access errors with mailbox backups on Exchange 2003.
To enable this option you must have the Exchange 2003 Management Tools installed on the machine running BackupAssist. See the Microsoft TechNet article 'How to Install the Exchange System Management Tools' for instructions.
-
For 2007 servers:
Most Exchange 2007 and Exchange 2010 setups do not require this option to have mailbox backups run successfully. This option should only be enabled when advised by the BackupAssist Technical Support team, usually for when issues relating to the Backup User Identity not being an Exchange Domain Administrator.
Please note: you cannot install both the Exchange 2007 and the Exchange 2003 Management Tools on the same machine. If you are backing up mailboxes from both types of Exchange Server (2003 and 2007) we recommend that you install just the Exchange 2003 Management Tools, as Exchange 2007 provides better on-server tools for managing mailbox rights.
6. Click Next and then click Add Exchange Server to select the Exchange server(s) from which you want to backup mailboxes.
7. Check the Backup individual mailboxes checkbox for each Exchange server from which you want to backup individual mailboxes.
8. Check the Backup public folders checkbox if you also want to backup your Exchange server public folders. The option to backup Public folders will be disabled if you selected ANSI PST using Exmerge as your PST format.
9. Click Next, name your backup job, and then click Finish.
10. To modify mailbox backup settings click Edit and select the appropriate job. From the left menu:
- Click Destination to change the mailbox directory path, grouping method, and PST file format.
- Click Exchange Servers to configure which Exchange servers to backup mailboxes from and whether public folders should be backed up.
- Click Export options to configure more advanced mailbox backup options.
11. After creating your Exchange mailbox backup job, we recommend that you perform a manual export of the selected mailboxes. Depending on the size of your Exchange server and the mailboxes you have selected, the initial export may take some time to complete, so it is best to run this export manually, at a time when the server is not being heavily utilized. After this initial export, BackupAssist will automatically export mail data according to the rotation scheme you have defined. These automatic exports merge new mail data into the existing PST files. To perform the manual export:
1. Select Exchange Servers from the left menu and within the Mailbox export status section click Perform manual export.
2. A new window will appear where you can select what periods of mail data you would like to export. The periods available for selection are sorted according to your grouping method.
Note : if you had selected the "separate PST for each month" grouping method and chose to export "May 2006" mail, only mail data created during May of 2006 would be exported, and not any mail sent or received prior to this.
3. After you have selected the appropriate periods click OK to begin exporting mailbox data to PST files in the exchange mailbox directory.
4. Restoring mailbox data
For instructions on how to restore mailbox data please refer to the BackupAssist Exchange Mailbox Add-on whitepaper: http://www.backupassist.com/downloads/whitepapers/ExchangeMailboxBackup_WP.pdf

