Backup Execution and Timing: setting the timeout length and wait time
Accessing the backup execution and timing settings
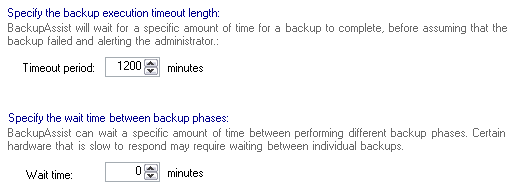
To access the Backup execution and timing settings shown above:
- Click
 Jobs in the navigation bar
 - Select the job to be edited and click
 Edit at the bottom of the window.
 - Click
 NTBackup options on the left menu.
 - Click
 Backup execution and timing to expand the section.
The timeout period in BackupAssist is the amount of time BackupAssist will wait before terminating a backup job in progress. It is assumed that if the backup has not completed in this time, some issue is preventing the backup from completing successfully so it is terminated in order to troubleshoot the issue, and to allow other scheduled backups to run.
Backup jobs, depending on the volume of data being backed up, or the transfer speed to the backup device, can sometimes take longer than the default timeout period. If you experience timeout errors in your backup report and you are aware that large volumes of data have been selected or that the transfer speed to the backup device is slow, you can try extending the timeout period.
- Use the up-arrow or down-arrow to the right of the Timeout period label to increase or decrease the timeout period in minutes. The maximum allowed value is 3000 minutes (50 hours).
BackupAssist uses a multi-phase backup process for NTBackup Method jobs to help backup open files and overcome certain NTBackup limitations, which are predominantly related to Exchange Server and system state backups.
If you experience any problems related to backup phases in your backup report, you may need to adjust the wait time. Certain hardware devices may also take time to respond, so increasing the wait time between phases may be required.
- Use the up-arrow or down-arrow to the right of the Wait time label to increase or decrease the wait time in minutes. The maximum allowed value is 15 minutes.