Rsync server options: configuring storage settings for Rsync Servers
Accessing Rsync Server options
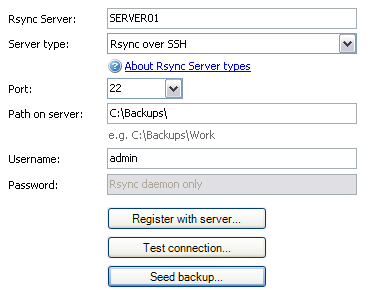
To access the Rsync Server options shown above:
- Click
 Jobs in the navigation bar.
 - Select the job to be edited and click
 Edit at the bottom of the window.
 - Click
 Destination on the left menu.
 - Click
 Rsync Server options to expand the section.
When backing up to a NAS device you need to specify both the server name of the NAS, as well as the backup path where the backup files should be stored.
- Input the Rsync server name or IP address directly in the Rsync Server field.
- Choose the Rsync Server type using the available drop-down menu:
- About Rsync Server Types
BackupAssist supports three types of Rsync server modes:- Rsync over SSH – encrypts all communication “over the wire”
- Rsync Daemon – non-encrypted transfer for servers running Rsync in Daemon mode.
- Rsync daemon over SSH tunnel - provided for backups to certain standalone NAS devices.
 Read more about standalone Rsync backups to NAS
For SSH communication, we use a public / private key method of authentication meaning that you will only be asked for your password once (when registering with the server), and your public key will be uploaded to the server, enabling BackupAssist to log into the server in the future in a secure, password-less manner. For more information on public / private key authentication, visit the following Wikipedia article.
Wikipedia Public Key CryptographyFor Daemon mode, your password is stored in encrypted format by BackupAssist and provided every time the backup runs. When running in Daemon mode, traffic will be unencrypted. For this reason, we recommend that you only use this closed network environments, such as LANs or WANs connected by a secure VPN. Note that VPNs inherently encrypt communication between nodes, so using Rsync in Daemon mode over a VPN is still secure.
- Enter the Port number for your Rsync Server
- Specify the backup path by typing it directly into the Path on server field.
- Enter the Rsync username and password (Rsync daemon connection only) generated when setting up your Rsync server and click Register with server.
- For instructions on how to set up a Rsync Server on both Windows and Linux systems download our Rsync Server Setup Instructions document.
Download our Rsync Server Setup Instructions
- You can also download cwRsyncServer from our website
Download our cwRsyncServer
- For instructions on how to set up a Rsync Server on both Windows and Linux systems download our Rsync Server Setup Instructions document.
- Click Test connection to ensure that your Rsync server has been correctly configured
With encryption enabled data stored on the Rsync server backup destination will be automatically compressed and encrypted with AES-256 bit encryption. This reduces the amount of disk space used on your Rsync host, and means that your data safe is “in the cloud”, making external hosting a safe and secure option. File names are also obfuscated on the Rsync server, which means that anyone looking at the data on the Rsync data host cannot determine what the data is, nor read its contents.
To enable encryption for your Rsync job:
- Check Encrypt the backup and enter your password and confirm it in the available fields.
- Note: if you enable or disable encryption for your Rsync job, BackupAssist will need to "re-seed" your backup to the Rsync backup destination with a full set of data (i.e. the next backup will be a full backup regardless of how many files have changed).
Seeding your first (full) backup offsite manually
Seeding is the process of performing your first (and full) backup to your Rsync Server. Rsync backups are in-file delta incremental backups, where only data that has changed since the last backup is transferred to the Rsync Server.
The first time an Rsync backup runs, however, no data will exist on your data host, so a full backup of all selected data is required. Performing a full backup via a slow Internet connection, however, may not be practical, so you may want to use this option to “seed” your data via a USB HDD, which can be physically transported to the data host and uploaded locally from there.
Once the initial seed to the data host is complete, each successive backup will be an in-file delta incremental backup of only data that has changed.
To perform the seed manually:
- Connect a USB HDD or an equivalent portable disk-based device to the machine running BackupAssist.
- Click the Seed backup button and select the location of an empty folder on your USB HDD.
- Once the seed is complete, your USB HDD destination should contain a:
- Directory with the backed up data
- README.txt file containing instructions on how to copy the backed up data to your Rsync server
- .sh script file, which is used to complete the copy of data to your Rsync server:
- Transport the USB HDD containing the seed to the site where your Rsync server is located and connect the device to this machine.
- To copy the seed to your Rsync server:
Note: these instructions are contained in the README.txt file located on your USB HDD - For a Windows server (assuming the seed is located on E:\SeedFolder)
- Go to Start menu > CopSSH > Start a Unix BASH shell
- Enter the following command:
bash "/cygdrive/e/SeedFolder/seed.sh"
- For a Linux or Unix server (assuming the seed is located in /mnt/usbdrive/SeedFolder)
- Run the following command in your shell:
bash "/mnt/usbdrive/SeedFolder/seed.sh"
- Run the following command in your shell:
- A complete seed of your data should now be copied to your Rsync server. Each successive backup from now on will be an in-file delta incremental backup of only data that has changed.