Burner drive options: configuring storage settings for burning devices
Accessing burner drive options
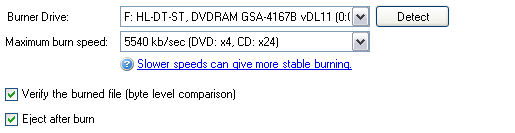
To access the Burner drive options shown above:
- Click
 Jobs in the navigation bar
 - Select the job to be edited and click
 Edit at the bottom of the window.
 - Click
 Destination on the left menu.
 - Click
 Burner drive options to expand the section.
Your optical drive(s) should have already been detected with the when the backup job was first created. If you want to backup to one or more optical drives on the same machine separately, you will need to create an additional backup job for each drive.
![]() Creating additional backup jobs
Creating additional backup jobs
- If your optical drive(s) was not automatically detected, click Detect.
When your optical drives are detected, BackupAssist will also determine the burn speeds (the speed that data will be transferred to your optical drive) that are available to the drive. The speed you should select depends on the reliability of your drive and the media you are using. If you find that you experience unreliable results at higher burn speeds (burn failures, or verify errors) we recommend either trying different media or lowering the burn speed.
- Use the Maximum burn speed drop-down menu to determine the maximum transfer rate BackupAssist should use to burn data to your optical media.
Enabling eject on optical drives
You can setup BackupAssist to automatically eject your backup optical media after each backup has been completed. This will ensure that the disc is not overwritten the next day.
To enable media eject:
- Check Eject after burn
You can choose to verify the data burnt to optical media after the burn process completes. BackupAssist compares the data burnt to your optical disc against the data from its original location. This process ensures that the data backed up is exactly the same as the original. As the backup process involves first creating a Window Backup .bkf file to disk which is then burnt to writable media, you can also enable NTBackup verification.
![]() Enabling NTBackup verify
Enabling NTBackup verify
Files that are in use at the time of backup may sometimes cause verification errors, but you can generally ignore these errors. If there are a significant number of verification errors, you may have a problem with the media or the destination you are backing up to. If this should occur, it would be wise to try different writable media or designate a different temporary disk destination for the backup file before it is written to disc.