Accessing Mailbox directory options
To access the Mailbox directory options shown above:
- Click
 Jobs in the navigation bar
 - Right-click on the desired job and select Edit.
- Click
 Destination on the left menu.
 - Click
 Mailbox directory options to expand the section.
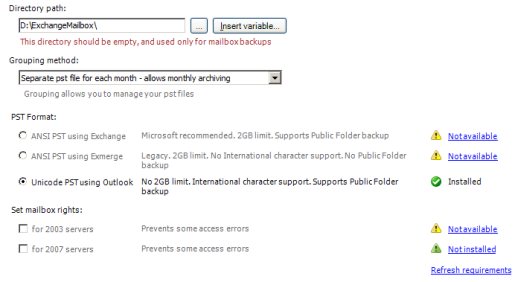
This is the directory where BackupAssist will extract mailbox data to in the form of PST files before they are backed up to your backup device (tape, DVD, REV, etc). BackupAssist can extract PST files to either a local or network share destination.
- Specify the mailbox data path either by typing it directly in the Directory path field
or by browsing for it.
- You can also customize your backup path by inserting unique variables:
- Click Insert variable.
- Choose a variable from the list.
- The variable will now be inserted into your backup path enclosed with percentage signs (eg. %JOB_NAME%).
- You can insert as many additional variables as required.
- You can also order the variables as you like.
- An example backup path:
- User input: \\server\ExchangeMailboxes\%COMPUTER_NAME%\
- Example path: \\server\ExchangeMailboxes\SERVER-SBS\
- You can also customize your backup path by inserting unique variables:
Below the Directory path you can choose a grouping method which defines how mail data is sorted and stored in the mailbox directory. You can store mail data within separate folders for different time periods, sorting PST files by either month, quarter, year, or simply as a single set. For example, if you were to sort by year, all PST files in the 2006 folder would only contain mail data created in 2006.
The grouping method option makes it far easier to locate mail data from specific dates and can also be utilized for archiving purposes (ie. you could group mail data by month and then archive a backup of your PSTs each month to a writable DVD and store this offsite as a complete record of all emails for any given month).
- Use the Grouping method drop-down menu to choose a grouping method:
- Single PST file for all messages
A separate PST file is created for each user’s mailbox. - Separate PST file for each month
Each user’s mailbox is stored in a separate PST file within a separate folder for each month. - Separate PST file for each quarter
Each user’s mailbox is stored in a separate PST file within a separate folder for each quarter. - Separate PST file for each quarter
Each user’s mailbox is stored in a separate PST file within a separate folder for each year.
- Single PST file for all messages
BackupAssist provides support for two different PST file formats: ANSI and Unicode. Each format has different advantages and disadvantages, as well as different pre-requisites that must be installed before mailbox backups can be performed. The advantages and disadvantages of each format are summarised to the right of each option. See section 2 of our Exchange Mailbox backup quickstart guide for more information about PST formats.
![]() Exchange mailbox backup quickstart guide
Exchange mailbox backup quickstart guide
Use the available radio buttons to choose an appropriate PST format:
- ANSI PST using Exchange:
To use this option you must have either the Exchange MAPI client OR the Exchange 2003 Management Tools installed on your machine. Note the following:- The Exchange MAPI client cannot be installed if Microsoft Outlook is already present on the machine. The Exchange 2003 Management Tools, however, can be installed on a machine with Outlook installed.
- You cannot install both the Exchange MAPI client AND the Exchange 2003 Management Tools – you must install one or the other.
- While BackupAssist provides a facility for automatically installing the Exchange MAPI client, we recommend that you install the Exchange 2003 Management Tools, particularly if you are backing up mailboxes from an Exchange 2003 server. See the Microsoft TechNet article
 ‘How to Install the Exchange System Management Tools’ for instructions on how to install the Exchange 2003 Management Tools.
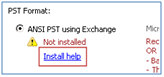
- Select the ANSI PST using Exchange radio button and then click the blue Install help link below:
- A new window should appear. Click the Install button under Microsoft Exchange Server MAPI Client (and CDO) 1.2.1 to install the MAPI client:
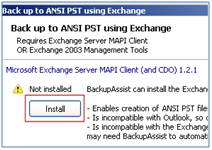
- BackupAssist will then download the Exchange MAPI client and install it on your machine.
- ANSI PST using Exmerge:
To use this option you must have both the Exchange 2003 Management Tools and Exmerge installed on your machine.- Note: if the Exchange MAPI client is already present on your machine you will need to first uninstall it before being able to install the Exchange 2003 Management Tools.
‘How to Install the Exchange System Management Tools’ for instructions on how to install the Exchange 2003 Management Tools. Once the management tools are installed BackupAssist can automatically install Exmerge for you as follows:
- Select the ANSI PST using Exmerge radio button and then click the Install button below:
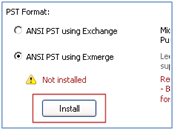
- BackupAssist will then download Exmerge and install it on your machine.
- Unicode PST using Outlook:
To use this option you must have Microsoft Outlook 2003 or later installed on your machine. Note that you cannot install Microsoft Outlook if the Exchange MAPI client is already present on the machine. So to store mailbox backups in Unicode format you need to make sure that a) the Exchange MAPI client is not installed; and b) Microsoft Outlook 2003 or later is installed.- Note: for Unicode PST backups, 64bit Outlook 2010 is not supported, but 32bit versions of Outlook 2003, 2007 and 2010 are supported
Setting mailbox rights will mean that BackupAssist will grant access to the Exchange mailboxes that have been selected for backup to the backup user identity (Settings > Backup user identity) . Enabling these options is recommended if you are experiencing access errors with mailbox backups.
- Choose whether BackupAssist should attempt to automatically set mailbox rights on your Exchange server(s) using the available checkboxes:
- For 2003 servers:
Select this option if you want BackupAssist to grant the backup user identity (Settings > Backup user identity) access to Exchange 2003 mailboxes that have been selected for backup. To enable this option you must have the Exchange 2003 Management Tools installed on the machine running BackupAssist. See the Microsoft TechNet article‘How to Install the Exchange System Management Tools’ for instructions. - For 2007/2010 servers:
Most Exchange 2007 and Exchange 2010 setups do not require this option to be ticked in order to have mailbox backups run correctly. This option should only be used when advised by the BackupAssist Technical Support team when issues with permissions on the mailbox store are experienced due to the Backup User Identity not being an Exchange Domain Servers administrator.
- For 2003 servers:
- Please note: you cannot install both the Exchange 2007 and the Exchange 2003 Management Tools on the same machine. If you are backing up mailboxes from both types of Exchange Server (2003 and 2007) we recommend that you install just the Exchange 2003 Management Tools, as Exchange 2007 provides better on-server tools for managing mailbox rights.
- Once you have configured mailbox rights settings we recommend that you perform an initial export of mailbox data in the
Mailbox export status section.
 Exporting mailbox data