Replication mode options: managing File Replication backups on portable media
Accessing replication mode options
To access the Replication mode options shown above:
- Click
 Jobs in the navigation bar.
 - Select the job to be edited and click
 Edit at the bottom of the window.
 - Click
 Destination on the left menu.
 - Click
 Replication mode options to expand the section.
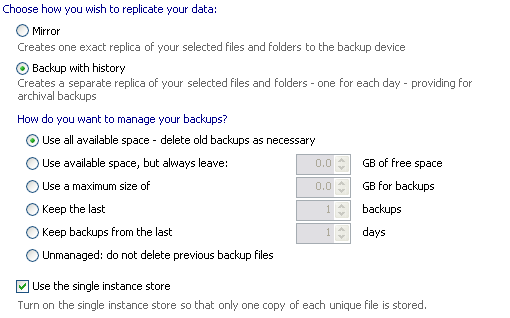
There are two ways in which files can be replicated on (copied to) your portable backup media (REV disks, external hdds, rdx QuikStor), which are described below:
- Mirror
Mirroring will create one exact replica of your selected files and folders to the backup media connected/inserted for backup. Only a single mirror of the selected data will ever be kept on each backup drive or disk with this option selected. If you want to create a series of mirrors on each drive or disk choose Backup with history instead. - Backup with history
Backup with history means that a separate replica of your selected files and folders will be created on the backup drive or disk each time a backup runs (a new folder will be created on the device for each backup). This means that you will have an archive of backups on each drive or disk that you can restore from. You can also combine this option with Single Instance Store (see below) to potentially store hundreds of day's worth of backup history on each drive or disk.
- We recommend using Backup with history combined with disk space management (see below) to allow for multiple restore points and data archiving.
If you choose to keep a history of backups on each of your portable backup media (see above), there are a number of ways in which disk space can be managed on each disk or drive:
- Use all available space (recommended)
BackupAssist will check the backup drive for free disk space while a backup is in progress. If the drive is running low on disk space and cannot accommodate the new backup set, the oldest backup set on the drive will be removed. BackupAssist will continue to remove backup set in age order (oldest to newest) as required to ensure that enough disk space is free to store the latest backup set. If each drive or disk is dedicated to backup storage this option is recommended. - Use available space but always leave X Gb of free space
Here you can define an amount of disk space to always leave free on the drive. BackupAssist will check the backup drive for free disk space while a backup is in progress and if the drive's free space goes below this value, the oldest backup set will be removed from the drive. BackupAssist will continue to remove backup sets in age order as required to ensure that this amount of free space is always maintained on the drive. - Use a maximum size of X Gb for backups
Here you can define a maximum amount of disk space that should be used for backup storage on the drive. BackupAssist will scan the backup drive for backup sets while a backup is in progress and if the amount of disk space used for backup sets goes above this value, the oldest backup set will be removed from the drive. BackupAssist will continue to remove backup sets in age order as required to ensure that backup storage does not exceed this value of disk space. - Keep the last X backups
Here you can determine the number of backup sets that should be constantly maintained on the drive. BackupAssist will delete the oldest backup set on the drive if this number of backup sets is ever exceeded. - Keep backups from the last X days
Here you can choose to have BackupAssist remove any backup sets on your backup drive that are older than a specified number of days. For example: you may like to set this value to "14" to always have the last two week's worth of backup sets on the drive. - Unmanaged
Here BackupAssist will continue to fill your backup drive with backup sets. You will need to manually manage the disk space yourself. If the drive ever runs out of space and a backup cannot complete you will receive an error in your backup report alerting you to this fact. This option is generally not recommended.
Single instance store, if enabled, means that only one unique copy of each file is stored on your backup device. Single Instance Store saves both time and disk space.
![]() Learn more about Single Instance Store
Learn more about Single Instance Store
To enable Single Instance Store:
- Check Use the Single Instance Store.
- Note: if Single Instance Store is disabled a duplicate of each file will be stored in every backup set and each duplicate will take up separate disk space. Backups will take longer to complete and use more disk space.
- We recommend that you enable Single Instance Store.