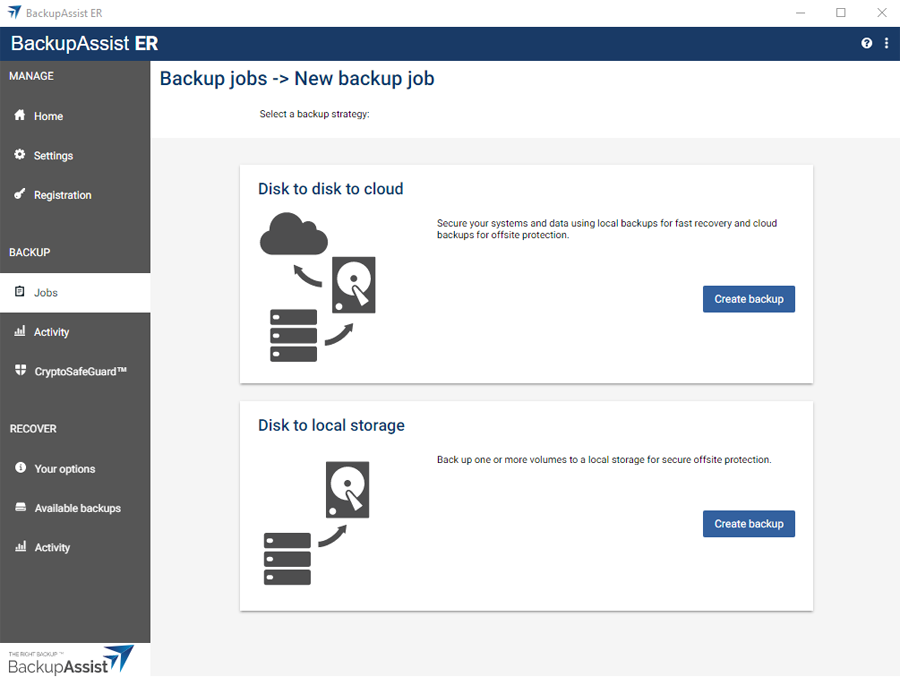
Disk to disk to cloud creates a local backup and then replicates that backup to a Microsoft Azure Blob Storage, Amazon S3 or S3-compatible cloud storage destination. This best practice strategy provides cyber-resilience and is our recommended backup type for all servers.
The local backup provides a fast and accessible backup that can be used for any recovery scenario. The cloud backup is safely stored offline and protected from cyber threats such as hacking and ransomware.
This backup can be used for file and folder recoveries and downloaded if you need to perform a bare-metal recovery.
Amazon S3
To back up to Amazon S3 storage, you need an AWS account. You use this account to log into the AWS portal and create an Identity Access Management account (IAM account). The IAM account creation process gives you a CSV file containing an Access Key ID & Secret Access Key, which is entered into the Storage location 2 section. Setting up Amazon S3 storage is documented by Amazon and in the S3 storage guide linked below.
To back up to Amazon S3, see our BackupAssist ER Amazon S3 storage guide and a Custom access policies for AWS guide.
Microsoft Azure
To back up to a Microsoft Azure cloud destination, will need an Azure account. You will use this account to log into the Azure portal and create a storage account for the job to use. BackupAssist ER will use the storage account's connection string to locate and access that storage. Setting up Azure storage is documented by Microsoft and in the Azure storage guide linked below.
To back up to Microsoft Azure, see our BackupAssist ER Azure storage guide.
Wasabi
Wasabi is an S3-compatible cloud storage solution that can be used as a backup destination by BackupAssist ER. This may be an attractive option if you're looking for a low cost cloud storage solution. Wasabi does not have the same feature set as AWS S3, but it does provide a simple, accessible cloud destination that is ideal for small and medium businesses.
To back up using the Wasabi storage solution, see our BackupAssist ER Wasabi storage guide.
BackBlaze
BackBlaze is an S3-compatible cloud storage solution that can be used as a backup destination by BackupAssist ER. BackBlaze B2 has customized configuration fields for each service, and you can back up to buckets that have the Object Lock or Bucket Immutability feature enabled.
To back up using the BackBlaze storage solution, follow the S3-compatible backup guide below, using the details in your BackBlaze account’s bucket settings.
S3-compatible cloud Storage
An S3-compatible destination can be set up as a private cloud using server software like MinIO, or you can use a 3rd party cloud storage service like Wasabi or BackBlaze. The server software or 3rd party service is used to create your cloud storage, and the settings used in BackupAssist ER are the same as those used for Amazon S3, except you will have an endpoint URL instead of Region.
To create an S3-compatible backup job:
- Select the Jobs tab.
- Select New from the Jobs tab menu.
- Select Create backup from the Disk to disk to cloud section.
- Fill in the General tab.
- Job name - enter a name for this backup job.
- Description - you can add a description to help identify or classify the job.
- Select and review the Files & applications tab.
- Select and fill in the Storage Location tab.
- Use the Backup disk field to select the drive letter assigned to the disk you are backing up to.
- Select Check disk to confirm that the selected destination is attached and accessible.
- Use the Network path (UNC) field to enter the server or device name. For example \\qnap01\F\backups\fileserver01
- If the destination requires authentication, select the Network credential option Specify credentials, and enter the credentials into the fields provided. This is the username and password that BackupAssist ER will use to access the network location or NAS device.
- Select Check network location to confirm that the selected destination is attached and accessible.
- Storage location type - Select S3-compatible, and the other fields will update to support the selected destination.
- Bucket - Enter a name for your S3 bucket. BackupAssist ER will use this name to create the bucket. Provide a different name for each job because each job will use its own bucket. This name needs to be unique and can only use lower-case characters, numbers, periods and dashes.
- URL - This is the URL endpoint that BackupAssist ER will use to access the cloud storage. If you are using an S3-compatible service provider, the URL will be available from your provider and may be region-specific. If you set up your own S3-compatible storage, you may have configured this URL when creating the storage, or you may need to refer to the product documentation.
- Access Key ID & Secret Access Key - enter the keys for the IAM account that you want BackupAssist ER to use for this job. Please refer to the relevant service provider's documentation or the S3 server software to extract these keys.
- Account status - Select the Check account button. This step uses the information provided to test the connection to the cloud destination, and then creates the cloud container that the backup job will use.
-
Throttle speed - This option is used to set the average upload speed limit. To set the average speed, tick the box next to Set the average speed, then enter the value by typing it in or using the up / down arrows. When the limit is set, the instantaneous speed can go over or under that limit, but the average speed (over time) would stay under the defined limit.
- Select and review the Schedule tab
- Use the Perform backup once at to schedule a daily backup at the selected time.
- Use the Perform backups at the following times section to schedule multiple backups each day at the selected times.
- Use the Retention scheme section to change the number of backups that should be kept.
- Configure Scripts (optional).
- Complete backup job
- Save and run - will save and then start the backup job. The job's progress screen will open.
- Save - will save the job, which will run at the time scheduled.
- Discard - will cancel the job. All information entered will be lost.
This will open the Disk to disk to cloud page and display the 4 tabs used to configure the job.
Fill in the General sections as follows:
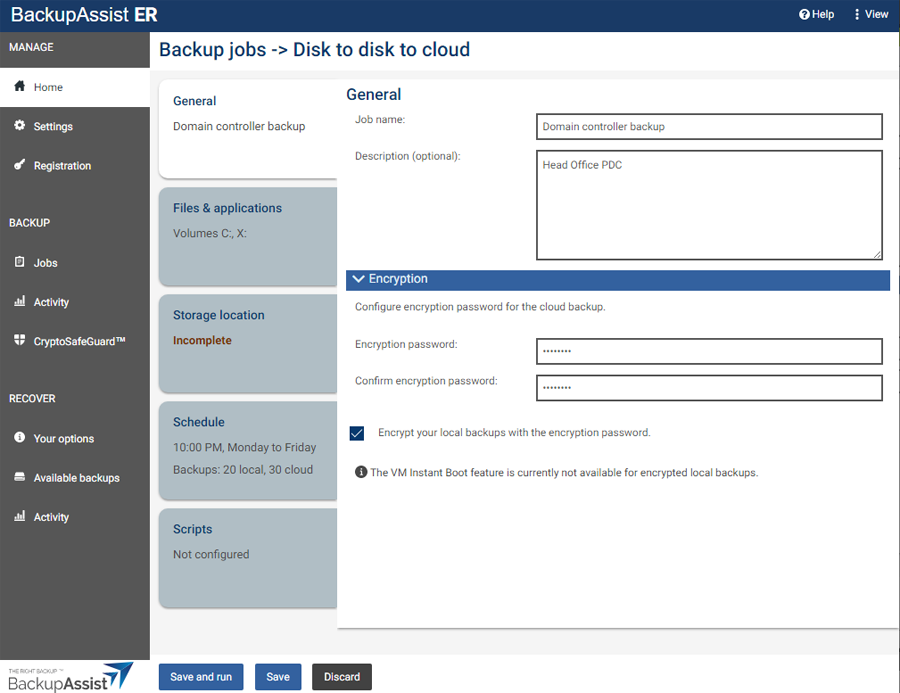
Encryption
All cloud backups are encrypted before the data is sent to your cloud provider. Enter a password into the Encryption password fields. This password will be used to encrypt this job's backups.
Tick the box next to Encrypt your local backups with the Encryption password if you also want to encrypt the local backup. The local backup will use the same password as the cloud backup.
Encrypted backups do not currently support VM Instant Boot
Note: You will be prompted to enter this encryption password if you ever use this backup for a recovery. It is therefore important that you keep a copy of your password in a safe place, as we cannot retrieve passwords if they are lost or forgotten.
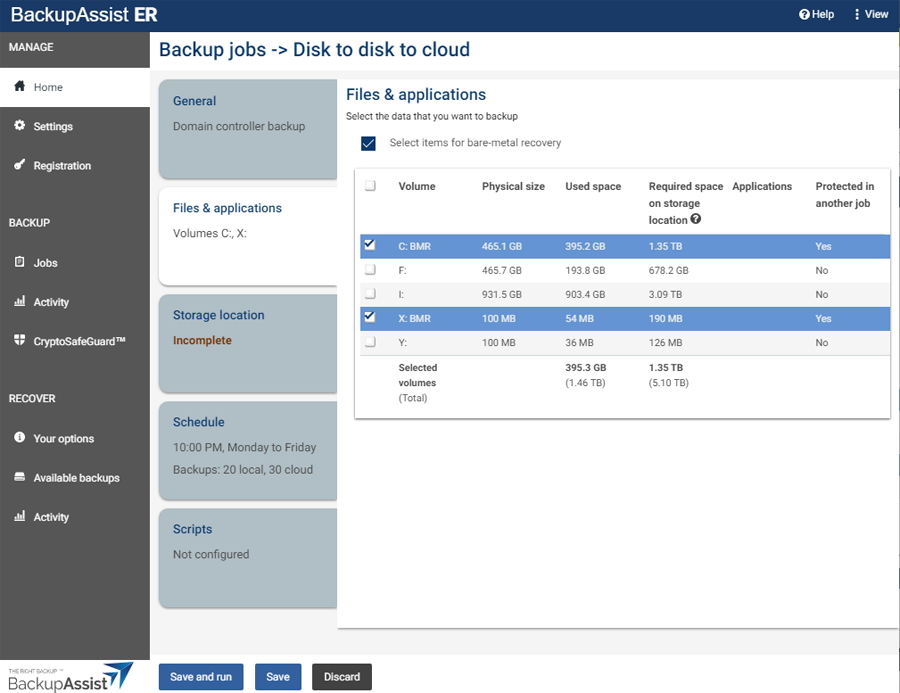
The volume with the server's operating system C: BMR (bare-metal recovery) is selected by default. Use the tick boxes to change the selected volumes as required.
To ensure that the backup can be used for a bare-metal recovery, tick Select items for a bare-metal recovery. This will select all volumes needed for a full server recovery, for example, if a server has a system boot volume and an operating system volume.
If there are SQL, Exchange or Hyper-V servers on the selected volumes, all volumes required to create application-consistent backups of those VSS applications will also be selected. These selections should not be changed.
Note: BackupAssist ER requires full volume selections because only full volume backups can be used for a bare-metal recovery. This means your system is cyber-resilient and protected against system failures, hardware loss, virus infections and ransomware.
This section is used to provide details for both the local destination (Storage location 1) and the cloud destination (Storage location 2).
Storage location 1 (local)
Choose the local storage location from the Storage location type field. The selected volumes will be backed up to here and replicated to the cloud location provided in Storage location 2.
If you chose Local disk:
If you chose Network location:
Storage location 2 (cloud)
An S3-compatible destination can be set up as a private cloud using server software like MinIO, or you can use a 3rd party cloud storage service. The server software or 3rd party service is used to create your cloud storage, and the settings used in BackupAssist ER are the same as those used for Amazon S3, except you will have an endpoint URL instead of Region.
For the Wasabi and BackBlaze B2 storage services, there are customized configuration fields for each service, and you can back up to buckets that have the Object Lock or Bucket Immutability feature enabled.
Complete the following configurations:

Configure how many times a day and at what times the backup job will run.
Review the schedule selections as follows:

The Scripts tab is used to add scripted processes to the backup job. Scripts support an extensive range of variables, and can be run before a backup and after a backup (successful or failed).
Before adding custom scripts, please check BackupAssist ER and the documentation to see if the function you require is already available.
To learn more, see the Adding backup scripts guide.

To complete the backup job, select one of the following options:
Note: The first time the job runs will be a full backup of all data. This will take longer than subsequent backups which will be incremental. For this reason, you may want to run the first backup at a time that minimizes the impact on other backup jobs and your network.