Emails and calendars are important resources that require granular recovery options. In BackupAssist ER, this is provided by Exchange Granular Restore, a dedicated console that makes it easy to locate specific mail items from any backup of an Exchange Server, and recover those mail items to a user mailbox or a PST file.
The following table shows what destinations different mail items can be restored to.
| Item type | *Mail folder | Journals | Notes | Contacts | Calendar | Tasks |
| Message | Y | Y | Y | Y | Y | Y |
| Journal | Y | Y | Y | Y | Y | Y |
| Sticky Note | Y | Y | Y | Y | Y | Y |
| Contact | N | N | N | Y | N | N |
| Calendar | N | N | N | N | Y | N |
| Task | N | N | N | N | N | Y |
* The Mail folder includes Deleted Items, Drafts, Inbox, Junk, Outbox and Sent.
This guide explains the mail item recovery process in 3 steps.
Step 1 : Locate the Exchange backup using BackupAssist ER.
Step 2 : Locate the mail items using Exchange Granular Restore.
Step 3: Restore the mail items to a PST file or Exchange Server.
Option: Manual recovery using Exchange Granular Restore.
Exchange Granular Restore is not yet supported from a cloud backup.
Step 1 - Locate the Exchange backup
Follow these steps to select the Exchange Server backup that you want to recover the mail items from:
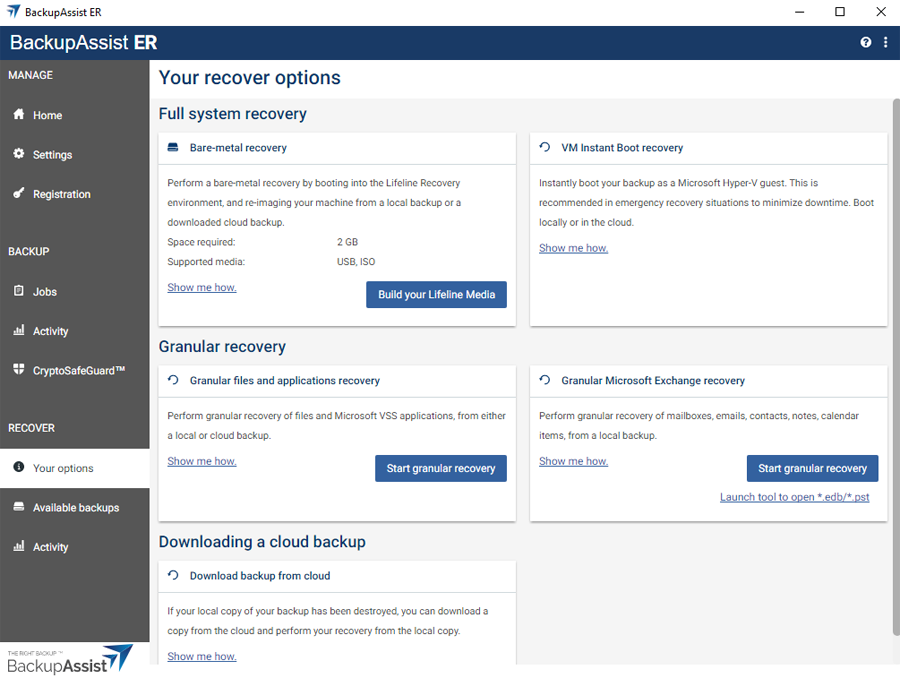
- Open BackupAssist ER.
- Click the Your options menu.
- Click the Start granular recovery button on the Granular Microsoft Exchange recovery card.
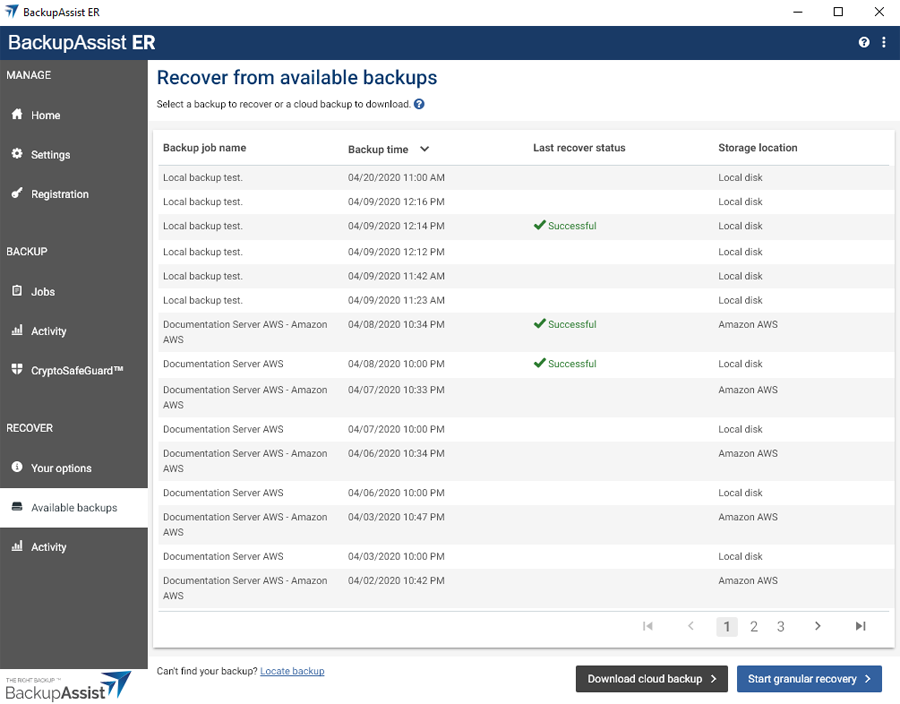
- Choose the backup you want to recover from.
- Click the Start granular recovery button.
- Enter the Encryption password into the field provided.
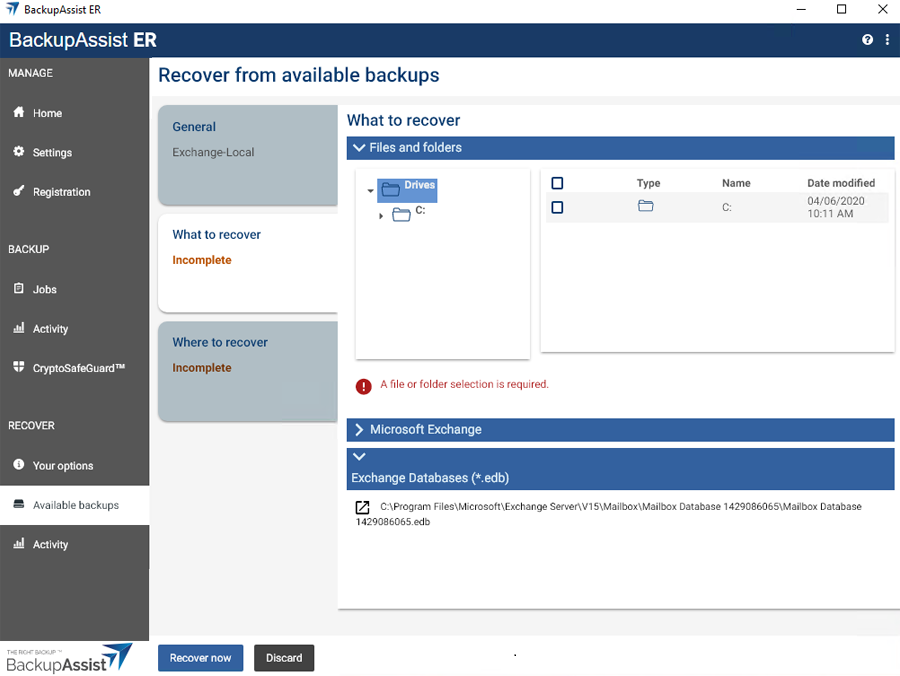
- Click the What to recover tab.
- Click the icon next to the left of the Exchange database file path.
The Recover from available backups screen will open.
This will open the Recover from selected backup screen and display 3 tabs.
If the backup is encrypted, the Access backup screen will open.
This is the password you entered in the General tab when the backup job was created.
Select Next.
This will display the contents of the backup. At the bottom will be a special Exchange Database (*.edb) section. That section will have a selectable icon for the Exchange database file (EDB).
Note: Do not use the Where to recover tab. It is only required when recovering the full Exchange Server using the process described in the File or application recovery page.
The Exchange Granular Restore console will now open and load the database.
Step 2 - Locate the mail items
An Exchange Server's database file can contain many mail boxes, each with thousands of emails and mail items. This step explains how to locate and select the mail items you are looking for.
The Exchange Granular Restore console has a mailbox tree that you can Browse and Search. Both of these options will help locate, preview and select the emails that you want to restore.
Note: The console's The Options menu has selections that can affect the items shown when using the Browse and Search feature.
Using Browse
Browsing for emails is ideal when you know the email’s location.
To browse for the emails that you want to restore:
- Expand a mailbox and select one of its folders to show the individual emails inside it.
- Select an email to preview its contents in the pane below it.
- Tick the box next to each email that you want to restore from the Browse pane.
Once you have selected an item to restore, the restore type icons in the menu will become active. Step 3 - Perform the restore explains how to restore the selected items to a PST file or an Exchange Server.

Using Search
Searching for emails is ideal when you do not know an email's location.
To perform a search:
- If you know what mailbox to search, tick the box next to that mailbox and its name will appear in the Search field. If you select multiple mailboxes, they will be listed in the Search in… field. Any expanded mailboxes are also added to the search by default.
- Click the Search field to open the Search dialog and enter your search criteria.
- Find whole words only- select if you only want to search for emails with complete versions of any search words used.
- Has words - searches all parts of an email (body, Subject, etc.) for the words in this field.
- Doesn't have - searches for emails that do not have the words entered in this field.
- Has attachments - will search for emails with attachments.
- From - will search for words entered in the From: field.
- To - will search for words entered in the To: field.
- Subject - will search for words entered in the Subject: field.
- Date range - will search for emails created, sent or received between the selected dates.
- Select the search icon to start the search.
-
Select the emails that you want to restore.
To restore all items listed in the search results, tick the Inbox. This will restore a copy of the mail account’s inbox containing only the items listed in the search results.
Once you have selected an item to restore, the restore type icons in the menu will become active. Step 3 - Perform the restore explains how to restore the selected items to a PST file or an Exchange Server.
Note: If you want to include emails that are no longer present in user mailboxes, select the Options menu then click display hidden deleted items and Display all items. Deleted items are stored in the Deletions folder. These items can only be exported to a PST file.
Note: The search feature will search the entire database unless you select a specific mailbox.
The option Include mailboxes that are expanded, have items selected or were searched before is ticked by default. Deselect this if you only want to search ticked mailboxes.
The following criteria can be used to perform a search:
A new tab will open with matches for your search.
If the search criteria does not locate any emails, review your search parameters and run another search.

Step 3 - Restore the mail items
Once you have located the required mail items, there are 3 ways they can be restored using Exchange Granular Restore: Restore to original location, Restore to alternate location and Export to PST.
Note: When you restore individual emails or a mailbox, RESTORED will appear in the Subject line of each email. This is enabled by default and can be turned off by selecting Options > Add 'RESTORED' to exported item > No.
Option 1 : Restore to original location
This option will restore the selected mail items back into their respective mailboxes on the original Exchange Server.
- Select the Restore to original location button.
- Select Restore to begin the restore process.
- The restore can be canceled by clicking the Cancel restore button.
- The progress window can be reopened by clicking the Progress bar on the status panel.
- Selected items will be copied into their original locations on the live Exchange Server. If selected items cannot be matched to a destination mailbox, they will not be restored.
A Restore to original location window will open. The domain name of the server running Exchange will be automatically detected if you are on the same domain.
The Exchange Server is detected using the current Active Directory domain so if necessary, you can change the server name and attempt a reconnect.
It is possible to restore data to someone else’s mailbox using Exchange Impersonation. To do this, the current user credentials must have Exchange Impersonation access to the destination mailbox. To learn more, see Exchange Impersonation
A progress window will be displayed during the restore. The window shows the number of folders, messages and errors. You can enable and disable the progress window in the Options menu.
Restore considerations
Option 2 : Restore to an alternate location
This option will restore the mail items to a live Exchange database that is different to the one they were backed up from.
- Select the Connect to Exchange Mailbox button.
- Server name - Domain name Exchange Server or IP address
- Mailbox user name - This will identify, authenticate and open the applicable mailbox.
- Password- The password for the applicable mailbox.
- If Connect using current user is selected, the existing user’s Windows password will be used.
- If Connect to a different user's mailbox (Exchange Impersonation) is selected, enter the SMTP address of the mailbox that you want to connect to. Exchange impersonation must also be configured on the Exchange Server.
- Restore the mail items.
- Restore using drag and drop.
- Restore to alternate location button.
Enter the following details into the Connect to Exchange Server mailbox dialog:

Considerations:
Once the connection has been made, the mailbox you have authenticated to will appear as a mailbox tree in a new pane called Connected Mailboxes. You can open a preview pane for the destination mailbox tree by selecting the Show item list and preview icon (CTL+R), to the right of the Connected Mailboxes pane.
There are two ways to restore mail items to the alternate location. You can drag and drop the files to the restore destination, or select the mail items and use the Restore to alternate location button.
Drag and drop mail items from the backup, into the live Exchange mailbox that you connected to. The hierarchy of the data being dragged will be recreated inside the destination folder.
You can create a new folder in the live mailbox by right-clicking the mailbox or a folder. You cannot delete or rename a folder once it has been created.
Click the check-box next to items that you want to restore and select the Restore to alternate location button. A dialog box will open and allow you to select a destination folder on one of the connected mailboxes. Make your destination selection and select OK to begin the restore
The data hierarchy will be restored automatically.

Option 3: Export to PST
Export to PST file is a good option as it restores the emails to a file that can be given to the user who requested the restore. The user can then open the PST file in their Outlook mail client.
To restore the emails to a PST file:
- Select the Export to PST file button.
- Confirm the Personal Storage Table (PST) format.
- For ANSI PST files, the size limit is 1 GB.
- For Unicode PST files, the size limit is 10 GB.
- A maximum of 15,000 messages can be restored into the PST file.
- Select the destination.
- Open the PST file and access the emails.
- Click File > Open and choose Open Outlook Data File.
- Browse to the PST file that was exported.
- Select the PST file and click OK.
- View and access the emails in Outlook.
- Drag-and-drop the emails from the PST to another folder in Outlook. These emails will be automatically synchronized with the live Exchange Server database.
This button will become active when emails or mailboxes have been selected.
You can choose Unicode or ANSI encoding for the PST output file.
With large exports, there can be more than one PST file. Additional files are created automatically when the file size limit is reached. The limit depends on the output file encoding.
You will be asked to select a folder or create a new folder.
After selecting the new or existing folder, the export will begin.

A window will display the export’s progress. The export can be canceled by clicking the Stop Export button.
The emails will be exported to a .pst file named: “Restore NNN <Mailbox Name>[ VVV]. pst”, where NNN is the current recovery session identifier and VVV is the volume number.
The user who requested the restore can be given a copy of the PST file to open and access the emails. The user should follow these instructions.
To open a PST using an Outlook Client:
The PST file will appear in Outlook as a container.
RESTORED will appear in the Subject line of each email restored. This is enabled by default and can be turned off by selecting Options > Add 'RESTORED' to exported item > No.
In the screenshot below, a PST has been restored and the contents of the PST appear with RESTORED next to each email.
Another PST is about to be selected and added to the Outlook client.

You can now:
The Options menu
The console's Options menu has selections that can affect the items shown when using the Browse and Search feature to locate mail items. The Options menu should be reviewed before searching for mail items.
Display hidden deleted items
Selecting this option gives access to previously deleted mail items. This is not mail from the deleted items folder but mail items that are no longer present. The database will reload when a selection is made and the deleted items will have a flag to indicate that they are a deleted item.
Deleted items are stored in the folder Deletions. These items cannot be restored to a live Exchange Server database. It is recommended that these items are exported to a PST file and then imported into the live Exchange Server.
Display time
Select Display time, from the Options menu and select Local or GMT. This applies to the date in the mail item's properties tab. The database will reload when the format is changed.
Add Restored to exported items
When you restore individual emails or a mailbox, the word RESTORED will appear in the Subject line of every email. This is enabled by default and can be turned off using the Options menu, by selecting Options > Add 'RESTORED' to exported items > No.
Manual Exchange Granular recovery
The Exchange Granular Restore tool can be opened manually by clicking the Launch tool to open *.edb/*pst link on the Granular Microsoft Exchange recovery card. This will open Exchange Granular Restore with a browse dialog, which you can then use to locate and open a Microsoft Exchange database EDB file.
This feature provides flexibility and allows you to perform a granular recovery of mail items from any EDB (Exchange Database) or PST file, including from databases you may have previously recovered from a backup.