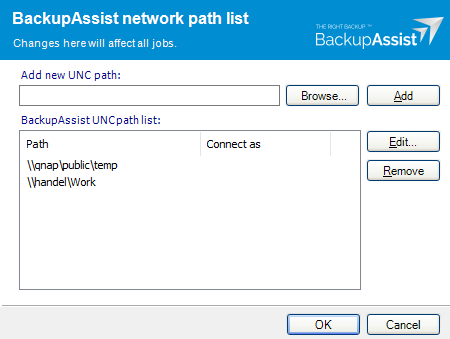
This option allows you to provide access credentials to networks, domains and drives that the default account (Backup user identity) does not have access to. Enter or browse to the location and add it to the Path list. The Edit option will allow you to enter an authentication account that is different to the default account. When you create a backup job to a remote location, that location will be added here.
To configure a network path in BackupAssist:
- Select the Settings tab.
- Select Network paths.
- Fill in the Add new UNC path by typing in the path directly or using the Browse button.
- Click Add once you have provided the network path.
- Click OK
Network paths must be entered in their UNC form \\Servername\Sharename (eg. \\SBS-SERVER\accountdata). If you use the Browse button, you will be taken directly to My Network Places.
BackupAssist will now attempt to connect to the network path using the Backup User Identity. If the Backup User Identity cannot access the network path, you will be asked to supply a different username and password that has access. Once the connection is confirmed, the new network path will be displayed in the global list and be available for selection in any job.
To edit a network path
Select the path in the list and click Edit. You can now edit either the network path itself, or the username and password used to access it. Changes made to a network path will be applied to all jobs using that selection.
To remove a network path
Select the path in the list and click Remove. The network path will be removed from the list and no longer available to any jobs for data selection. Jobs that use the network path as part of their file selection will no longer backup this data.
Note: Having multiple connections to a resource using the same logon credentials can generate a Windows error (e.g.BA260). Avoid having mapped shares on the computer running BackupAssist, that are the same as the paths configured within BackupAssist.
