Cyber Black Box
Cyber Black Box captures this vital forensic information and saves it in the backups where it's protected by CryptoSafeGuard Shield. This means digital forensic investigators have the information they need to piece together the events leading up to a cyber attack. For a business, this information is also critical when making a cyber insurance claim.
Requirements
BackupAssist Classic v11 or later with a BackupCare subscription. BackupCare includes access to CryptoSafeGuard, which creates the forensic files.
How Cyber Black Box works
Each time a backup job runs with CryptoSafeGuard enabled, a forensic ZIP file is created in the local BackupAssist folder C:\ProgramData\BackupAssist v12\forensics. The forensics file is also copied to the backup destination, so you have a secure copy even if access to the local machine is compromised due to ransomware or hacking. The local files are retained for up to 60 days, and if the forensics files' folder grows larger than 10 MB, older files will be deleted until the folder size is under 10 MB.
Each forensics file includes information that digital forensic investigators and cyber-security specialists can use to see changes over time and spot suspicious activities.
For non-cloud backups
The forensics files are copied to a folder called .forensics in the backup destination. The files are retained for up to 60 days at the backup destination, and if the forensics files' folder grows larger than 10 MB, older files will be deleted until the folder size is under 10 MB.
For cloud backups
The forensics files are copied to the cloud container. The files' retention is tied to the cloud backup retention policy, so a forensics file will be retained for each backup in the cloud. The cloud container will not be visible in the cloud provider’s file system. BackupAssist Technical Support will be able to help you retrieve the forensics file if required.
Warning: If you run a backup with CryptoSafeGuard disabled, a forensics file will not be created. If a CryptoSafeGuard scan is canceled before the forensic collection process has finished, no forensics file will be created.
How to use Cyber Black Box
Forensic investigators will need to access and make copies of the forensics files so they can piece together a timeline of events and see how system activities changed over time.
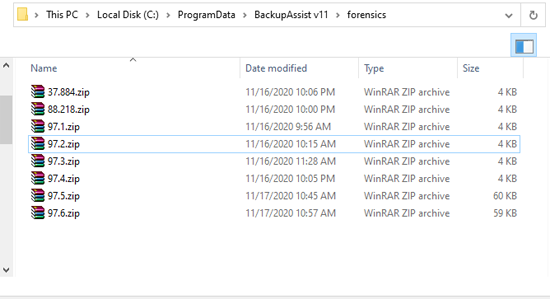
To access the local forensics files:
- Open the hidden folder C:\ProgramData\BackupAssist v12\forensics.
- Copy the forensics ZIP files to a location that the investigators can access.
- Extract and open the files.
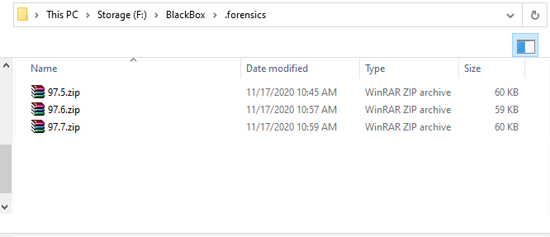
To access the secure forensics files in non-cloud backups:
- Open the drive or folder that was used as the backup job's destination.
- Copy the forensics ZIP files to a location that the investigators can access.
- Extract and open the files.
In the example below, the backup destination is a folder called BlackBox.
To access the secure forensics files in cloud backups
The forensics files are copied to the cloud container. The cloud container is part of the virtual file system so the forensics file will not be visible in the cloud provider’s file system. BackupAssist Technical Support will be able to help you retrieve the forensics file if required.
Note: If CryptoSafeGuard Shield is enabled, the local forensics folder (under C:\ProgramData\BackupAssist v12\forensics) will be protected by the shield. It will not be possible to create, rename, edit or delete any files in this folder via File Explorer or a command prompt while the CryptoSafeGuard Shield is enabled. To learn more, see CryptoSafeGuard Settings