Hard drive pool options: configuring storage settings for external drives
Accessing hard drive pool options
To access the Hard drive pool options shown above:
- Click
 Jobs in the navigation bar
 - Select the job to be edited and click
 Edit at the bottom of the window.
 - Click
 Destination on the left menu.
 - Click
 Hard drive pool options to expand the section.
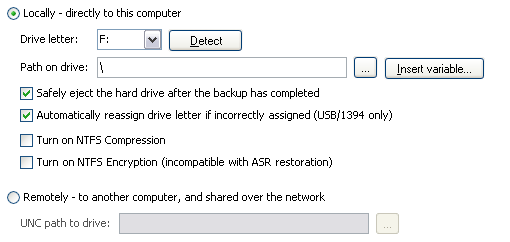
BackupAssist can backup to external drives that are connected either locally to the machine, or remotely, via a network share or UNC path.
- For drives that are connected locally select the Locally radio button.
- Specify the drive letter from the drop-down menu.
- Drive letters that correspond with external drives should be automatically detected. If the drive does not appear or you have just connected the drive click Detect. If it still does not appear you can input the drive letter manually (ie. J:\ ).
- It is recommended that you select a drive formatted with NTFS as this is a more reliable file system and allows for backup files greater than 4GB in size.
 Converting drives to NTFS
- The option to Automatically re-assign drive letter if incorrectly assigned is useful if an external drive is connected to the machine but appears as a different drive letter to that specified in BackupAssist. If the drive has either been prepared or used with BackupAssist previously, BackupAssist will automatically convert the drive letter to the correct value and ensure that the backup still runs. This option is not available for eSata drives.
Preparing media with BackupAssist
- Specify the backup path either by typing it directly into the Path on drive field
or by browsing for it.
- You can also customize your backup path by inserting unique variables:
- Click Insert variable.
- Choose a variable from the list.
- The variable will now be inserted into your backup path enclosed with percentage signs (eg. %JOB_NAME%).
- You can insert as many additional variables as required.
- You can also order the variables as you like.
- An example backup path:
- User input: \%JOB_NAME%\%COMPUTER_NAME%\
- Example path: \SQL Backup\SERVER-SBS\
- You can also customize your backup path by inserting unique variables:
- Specify the drive letter from the drop-down menu.
- For drives that are connected remotely select the Remotely radio button.
- Specify the network path of the external drive either by typing it directly into the UNC path to drive field or browsing for it.
Enabling hard drive eject acts to safely remove/disconnect your USB, 1394 or eSata drive from Windows. If the drive is not safely ejected in this way, you risk corrupting or losing data on the drive. Hard drive eject also ensures that data on your external drive is not overwritten the next day. Additionally, if you are running SBS and have configured windows to produce a daily performance report you must enable hard drive eject if you want the SBS report to correctly indicate data usage on the external drive.
To enable hard drive eject:
- Check Safely eject the hard drive after the backup has completed
NTFS compression is only available to external drives that are formatted with the NTFS file system. Enabling NTFS compression decreases the size of backup files stored on your external hard drive, meaning that you can fit more backups on each drive. NTFS compression occurs on-the-fly (as the backup file is written to disk) and offers storage space savings at a small performance cost to the user.
![]() Read more about NTFS compression in Windows
Read more about NTFS compression in Windows
To enable NTFS compression:
- Check Turn on NTFS compression.
NTFS encryption is only available to external drives with the NTFS file system. Enabling NTFS encryption will encrypt any backup files written to the external drive, which means that backup files can only be accessed by a system administrator user or the backup user identity defined in BackupAssist.
Note: Drives that have been encrypted with NTFS compression cannot be used for Automated System Recovery disaster recovery.
![]() Setting the backup user identity
Setting the backup user identity
![]() Read more about Automated System Recovery (ASR)
Read more about Automated System Recovery (ASR)
![]() Read more about NTFS encryption in Windows
Read more about NTFS encryption in Windows
To enable NTFS encryption:
- Check Turn on NTFS encryption.