BackupAssist provides a utility for restoring one or more SQL databases to either a local or remote SQL server in just a few simple steps. The utility also lets you restore a SQL database to a specific point in time, provided you have a transaction log backup to restore from.
The databases you wish to restore must already exist on the SQL server; if they do not you can either choose to use the SQL Restore Utility to restore the master database first, which will result in recreating all databases on the server, or you can manually recreate each database you wish to restore. If you are restoring your SQL server after a disaster or new installation, it is advised that you restore the master database before restoring any other database.
![]() Restoring the master database
Restoring the master database
To restore one or more databases:
- Click
 Restore in the navigation bar.
 - Click
 SQL restore.
 - Choose the SQL server instance you wish to restore to from either the list of local or remote servers detected.
- Check Selected databases
- Note: checking this option will not let you restore the master database. if you want to restore the master database check Master database recovery as well. The master database will be restored before other databases.
 Restoring the master database
- Note: checking this option will not let you restore the master database. if you want to restore the master database check Master database recovery as well. The master database will be restored before other databases.
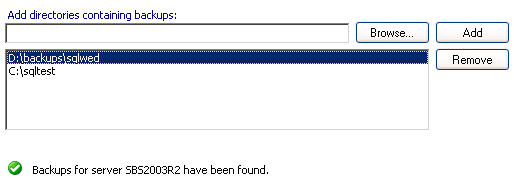
- Specify the path where the database backup files reside (in .BAK format) either by typing it directly in the Add directories containing backups field or by browsing for it.
- Note: this is typically the SQL directory used in your BackupAssist backup job. Each database backup created is stored in the SQL directory in .BAK format (a separate file for each database) before being copied to the backup destination (tape drive, external hdd, REV drive, etc). If the backup files for your databases are not available you may need to first restore them from your backup media using NTBackup.
Restoring data files using NTBackup - Click Add if the path was entered manually. You can add as many directories as you like. BackupAssist will search each directory added and determine if there are database backups that can be restored from.
- Click Next and you will be presented with a list of databases that can be restored using the SQL backup files specified in the previous step. The list may take time to generate depending on the number of backup files.
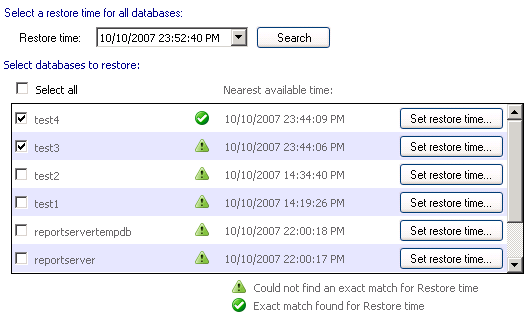
- Check each database in the list that you wish to restore.
- To restore all databases to the same point in time, specify the time in the Restore time drop-down menu and click Search.
- If the restore time specified is not available from the supplied backup files, a
 warning icon will appear to the right of the database and the nearest available time to that specified that the database can be restored to will be indicated.
 - If the restore time selected is available, a
 success icon will appear to the right of the database.
- If the restore time specified is not available from the supplied backup files, a
- If you wish to specify a different restore time for each database individually, click Set restore time to the right of the appropriate database:
- To restore all databases to the same point in time, specify the time in the Restore time drop-down menu and click Search.
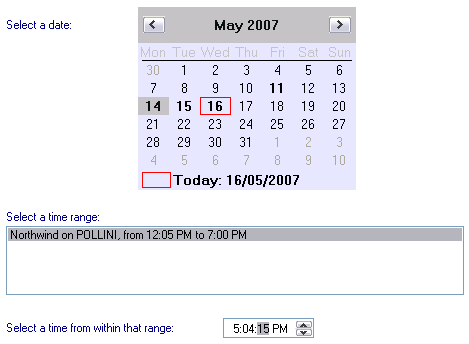
- The available dates that the database can be restored to appear in bold on the calendar. Select one of these dates from the calendar.
- A list of time ranges will appear in the Select a time range box. You can restore the database to any point in time between any of the time ranges listed.
- Select a time range from the list and input a specific point in time to restore the database to in the Select a time from within that range field.
- Once you have set the restore times for all databases you wish to restore click Next.
- Click Start restore to the right of the window to restore all databases selected. Click Next once the restore process completes.
- Future transaction log backups cannot be used to restore a database to a specific point in time until a full backup runs so it is recommended that you now run a full backup of the databases that were restored. Click Start full backup. Full backups of these databases will be stored in the same folder as the backup files you just restored from.
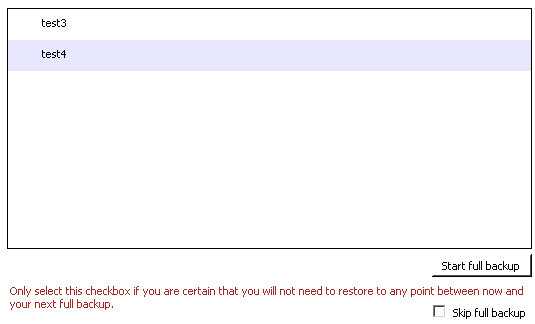
- If your backup schedule already includes a full backup as the next SQL backup and you are certain you will not need to restore these databases to a specific point in time between the restoration and the next full backup you can check Skip full backup and click Finish.
- If your backup schedule already includes a full backup as the next SQL backup and you are certain you will not need to restore these databases to a specific point in time between the restoration and the next full backup you can check Skip full backup and click Finish.