 Using the BackupAssist Restore Console you can browse through BackupAssist backups for data to restore. Data can be restored to either its original location or to an alternate location of your choosing.
Using the Browse option you can restore:
- Files and folders
 File Replication,
  Zip,
Zip,  Rsync, and
  Imaging backups
 - VSS applications (Exchange, SQL, SharePoint)
File Replication, Zip, Rsync and Imaging backups. - System State
File Replication and Zip backups - Exchange mailboxes and public folders
Any backup that used the Exchange Mailbox Add-on to backup mailboxes to PST files.
The Browse option is best used if you know the date of the backup you wish to restore data from, you want to restore the entire contents of a backup set, or if you need to restore an entire application, the System State, or Exchange mailbox data. If you want to restore a particular file from any of your backup sets, and you know the name of the file, use the File search option. The File search option also helps you locate multiple versions of the same file across all your backup sets.
![]() Using File search to search for and restore individual files
Using File search to search for and restore individual files
To browse through BackupAssist backups and select data to restore:
- Click
 Restore in the navigation bar.
 - Click
 BackupAssist Restore Console.
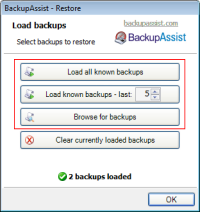
 - Load the relevant backups from which you want to restore:
 Help with loading / browsing for backup catalogues
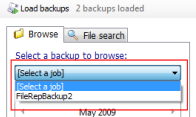
- Choose the job that corresponds to the backup from which you want to restore:
- Use the calendar to select the date of the backup from which you want to restore:
- Note: dates on which backups are available are marked in bold on the calendar.
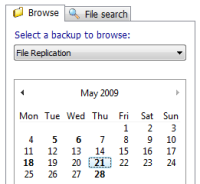
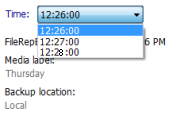
- Optional: if multiple backups were created on the same day a Time drop-down menu will appear below the calendar, which you can use this menu to select the appropriate backup:
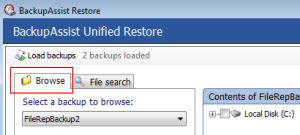
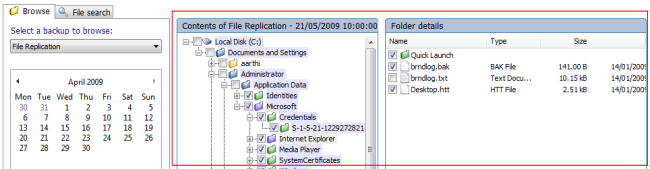
- Use the middle pane and right-most pane to expand the loaded backup set and select the data you wish to restore.
- Files and folders
Use the checkboxes to the left of any drive, folder or file that you want to restore.
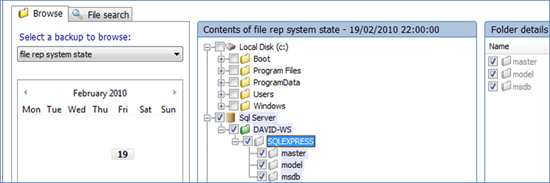
- VSS applications (File Replication, Zip, Rsync and Windows Imaging backups)
If any VSS application backups are included in the loaded backup set, such as Exchange, SQL, SharePoint or Hyper-V Guest VMs, you can use the checkbox to the left of any application to select it for restoration. You can also expand each application and select individual components (databases, storage groups, etc) to restore..
- How the VSS application restore works: VSS supports live application restore, which means that you do not need to stop a live application before restoring a previous version of it from a backup. If any Windows services need to be stopped and restarted during an application restore this will happen automatically. If, for example, you are recovering an SQL Server and the SQL database being restored is in use, SQL Server will automatically deny access to the database until the restore is complete. Databases that are not part of the restore will not be affected unless the master database is being restored, in which case the entire SQL service will be stopped for the duration of the restore. While we recommend that you notify all users to stop using any applications before commencing a VSS application restore, the restore process will not be affected if the applications are in use.
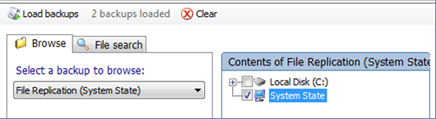
- System State (File Replication, Zip, and Windows Imaging backups)
If the System State is included in the loaded backup set you can use the checkbox to the left of the System State to select it for restoration.
- Note: you cannot restore the System State from an Image backup using the BackupAssist Restore Console. You can, however, use the built-in Windows tool, wbadmin. Visit wbadmin.info for instructions.
- Note: files located on the Windows system drive (e.g. C: drive) may also be available for restore, even though only the System State was selected for backup. These files are those required for a System State backup. If you choose to restore individual files from this list and not the actual System State, the System State will not be restored, and the files themselves may not restore correctly. If you choose to restore these files together with the System State, the System State option will override selections where there is an overlap.
- Note: a reboot is required to complete a System State restore. Before the restore starts, BackupAssist will take a VSS snapshot of the volumes to be restored. This allows the user to manually roll back to a pre-restore state, if necessary, using Windows' previous versions feature.
- Mailboxes and public folders
- Please note: mailboxes must be restored independently of other data. If you need to restore other data, such as files, applications or the System State, as well as Exchange mailbox data you will need to complete this as a separate restore task.

- Files and folders
- Once you have selected the data you wish to restore click the Restore to button to the bottom right of the window.

- You will then be taken to the Restore confirmation screen:
-
Files, VSS applications and the System State
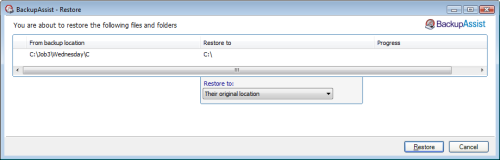
Here you can choose whether to restore your data to either its original location or to an alternate location of your choosing. If you select an alternate location click [...] and browse to the path where you would like files to be restored to.- Note: Restoring to an alternate location will use a minimal path. For example, restoring a single file to an alternate location will just copy that single file to the alternate location, without re-creating the original folder structure as well.
- Exchange mailboxes and public folders
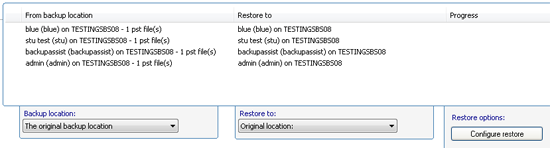
In the middle drop-down menu you can choose where you want to restore your mailbox and public folders to:- Original location: the mailboxes selected for restore will be copied directly back into the Exchange Server that they were originally exported from.
- Alternate server: the mailboxes selected for restore will be copied to an alternate Exchange Server of your choosing. Click the Select button to choose an alternate server to restore to. If no Exchange Servers are detected, click the Select button to search for one.
- Alternate path: all mailboxes will be restored as separate PST files to a single folder of your choosing. you can have all your mailbox PST backups. You can then open up any of the PST files extracted with Outlook and drag-and-drop the required mail items back a the user's live mailbox. This option is useful if your PST backups are distributed across multiple folders (e.g. you used a grouping period or modified your mailbox backup directory between backup runs).
If you choose to restore your mailboxes to either their original location or an alternate server, you can click the Configure restore button located under 'Restore options' to change how mailboxes are restored. Here you can individually specify which mailbox each PST mailbox backup should overwrite in your Exchange Server. This is useful if an Exchange Server mailbox has been renamed since being backed up, or if you want to overwrite one mailbox with another.
-
Files, VSS applications and the System State
- Once you have selected where to restore your data click Restore to the bottom right of the window. Once the restore is complete the result will be printed to the left of the window. Click the blue link to view the restore report.
- Note: if BackupAssist cannot access the backup location (for example, the backup may be stored on an external hard drive that is not connected to the machine) you will be prompted to either connect the appropriate media or specify an alternate location where the backup can be found.
