Microsoft Azure is a cloud storage solution that can be used as a backup destination by BackupAssist ER. To use this cloud storage, you need to create an Azure account, then log into the Azure portal to create or open a storage account and get the connection string that BackupAssist ER will use.
Azure account
To create an Azure account, go to https://azure.microsoft.com/. You can select Start for free or review the purchase options. Once you have created your account, you can log into the Azure portal and manage your storage.
Storage accounts and containers
A storage account is like a destination in Azure that BackupAssist ER jobs can use. Within a storage account are containers (called blobs) and each backup job uses its own container. A BackupAssist ER job will create its container using the name you provide in the backup job. A container cannot be used by different jobs, but different jobs can use the same storage account.
Connection strings
Each storage account has a pair of connection strings - codes that are used by applications like BackupAssist ER to locate and access a storage account. Each application will use the same string but two strings are provided so that you can regenerate a new string with invalidating the string currently being used.
Using Azure with BackupAssist ER
This section explains how to create a storage account and how to get a connection string.
To learn more, see the official Microsoft Azure documentation.
How to create a storage account
If you do not have a storage account for your backup job, you will need to create one.
To create a storage account:
- Log into your Azure account. and open the portal.
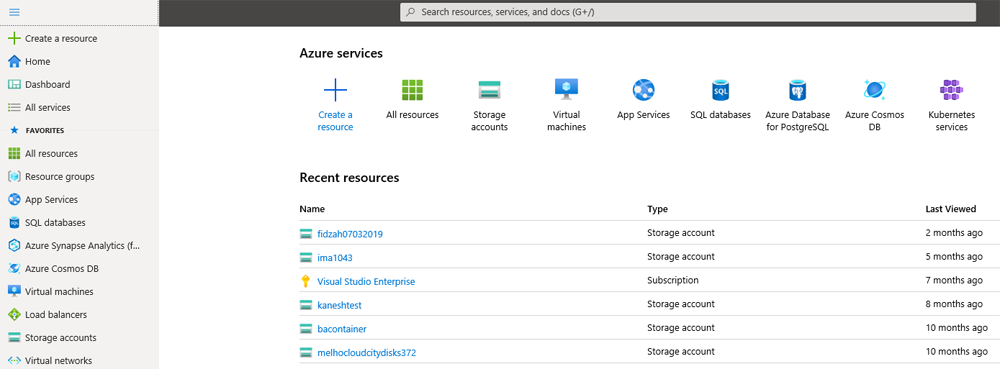
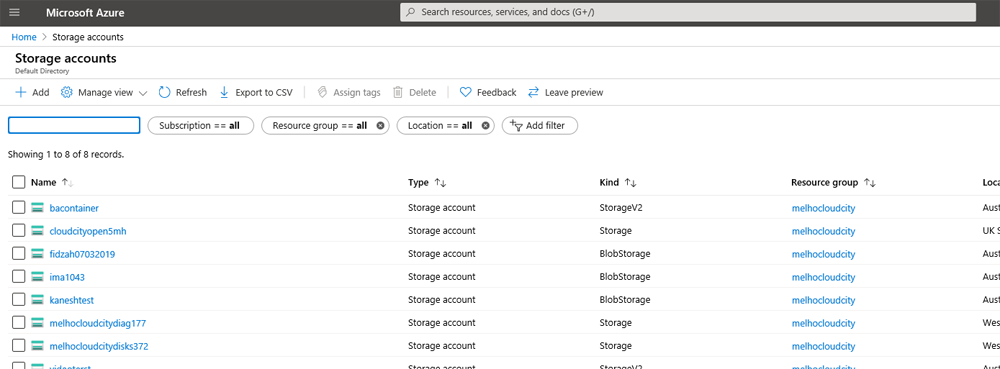
- From the portal's Home page, click Storage accounts.
- Click Add + on the Storage accounts page.
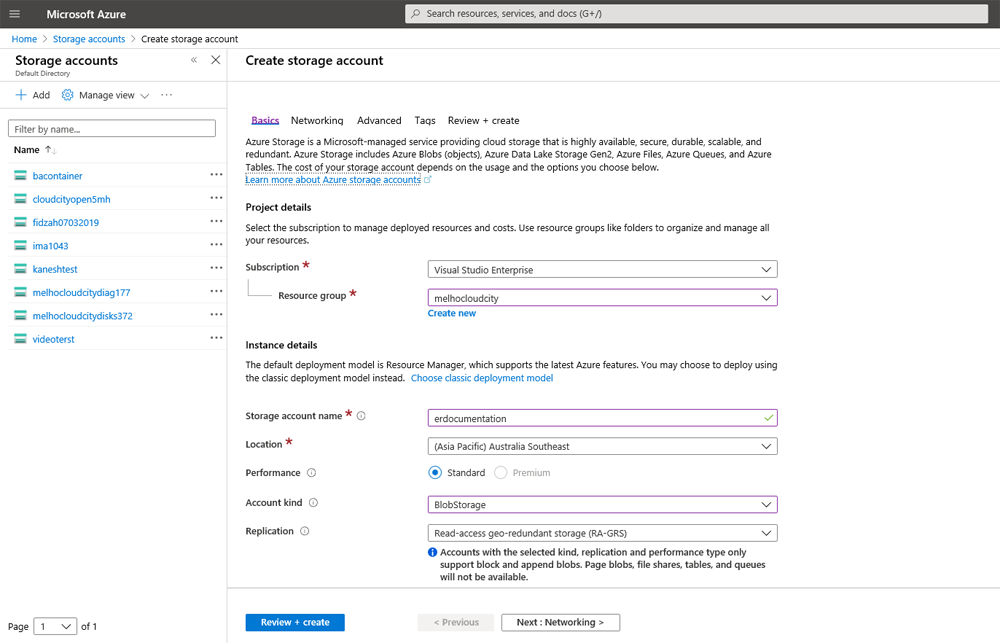
- Review and update the storage account creation fields.
- For Account kind select BlobStorage.
- If you do not have a Resource group, use Create new to create one. This resource group can be used for all storage accounts that you create for BackupAssist ER.
- Some of the selections made can affect the cost of your storage. To learn more, see our Estimating cloud storage guide.
- Once you have reviewed and updated the required fields, select Create and Azure will create and deploy the storage account.
You can select Storage accounts from the Azure services menu or the hamburger menu on the top left.
Use the progress button at the bottom of the screen to review each page. The Basic page contains fields that require input.
Considerations:
How to get an Azure connection string
If you already have a storage account, you can use one of its connection strings for your backup job.
To get an Azure connection string:
- Log into your Azure account and open the portal.
- From the portal's Home page, select Storage accounts.
- Choose the storage account that you want to use.
- Select Access Keys from the Settings menu.
- Use the copy button to take a copy of the connection string that you will use.
You can select Storage accounts from the Azure services menu or the hamburger menu on the top right.
This will open the storage account and display the menus and options used to manage that account.
The page will display the keys available. Each key has a key code and a connection string.
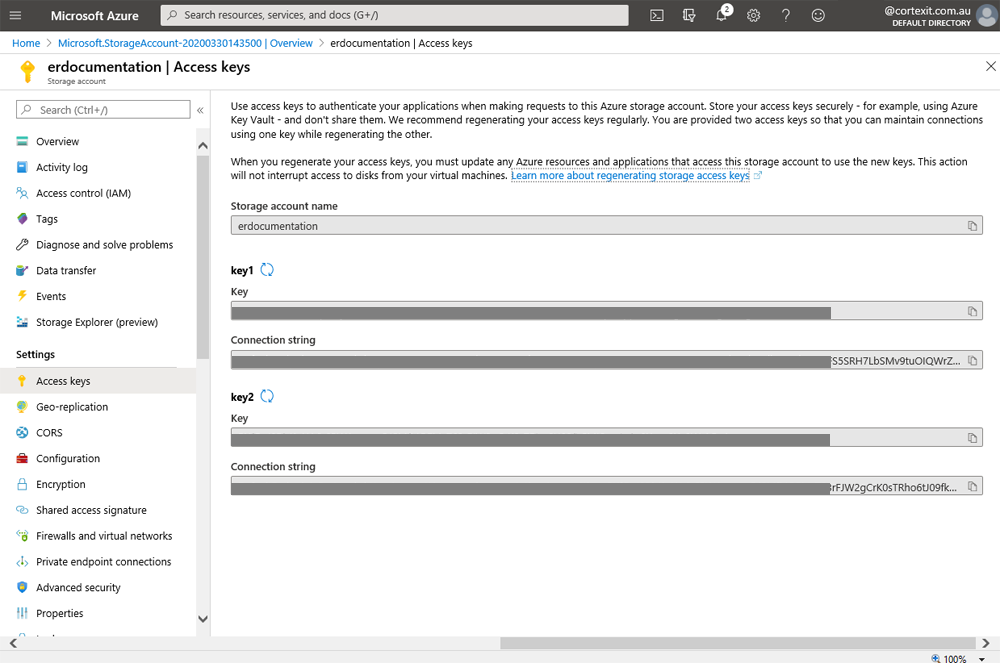
Note: Each BackupAssist ER job will use the same string. Microsoft recommends regularly rotating and regenerating your keys so two strings are provided so that you can regenerate a new string without invalidating the string being used.
The string can now be entered into the storage location tab when you create a disk to disk to cloud backup job.
Backing up to Azure with BackupAssist ER
To create a Disk to disk to Azure cloud backup job:
- Select the Jobs tab.
- Select New from the Jobs tab menu.
- Select Create backup from the Disk to disk to cloud section.
- Fill in the General tab.
- Job name - enter a name for this backup job.
- Description - you can add a description to help identify or classify the job.
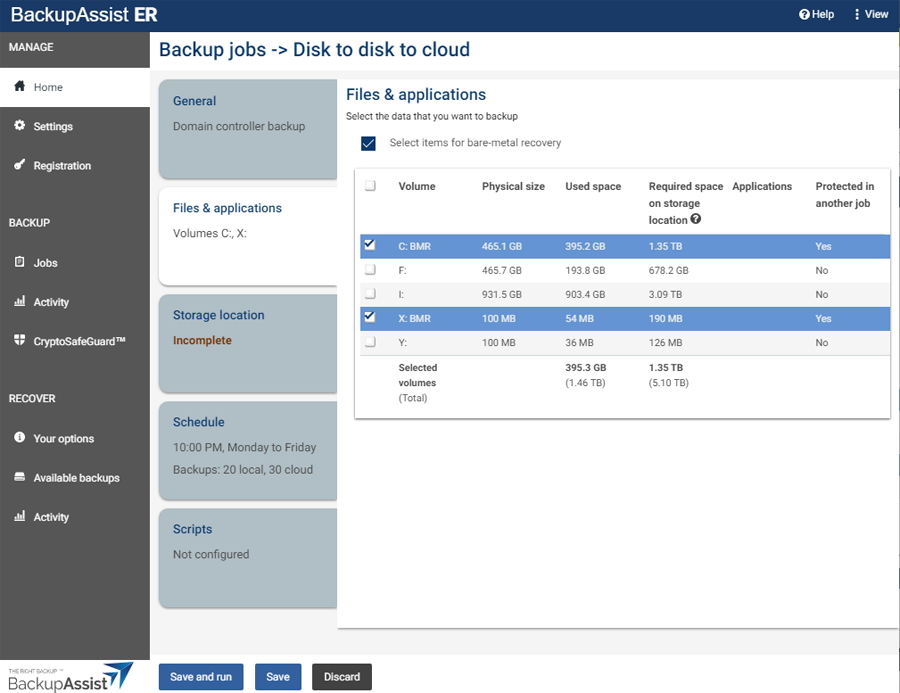
- Select and review the Files & applications tab.
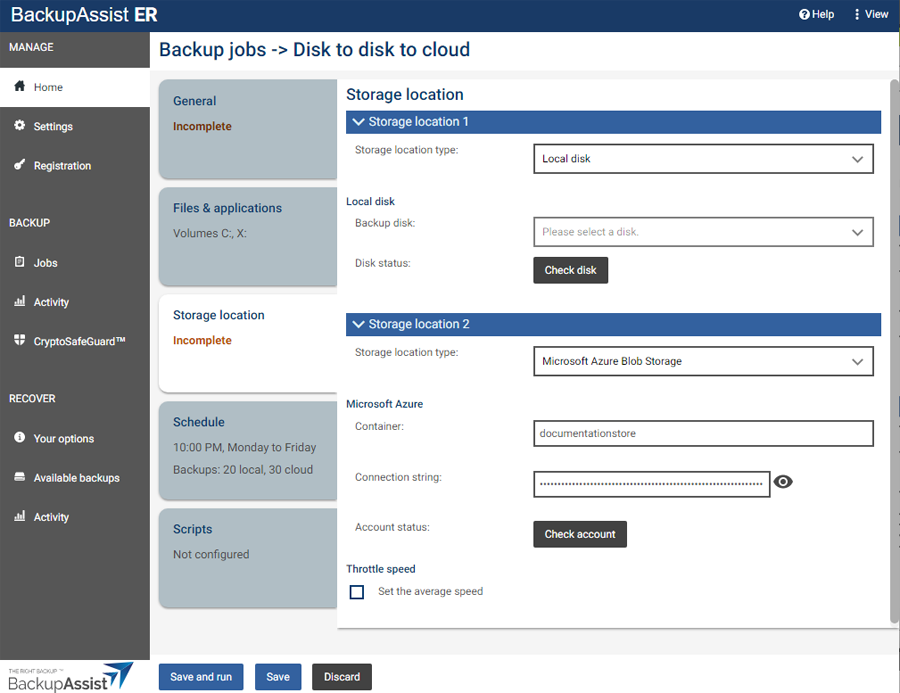
- Select and fill in the Storage Location tab.
- Use the Backup disk field to select the drive letter assigned to the disk you are backing up to.
- Select Check disk to confirm that the selected destination is attached and accessible.
- Use the Network path (UNC) field to enter the server or device name. For example \\qnap01\F\backups\fileserver01
- If the destination requires authentication, select the Network credential option Specify credentials, and enter the credentials into the fields provided. This is the username and password that BackupAssist ER will use to access the network location or NAS device.
- Select Check network location to confirm that the selected destination is attached and accessible.
- Container - Enter a name for your Azure container. BackupAssist ER will use this name to create the container. Provide a different name for each job as a different container must be used by each backup job. The name can only user lower-case characters, numbers and dashes.
- Connection string - enter the connection string for the storage account that you want this backup job to use. To get the connection string, log into the Azure portal, select the Storage account from the Resources list and select Access keys from the list of Settings. Under each key is a Connection string. Use the copy button to select a connection string from one of the key sections and paste it into the Connection string field.
- Account status - Select the Check account button. This step uses the information provided to test the connection to the cloud destination, and then creates the cloud container that the backup job will use.
-
Throttle speed - This option is used to set the average upload speed limit. To set the average speed, tick the box next to Set the average speed, then enter the value by typing it in or using the up / down arrows. When the limit is set, the instantaneous speed can go over or under that limit, but the average speed (over time) would stay under the defined limit.
- Select and review the Schedule tab
- Use the Perform backup once at to schedule a daily backup at the selected time.
- Use the Perform backups at the following times section to schedule multiple backups each day at the selected times.
- Use the Retention scheme section to change the number of backups that should be kept.
- Configure Scripts (optional).
- Complete backup job
- Save and run - will save and then start the backup job. The job's progress screen will open.
- Save - will save the job, which will run at the time scheduled.
- Discard - will cancel the job. All information entered will be lost.
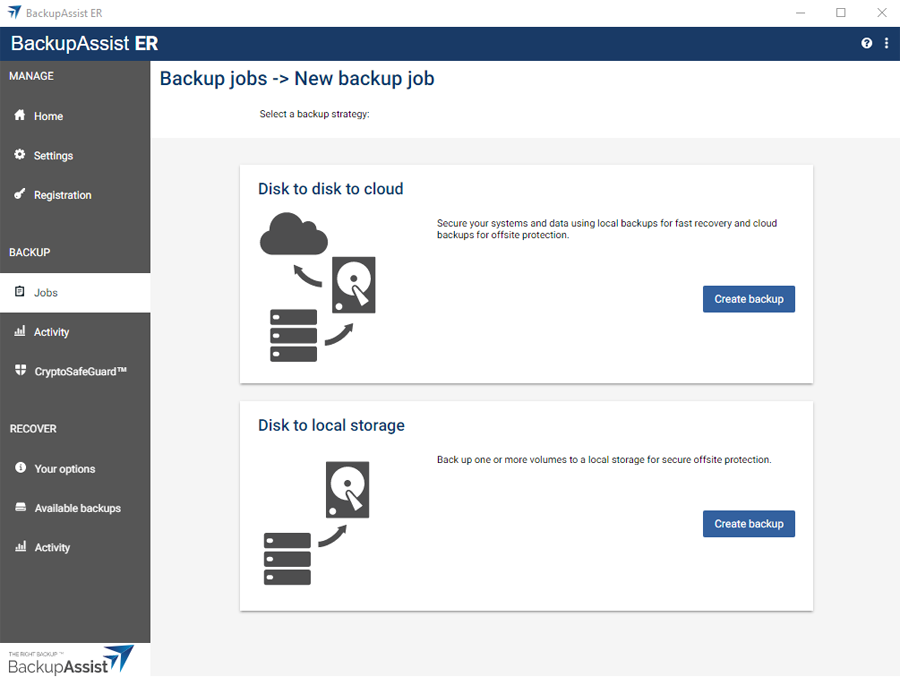
This will open the Disk to disk to cloud page and display the 4 tabs used to configure the job.
Fill in the General sections as follows:
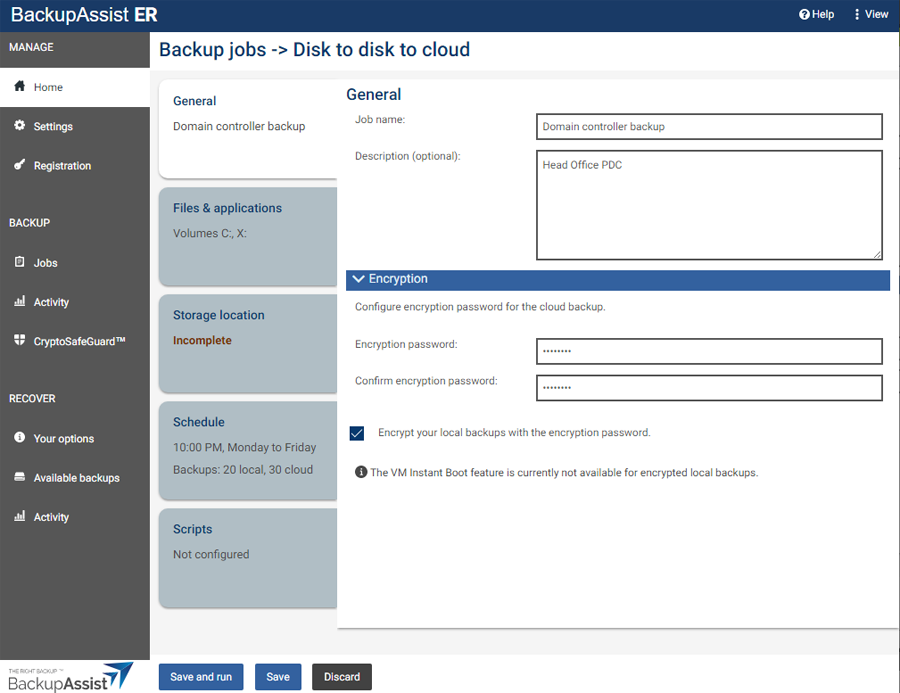
Encryption
All cloud backups are encrypted before the data is sent to your cloud provider. Enter a password into the Encryption password fields. This password will be used to encrypt this job's backups.
Tick the box next to Encrypt your local backups with the Encryption password if you also want to encrypt the local backup. The local backup will use the same password as the cloud backup.
Encrypted backups do not currently support VM Instant Boot
Note: You will be prompted to enter this encryption password if you ever use this backup for a recovery. It is therefore important that you keep a copy of your password in a safe place, as we cannot retrieve passwords if they are lost or forgotten.
The volume with the server's operating system C: BMR (bare-metal recovery) is selected by default. Use the tick boxes to change the selected volumes as required.
To ensure that the backup can be used for a bare-metal recovery, tick Select items for a bare-metal recovery. This will select all volumes needed for a full server recovery, for example, if a server has a system boot volume and an operating system volume.
If there are SQL, Exchange or Hyper-V servers on the selected volumes, all volumes required to create application-consistent backups of those VSS applications will also be selected. These selections should not be changed.
Note: BackupAssist ER requires full volume selections because only full volume backups can be used for a bare-metal recovery. This means your system is cyber-resilient and protected against system failures, hardware loss, virus infections and ransomware.
This section is used to provide details for both the local destination (Storage location 1) and the cloud destination (Storage location 2).
Storage location 1 (local)
Choose the local storage location from the Storage location type field. The selected volumes will be backed up to here and replicated to the cloud location provided in Storage location 2.
If you chose Local disk:
If you chose Network location:
Storage location 2 (Azure cloud)
Complete the following Microsoft Azure configurations:
To learn more about the naming conventions see the "Container Names" section in Microsoft's naming guide.
Configure how many times a day and at what times the backup job will run.
Review the schedule selections as follows:

The Scripts tab is used to add scripted processes to the backup job. Scripts support an extensive range of variables, and can be run before a backup and after a backup (successful or failed).
Before adding custom scripts, please check BackupAssist ER and the documentation to see if the function you require is already available.
To learn more, see the Adding backup scripts guide.

To complete the backup job, select one of the following options:
Note: The first time the job runs will be a full backup of all data. This will take longer than subsequent backups which will be incremental. For this reason, you may want to run the first backup at a time that minimizes the impact on other backup jobs and your network.