The recovery process is designed to recover a server to a previous operating state, in the event of a hardware or operating system failure. The recovery process will begin by starting your computer using a Bootable RecoverAssist Media or a Bootable Backup Media. The process will then load a recovery environment, which you can use to select the location of the backup to be used, and to start the recovery.
The RecoverAssist recovery environment works on backups created by:
Option 1 - A bootable media and a bare-metal backup
This option requires a Bootable RecoverAssist Media to start the server, and a System Protection bare-metal backup. The backup can be on another media or in an accessible network location.
To learn more, see Create a recovery media
Option 2 - A Bootable Backup Media
This option requires a Bootable Backup Media. This media contains both RecoverAssist and an System Protection bare-metal backup.
To learn more, see Legacy System Protection
To perform a disaster recovery, you will need a backup that can be used by the recovery environment. The contents of the backup and how it was made are important considerations. These requirements are explained in detail below.
The 2 critical backup requirements are:
- The backup must be an image backup. For example, a System Protection bare-metal backup. This creates a set of VHD or VHDX image files.
- The backup must be a bare-metal backup of the computer. For example, the computer’s settings and operating system (as well as the data) must be in the backup. When creating a System Protection backup, you must select Backup up the Entire System.
If a backup cannot be detected by the recovery environment, then it could be a problem with the backup. Check your backup to ensure it meets the requirements listed above
A computer’s BIOS or EFI (a chip containing basic hardware settings) detects the hardware needed to start the computer. When you turn your computer on, the BIOS / EFI will display some of the steps onscreen and beep to confirm that it has run successfully. It is important to know if your backup and recovery computers use BIOS or EFI because the firmware compatibility will determine your recovery options.
- Backups made on a computer with one type of firmware cannot be used to start a computer that uses a different type of firmware.
- EFI booting can be turned off. When EFI is turned off, the system will use BIOS to boot.
This table shows the firmware compatibility of BIOS and EFI computers.
| Backups of a BIOS machine | Backups of an EFI machine | |
| Recover to a BIOS machine | Compatible | Incompatible |
| Recover to an EFI machine | Incompatible | Compatible |
Warning: Advanced format (4k sector) drives using BIOS may not work in certain environments. We recommend performing a test recovery to ensure you environment is supported. Performing test recoveries are an important part of disaster recovery planning.
Supported bootable media
For a standalone bootable recovery media: External USB hard drives; USB thumb drives and SD cards; CDs, DVDs and BDs
For a Bootable Backup Media: External USB hard drives
Memory
The computer being recovered must have at least 4GB of RAM.
Disks
When planning a recovery, it is important to know the details of the disks that were backed up (to create the backup), and the disks on the computer that you plan to recover (using that backup).
The 2 critical disk requirements for a recovery are:
- The computer that is being recovered, must have a physical disk the same size, or larger than, the physical disk that the backup was made from. For example, if your backup contains 200GB from a 1TB drive, the physical disk of the computer that you are recovering, must be 1TB or larger.
- If the backup used in a recovery contains data from multiple disks, the computer that is being recovered must contain at least the same number of disks. For example, if the backup image contains data from 2 physical disks, then the computer being recovered must have at least 2 physical disks.
Note: The computer being recovered must have a physical disk setup that's compatible with the computer that was backed up.
Recovery process
The following steps explain how to perform a recovery.
- Attach the bootable media to the server
- Start the computer
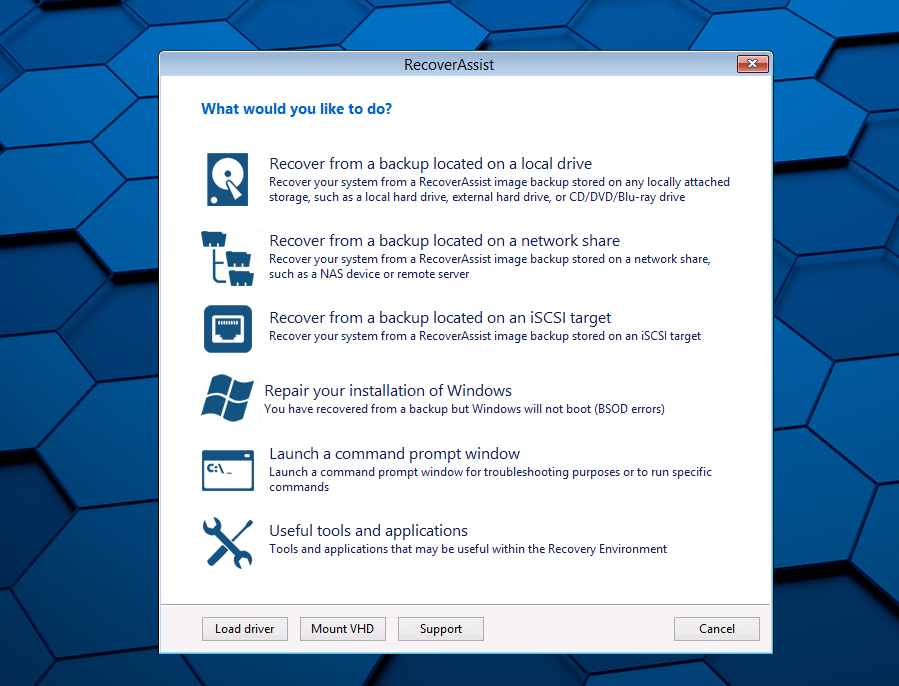
- Make your RecoverAssist selections
- Recover from a backup located on a local drive
- Recover from a backup located on a network share
- Recover from a backup located on an iSCSI target
- Repair your installation of Windows
- Launch a command prompt window
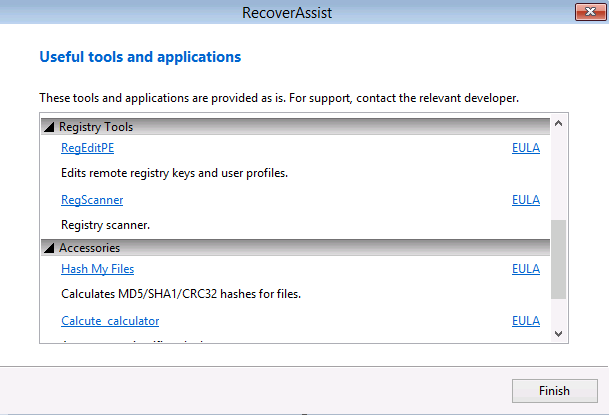
- Useful tools and applications
- Clicking on the name of an application will launch that application.
- These tools can be used to perform diagnostics and troubleshoot problems.
- Load driver - loads any additional device drivers that were not included when creating the recovery environment.
- Mount VHD - mounts any VHD such as Windows Backup images. After mounting the VHD, you will be able to access the files using a local drive letter. This option is not used to mount Data containers.
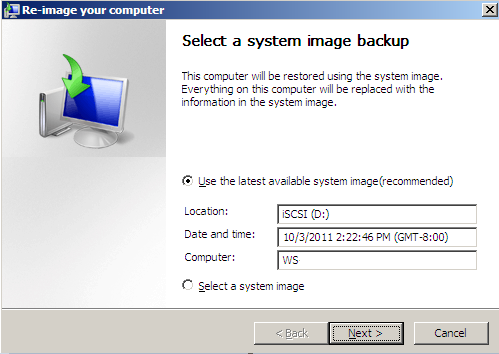
- Select an image backup
- If backups are found, you will be given a chance to choose which backup to use then select Next..
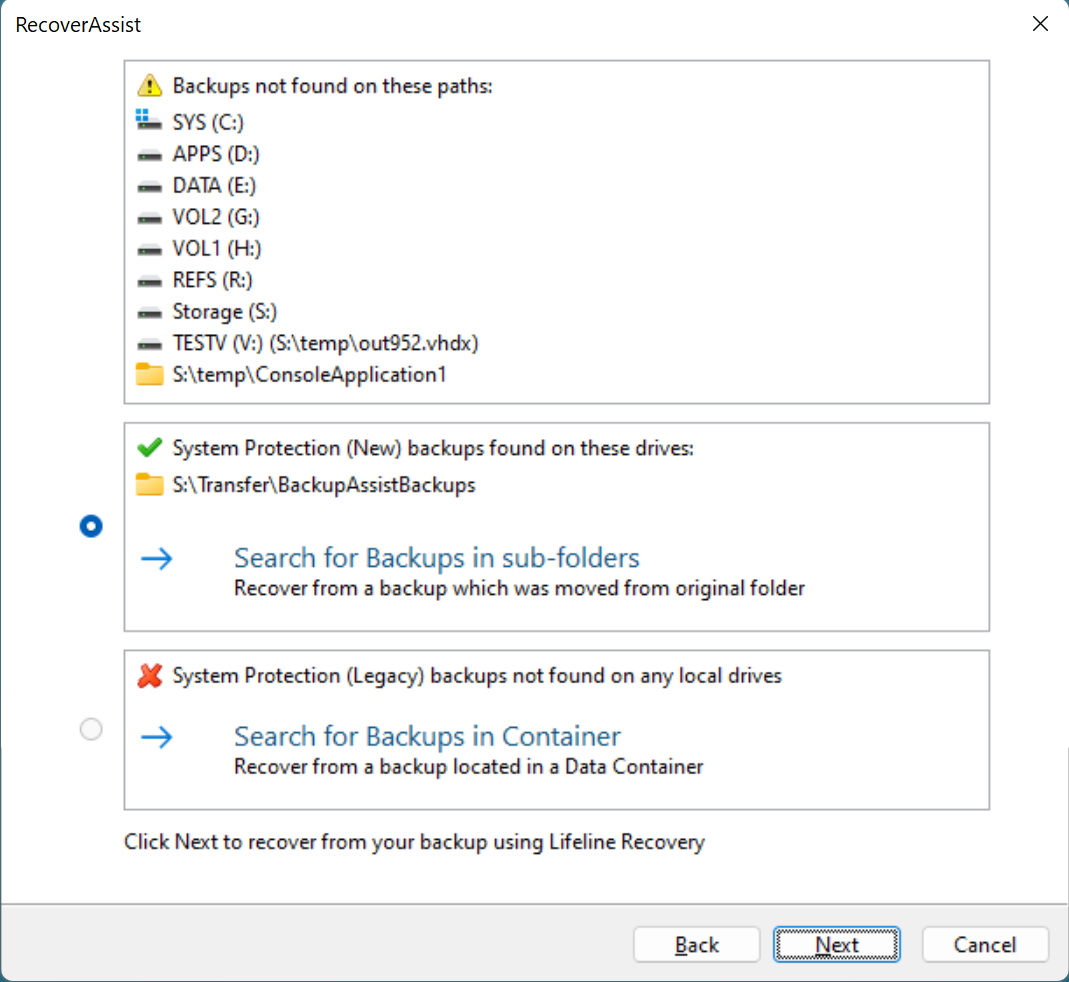
- If backups are not found in local drives or network location you selected:
- For (New) System Protection backups (incl. Advanced System Protection and Cloud Backup), you can choose to Search for Backups in sub-folders
- For (Legacy) System Protection backups, you can choose to Search for Backups in Data Container
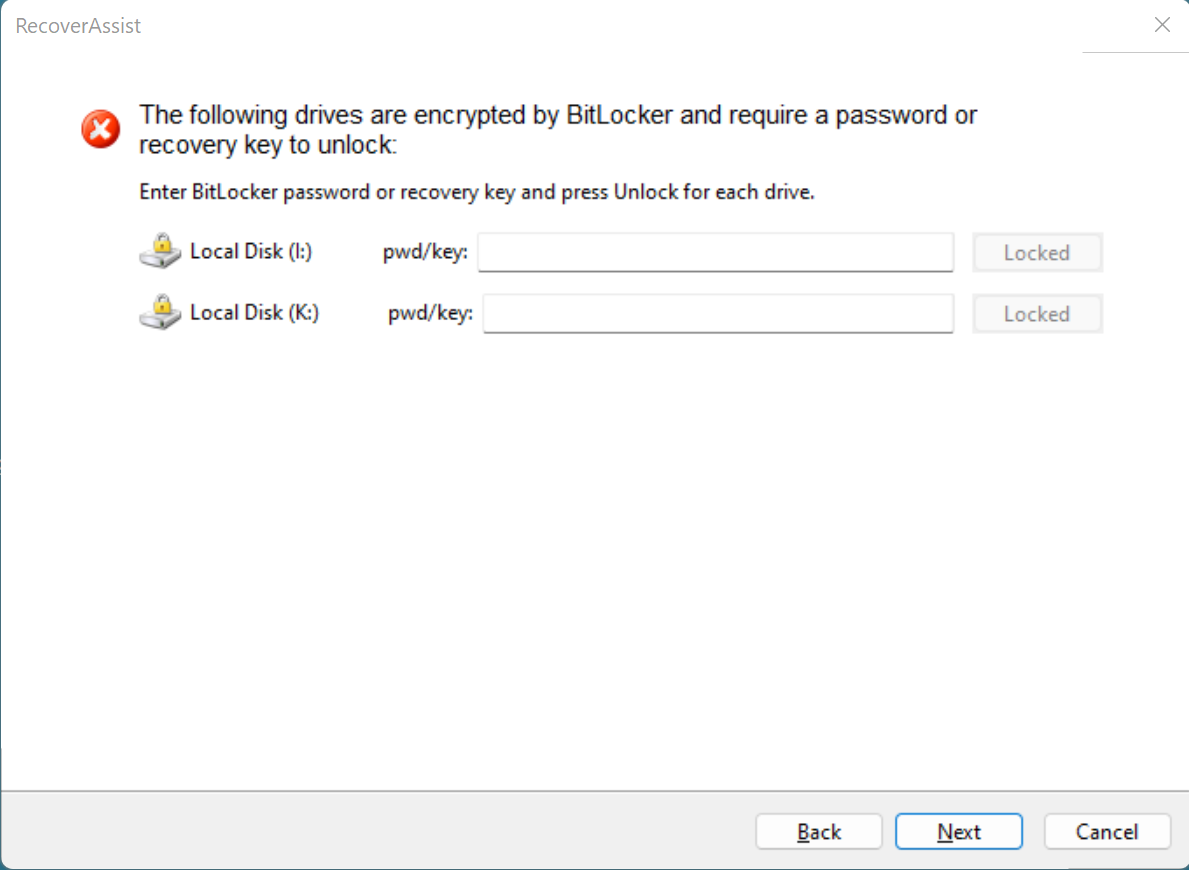
- If the backup is BitLocker protected, RecoverAssist will prompt for the BitLocker password.
- Start the recovery
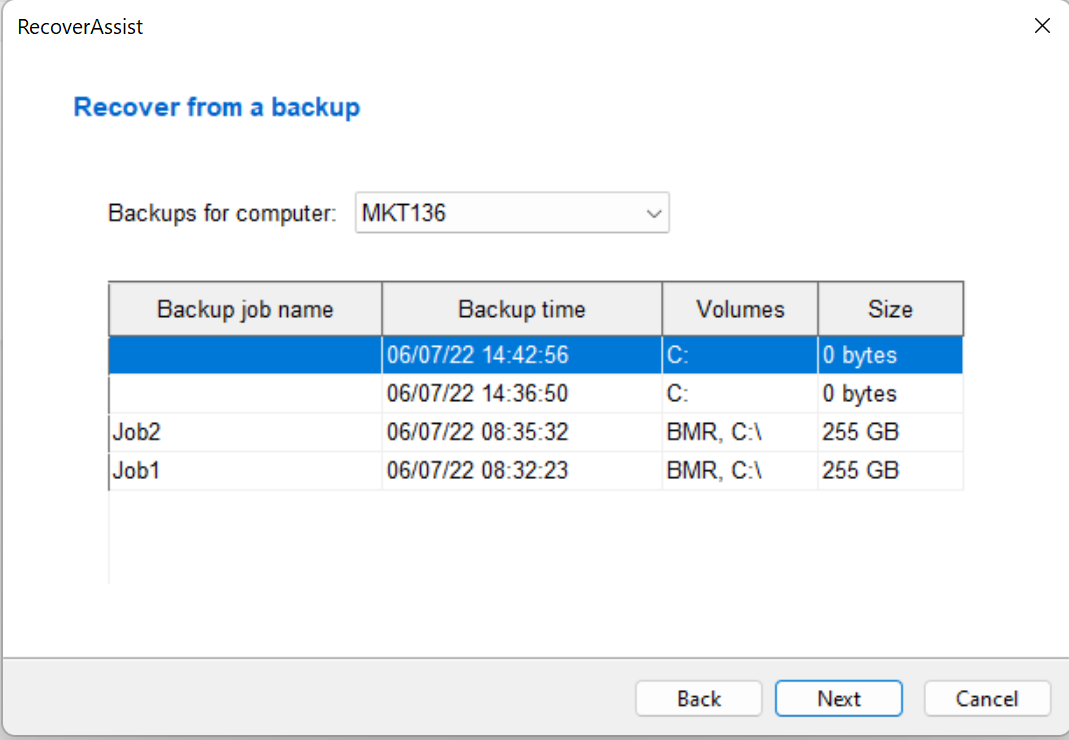
- From the Recover from a backup dialog, select the backup you would like to recover from. If the backup storage has backup of multiple computers, use the drop down list to select the computer you want to recover. Select Next.
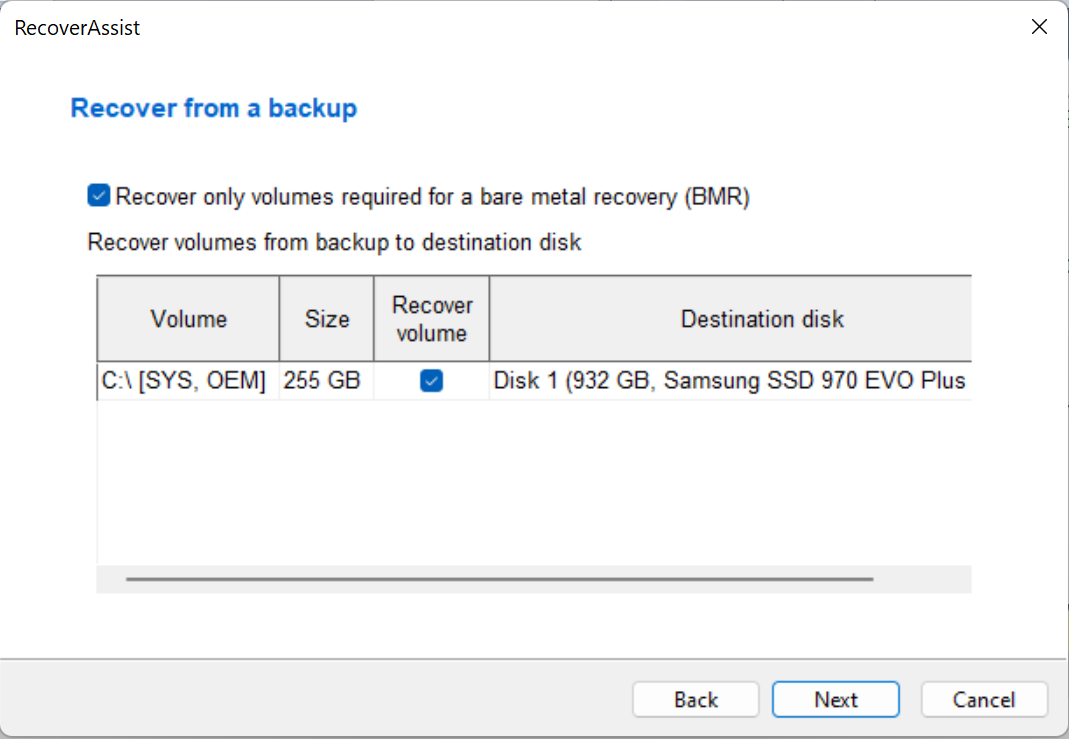
- In the next step, you will presented with the list of Volumes that you can include and exclude from the recovery, and the Destination disk that you want to recover into. Select Next to start the recovery process.
Connect /insert the Bootable RecoverAssist Media or the Bootable Backup Media to the system that is to be recovered.
Your computer should detect the bootable media and begin the boot process. Understanding the boot process can assist if a problem is encountered.
BIOS stage
The system will access its BIOS or EFI and detect the hardware needed to boot. It will display some of the steps onscreen and beep to confirm that it has run successfully. Additional beeps can indicate a problem detecting the required hardware.
Note: EFI booting can be turned off and the system will revert to BIOS mode
EFI Systems that have been backed up must be restored by booting RecoverAssist in EFI mode.
EFI Systems can't be restored to BIOS systems and BIOS systems cannot be restored to EFI systems
O/S stage
Once the system has completed the BIOS stage, it will look for the operating system boot files. The BIOS will be configured with a device order to search for the location of these boot files. The attached bootable media must be configured in this BIOS setting (boot device order) before the C drive. To check or change the boot device order, you will need to access the BIOS configurations by pressing a key during the BIOS stage. The key stroke required may be displayed in screen during the BIOS post process, or noted in your hardware / server documentation.
After the system has started, you will see a progress bar or a blank screen then a Windows logo, depending on the operating system being recovered. Then the RecoverAssist recovery environment will load.
Use this option if your backup is located on an internal or locally attached drive.
The Recovery Environment will scan the available media for backup images, and display the backups that were found.
Use this option to provide the location of the backups on network share. The Recovery environment will open a screen that allows you to configure the network card. Network drivers added to the RecoverAssist Builder, are automatically loaded as part of the boot process.
You can modify any TCP/IP network settings or review the automatically assigned settings, before advancing to select the location of the backup. RecoverAssist will search the specified location for backup images and display any images found.
Use this option to provide the location of the backups on an iSCSI target. The Recovery environment will open a screen that allows you to configure the network card. Network drivers added to the RecoverAssist Builder, are automatically loaded as part of the boot process.
You can modify any TCP/IP network settings or review the automatically assigned settings, before advancing to select the location of the backup. RecoverAssist will search the specified location for backup images and display any images found.
This option loads the Windows Recovery Environment and allows you to attempt a repair of the operating system files that caused the system to bluescreen or the Windows load failure.
Using the repair function is not necessary for systems that are recovered within the RecoverAssist recovery environment.
This option allows the user to launch a command prompt in order to run the various command line tools included with RecoverAssist.
The tools that can be run include diskpart.exe, bootsect.exe, regedit.exe.
This option will display the applications and tools that you selected to include when you created your RecoverAssist media.
At the bottom of the Recovery environment UI are three buttons that provide access to additional recovery features.
When you select a Recover from a backup located on ... option, RecoverAssist will scan the selected location (local drive, network share or iSCSI target) for image backups.
Disaster Recovery resources
BackupAssist's blog includes Disaster Recovery related articles that explain best practices and advice on how to make the most of BackupAssist in your disaster recovery process.
- A disaster recovery graphic that explains a recovery in 4 simple steps. Read the article.
- How to plan for a BackupAssist / RecoverAssist recovery. Read the article.
- P2V fir disaster recovery. Read the article.
- How to perform a P2V recovery with BackupAssist. Read more.
