This guide explains how to use MultiSite Manager to remotely administer your BackupAssist Classic Installations across the internet. MultiSite Manager is installed onto a computer and interfaced with using a web application.
Opening MultiSite Manager
Once you have set up MultiSite Manager you can open the application using either the shortcut on the computer that MultiSite Manager is installed on, or by entering the MultiSite Manager's FQDN and port into a web browser.
MultiSite Manager is opened using one of the following methods:
The desktop shortcut
This shortcut will appear when MultiSite Manager is installed.
Select the Windows Start button > All Programs > BackupAssist MultiSite Manager vX > BackupAssist MultiSite Manager.
Note: A browser warning will appear if you use HTTPS. You can dismiss / ignore this warning as the shortcut uses the computer name, rather than a FQDN from the HTTPS SSL certificate.
A web browser shortcut (favorite)
For computers that do not have MultiSite Manager installed, you can open the MultiSite Manager web application using a web browser. Just enter the MultiSite Manager URL using the following format - HTTP (or HTTPS) ://< the MultiSite Managers FQDN or routable IP address>: port/index.
For example - http://servername:8455/index.
This is the same URL used by the computer that has MultiSite Manager installed.
When the web application opens in your browser, you will be prompted to enter a username and password. Once you are authenticated, the full UI will be displayed as shown in the screenshot below.
Note: If you have forgotten your username or password, you can select Forgot Password? This will prompt you to enter your MultiSite Manager account’s email address, and send you a link. Selecting the link will open a MultiSite Manager password reset page.
Navigating MultiSite Manager
MultiSite Manager has tabs down the side. The top tab will display either All Sites or Manage Site. The names and contents of tabs 2 and 3 will depend on whether All Sites or Manage Site is selected. You can use the breadcrumbs at the top of the UI to navigate back.
MultiSite Manager Navigation table
| Tab | Tab Name | Displays | Specific features | ||
| 1 | All Sites | All managed sites |
|
||
| 2 | Reports | MultiSite Manager reports and report configurations |
|
||
| 3 | Licenses | Licenses of all BackupAssist installations on all sites | Info only | ||
| 1 | Manage Site |
|
|
||
| 2 | Site Alerts | All Alerts for the site |
|
||
| 3 | Site Licenses | All BackupAssist licenses in the site |
|
All Sites tabs
The All Sites tab indicates that you are managing MultiSite Manager at the top level. When the All Site tab is displayed, the two tabs below it will be the Reports tab and Licensestab.
All Sites
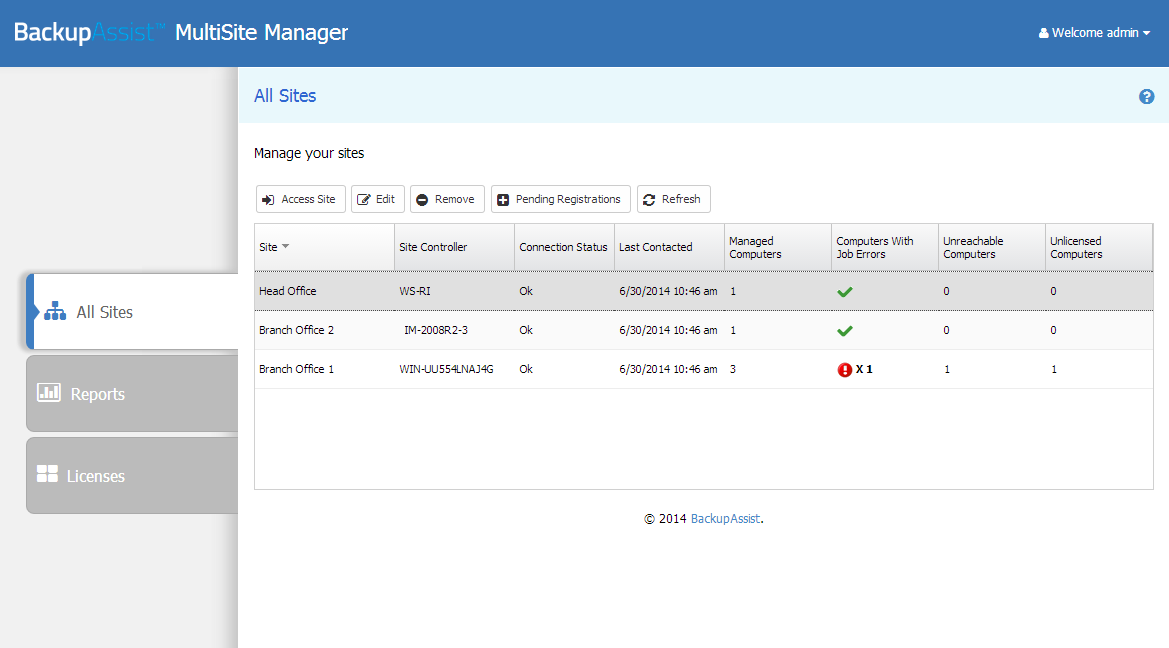
The All Sites tab displays the BackupAssist sites that have been registered to the MultiSite Manager. A site is a set of grouped computers located in the same local area network. Computers from different networks cannot be grouped into the same site.
The example below shows three sites, with columns of information about each site. Selecting the right edge of a column will open a drop-down list of sorting options, filters and column selections.
The following functions are available on the All Sites tab:
Access site
This button will take you to the Manage Site screen, for the site selected.
Edit
This button allows you to add or edit a comment. The comment will appear in the site’s Comment field.
Remove
This button will remove the selected site from MultiSite Manager.
Pending registrations
This button is used to approve Site Controllers that have been registered with the MultiSite Manager. This button will be red if registrations are awaiting approval. Selecting the Pending Registrations button will open a dialog and display any pending requests. You can then select the Approve tick next to the Site Controller to add its site to the MultiSite Manager.
Refresh
This button will refresh the listed sites and their information.
Reports
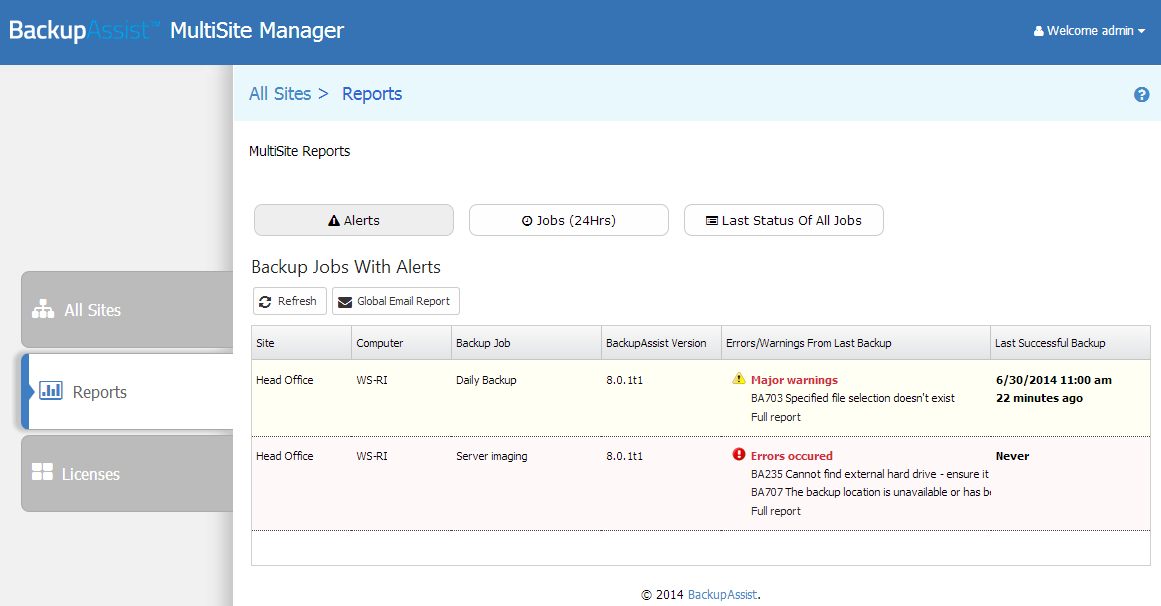
The Reports tab displays information about all backup jobs on all computers managed by MultiSite Manager. This information is divided into three screens: Alerts, Jobs (24hrs) and Last Status Of All Jobs. The Reports tab is also used to configure the Global Email Report.
The Reports tab will only display backup jobs that are enabled in BackupAssist. The drop-down arrow by each column’s heading allows you to select what columns are displayed.
Alerts
When you select this button, the Alerts screen will display.
- If you click Refresh, the alerts displayed will be updated.
- If you click on Full report in the Errors / Warning column, the backup report for that job opens.
- If you click the Knowledge base BA error code, the knowledgebase article for that error opens.
The Non-Contactable Machines section lists all computers in all sites that are not currently accessible.
Jobs (24Hrs)
When you select this button, all backup jobs that ran in the last 24 hours will be displayed. This will include both successful jobs and jobs with errors or warnings.
- The View Reports button will display the past backup jobs run by the selected backup job.
- The Refresh button will update the status of the backup jobs displayed.
Last Status Of All Jobs
When you select this button, the last backup report for every backup job will be displayed. This will include both successful backup jobs and backup jobs with errors / warnings.
- The View Reports button will display the past backup jobs of the selected backup job
- The Refresh button will update the status of the backup jobs displayed.
Global Email Report
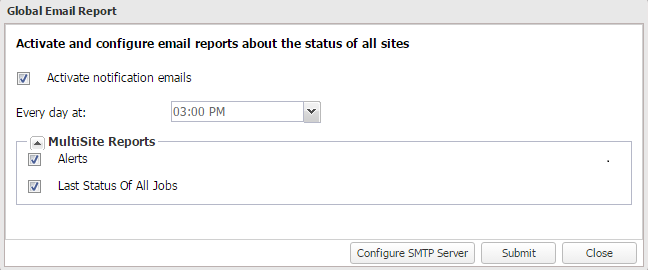
This button opens the Global Email Report configuration screen. Use this screen to enable daily email notifications. The Global Email Report provides a snapshot of all backup jobs in all sites.
To enable or disable Global Email Reports:
- Select or deselect Activate notification emails. This is selected by default.
- Use the Every day at field to enter the time the notifications are to be sent at.
- Select the reports to be sent by putting a tick beside the report names: Alert, Last Status Of All Jobs.
- Select Submit.
The Configure SMTP Server button is a link to the Welcome menu’s MultiSite Manager User Guide.
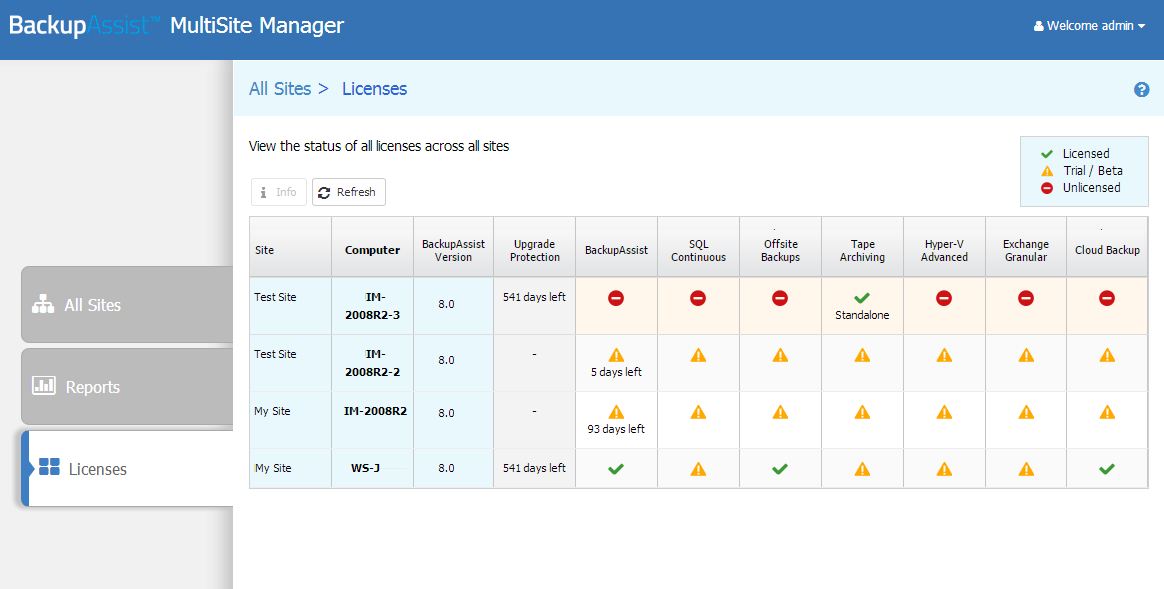
Licenses
The Licenses tab displays the status of all BackupAssist licenses in all sites. Use the drop down arrow by each column’s heading to select the columns that you want to see and to sort their contents.
Manage Site tabs
When you select a site in the All Sites tab, the tab will change to Manage Site and the next 2 tabs will change to Site Alerts and Site Licenses. The Manage Site tab displays two levels of information: All computers view (all machines listed) and a Single computer view (when one of the listed computers is opened)
All computers view
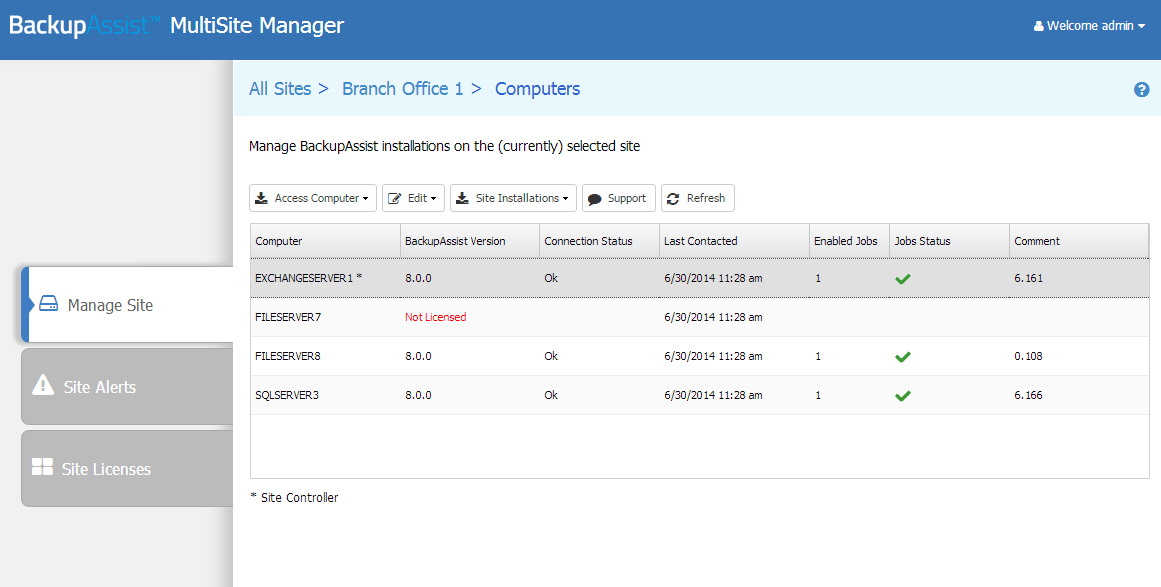
This is the default of the Manage Site tab. It is used to manage all computers in a specific site, and includes options for adding computers, performing remote installs and initiating remote BackupAssist sessions.
This section explains the menu options available in the Manage Site tab’s - All computers view.
Access Computer
This button has two selectable options:
- Access computer displays the backup jobs on the selected computer.
- Initiate Remote Session initiates a remote session to the selected computer. This feature allows you to remotely create and modify backup jobs and perform remote restores. See the, Remote control of BackupAssist section, for more information about this feature and how to use it.
Edit
This button has two selectable options:
- Edit allows you to add or edit a comment. The comment will appear in the site’s Comment field.
- Remove removes the selected computer from the site.
Site Installations
This button has four selectable options:
- Download Latest BackupAssist: This option is used to download a newer version of BackupAssist and store it in the Site Controller’s BackupAssist directory. This copy is used to install and update BackupAssist on the Site Controller and other computers within the site. If a newer version is required, select it from the dialog’s drop-down list and select Download.
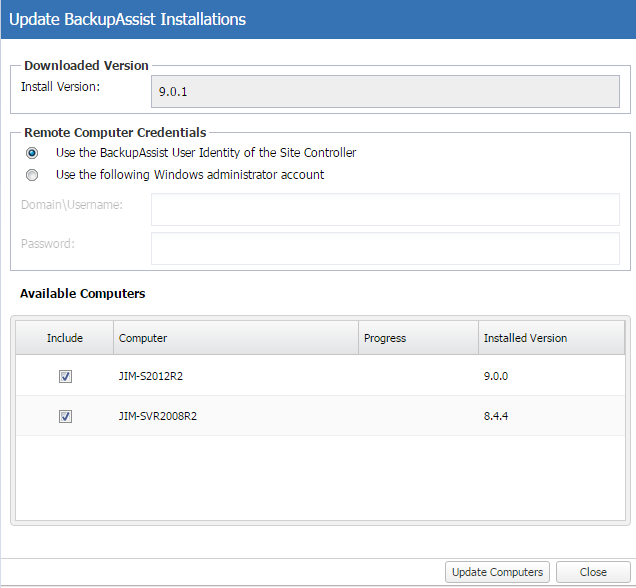
- Update Existing Computers: This option is used to upgrade the version of BackupAssist currently installed on computers within the site. The Install version field displays the last version downloaded.
The Remote Computer Credentials section is used to select an account to perform the updates. The account must have Administrator access to the selected computers.
The Available Computers section displays all computers with a version of BackupAssist older than the current Install Version.
To perform the updates, tick the computers to be updated and click Update Computers.
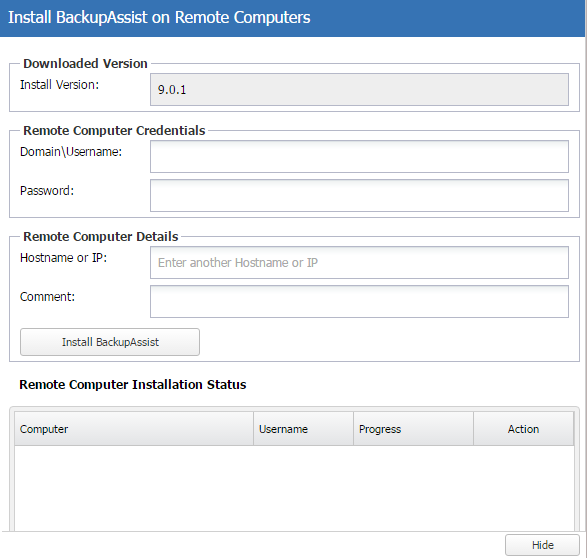
- Install to New Computers: This option is used to install BackupAssist onto computers within the site that do not have BackupAssist installed.
- Add Other Installations to Site
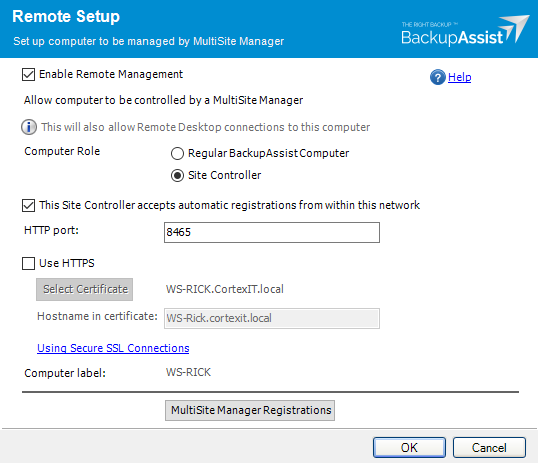
- For a Site Controller: Enable Remote Management and Enable automatic registration with Site controllers within this network.
- For is a standard BackupAssist installation: Enable Remote Management and Enable automatic registration with Site Controllers within this network.
- Tick the box next to the computer you want to add.
- Select Add Selected To Site.
Note: A remote install of BackupAssist is done using a Site Controller within that site. This means a computer within the site must already be running BackupAssist, and configured as a Site Controller.
The Remote Computer Credentials and Remote Computer Details sections are used to enter the details of the computer that is to have BackupAssist remotely installed.
Select Install BackupAssist to start the remote installation. Repeat the process for each computer as required.
The Remote Computers Installation status section displays the progress of all remote installations. BackupAssist is installed concurrently on all computers added to the Remote Computers section.
Note: For Windows 2008 R2 and earlier, you will be prompted to execute a script to enable PowerShell Remoting, which the remote install process uses. A Windows 2008 R2 or earlier machine will need to have .Net Framework 4.0 or later installed to be able to use the remote install feature.
A Site Controller can automatically detect computers running BackupAssist 9.2 or later and add them to MultiSite Manager. To enable this feature, the following selections made BackupAssist's Remote tab.
Selecting Add Other Installations to Site in MultiSite Manager will open the dialogue used to make provisional computers managed BackupAssist computers.
To add a computer to the site:
Support
The support button opens an email template, so you can send a support request to BackupAssist Technical support. The template allows you to select BackupAssist installations within the site and send their BackupAssist diagnostics, as well as the MultiSite Manager diagnostics, with the support request.
Refresh
This button will reload and update the list of computers in the site.
Single computer view
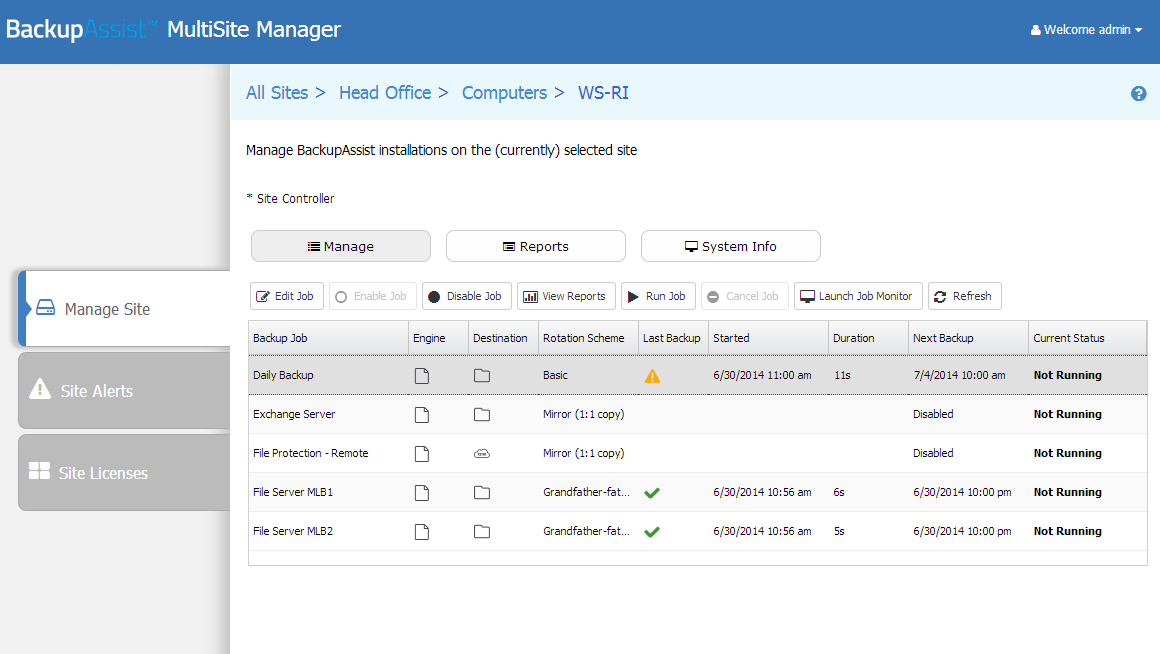
When you open a computer from the Manage Site tab, you can view that computer’s jobs, reports and system information using the Manage, Reports and System Info buttons.
Manage
This default screen is used to manage the backup jobs on the computer, using the following options:
- Edit Job: Initiates a remote session to the computer so that a backup job can be edited. See the, Remote control of BackupAssist section for more information.
- Enable Job & Disable Job: Enables or disables the selected backup job.
- View Reports: Opens a window with a list of past backup reports for the selected job. Double-clicking a backup report from the list will open the report.
- Run Job & Cancel Job: Starts or stops the selected backup job.
- Launch Job Monitor: Displays a summary of the last backup job that was run. This window will automatically open when Run Job is selected and display the job’s progress in real-time.
- Refresh: Updates the backup jobs displayed and their status.
Reports
This screen lists the reports of all backup jobs that have been run on the BackupAssist computer. Select View Backup Report or double-click the report to display its contents.
System Info
This screen displays system information such as the selected computer’s operating system and the version of BackupAssist installed.
Site Alerts
The Site Alerts tab is used to manage alerts within a site (at the Manage Site level).
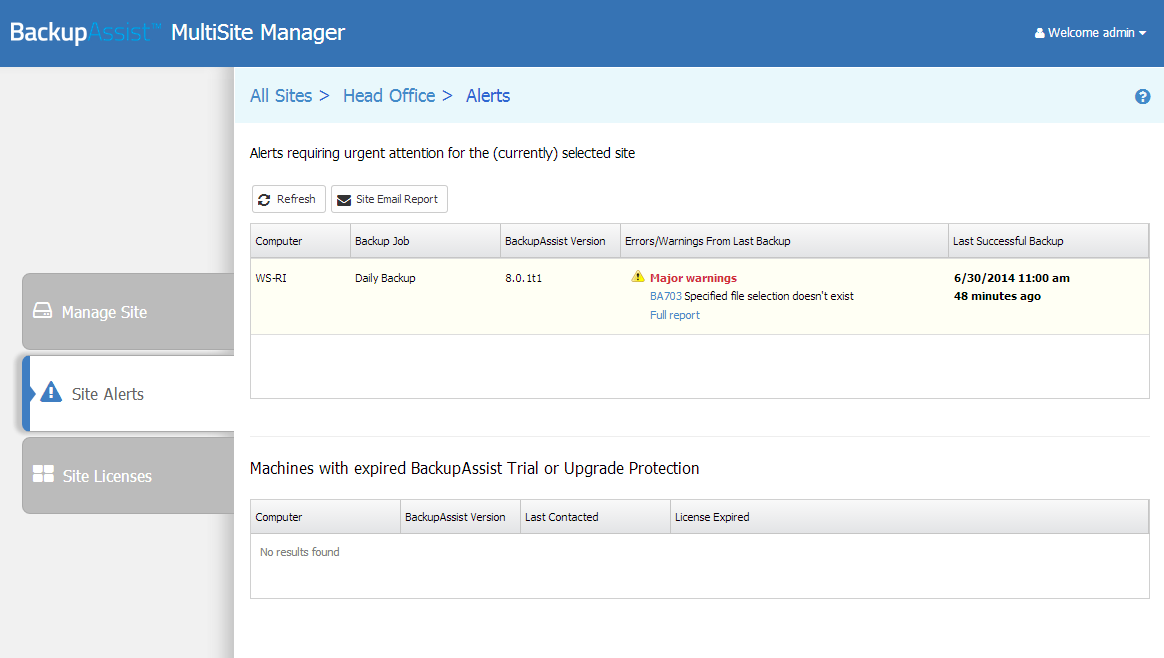
The Site Alerts shows:
- A list of all current alerts on all BackupAssist installations.
- A list of computers with an expired BackupAssist Trial or BackupCare (formerly Upgrade Protection).
- The email report configurations for all backup jobs on all BackupAssist installations.
Alerts requiring attention for the selected site
This section is used to access alert information within the site.
- An alert is an error / warning reported by a backup report.
- The alerts displayed are from a backup job’s most recent backup report.
The following actions can be performed:
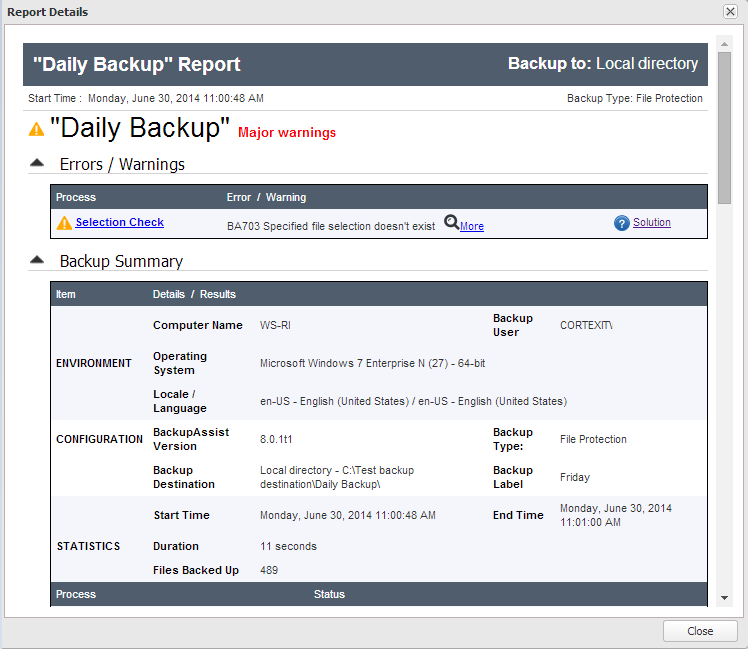
- Select Full report in the Errors / Warning column to open the backup report for that job.
- Select the Knowledge base BA error code to open the knowledgebase article for that error.
- Select Refresh to recheck the backup reports and update the displayed results .
Site Email report
This button opens the Site Email Report configuration window. To set up a sites notifications, tick the Activate notification emails box and enter details that will only be used for this site.
- Use the From fields to enter the sender’s name and email address, and to provide a subject line.
- Use the To field to list the email addresses that the eite emails are to be sent to.
- User the Every day at field to specify the time that the Site Email report is to be sent.
Before reports can be sent, the administrator must configure the Welcome menu’s MultiSite Manager User Guide
Machines with expired BackupAssist Trial or BackupCare
This section displays any computer with expired BackupAssist Trial or BackupCare (formerly Upgrade Protection).
Site Licenses
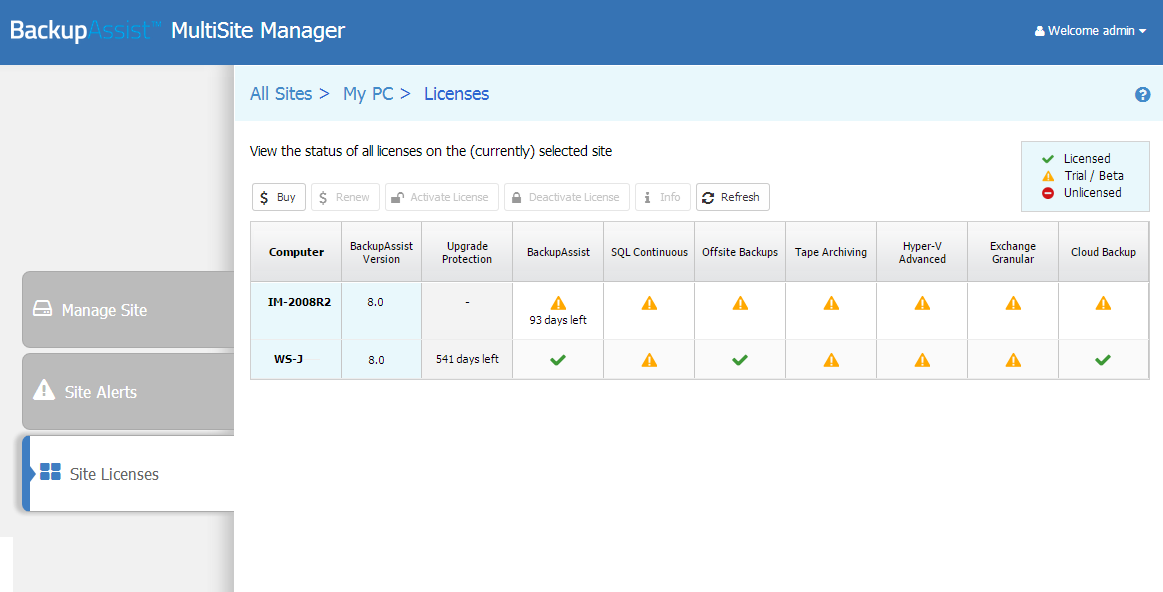
The Site Licenses tab displays the status of all BackupAssist licenses in the site. You can use this tab to buy, renew, activate and deactivate any BackupAssist license or add-on license.
To view the licenses for all sites, select the License tab while the All Sites tab is also displayed.
The following buttons are used to administer BackupAssist keys and licenses.
Buy
This button will take you to the BackupAssist purchasing page, so you can buy BackupAssist licenses and add-on licenses.
Renew
This button will open the BackupAssist renewal page, where you can extend the BackupCare (formerly Upgrade Protection) for you BackupAssist licenses.
Activate License
Selecting activate will open a dialogue that allows you to enter a license key to activate the selected license.
Deactivate license
Selecting deactivate will open a confirmation prompt to deactivate the selected license.
Info
This button will display a list of all BackupAssist licenses on a selected computer, and how long each license is valid for.
Refresh
Selecting refresh will recheck the licensing information and refresh the site licenses displayed.
Remote control of BackupAssist
MultiSite Manager can be used to open a remote BackupAssist session on another computer.
The remote session will give you access to:
- The Job tab so you can create and modify backup jobs.
- The Files/Apps tab so you can run the following restore types:
- Local and Network Files
- Exchange Server
- SQL Server
- The Hyper-V tab, so you can use the Granular Guest Restore menu to perform a Hyper-V Granular restore.
- The Settings and Remote tab so you can modify your BackupAssist settings.
Initiating a remote session
To start a remote BackupAssist session:
- From the All Sites tab, select the site with the computer that you want to open a remote session to.
- From the Manage Site tab, select the computer that you want to open a remote session to.
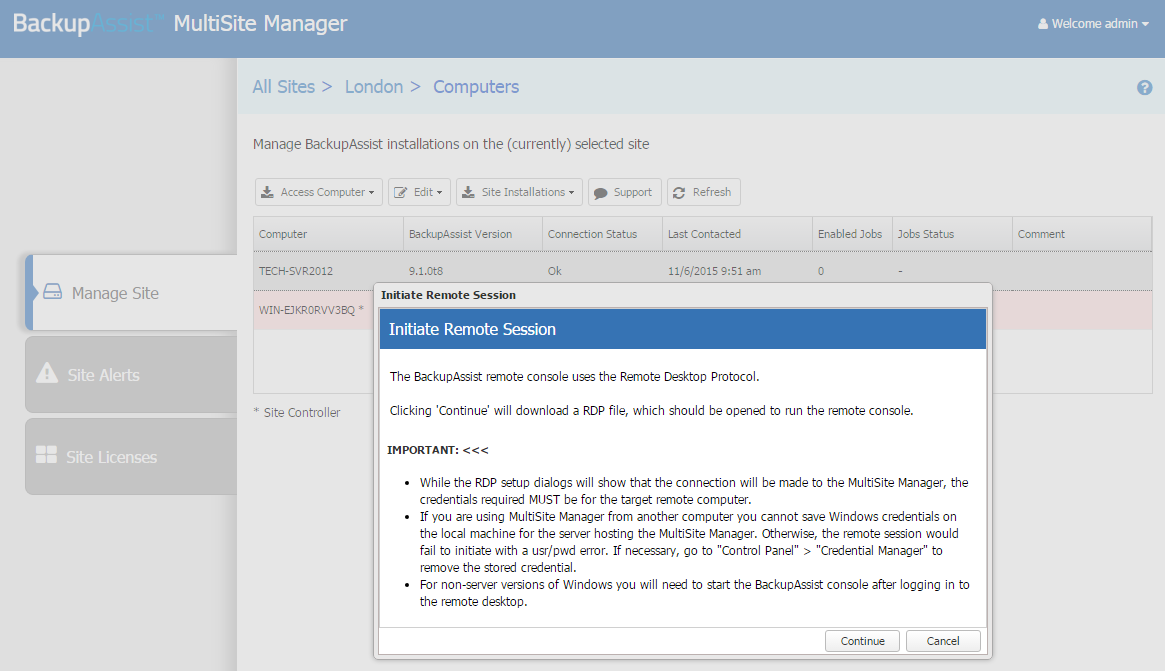
- Select, Initiate Remote Session.
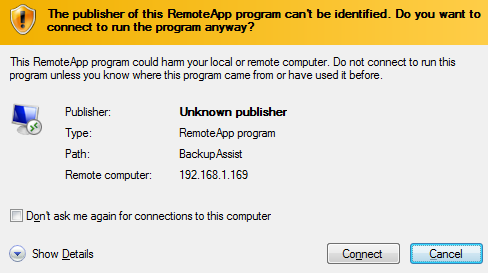
- Select and Open the RDP connection file
- Select Connect to proceed with the remote session.
- Select the tick box if you do not want to be prompted with this message again.
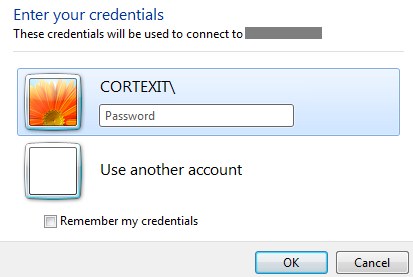
- Authenticate the remote connection
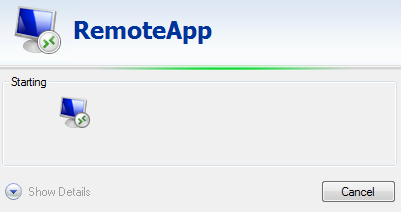
- Once authenticated, a remote BackupAssist session will be established.
If Initiate Remote Session is greyed out, review the MultiSite Manager Setup guide's Enabling remote management: section.
When you select Initiate Remote Session, an RDP configuration file will be downloaded by your web browser. This download can prompt web browser specific messages.
If this is the first time you have opened a remote session, read the information in the dialog.
When you select the RDP connection file, a remote connection will be initiated and you will be asked to confirm that you want to run the program.
When you select Connect, the remote session’s authentication window will open.
Enter the username and password for the remote computer. These are the credentials you would use to log into the remote computer locally.
If User Account Control is enabled on the remote machine, a Yes confirmation will be required to allow the program to run before the remote session is established.
Using a remote session
When the connection is established, the remote computer's BackupAssist installation will open as a remote session on the computer running the MultiSite Manager web application. Although BackupAssist appears to be running on the local computer, it is updating the remote computer’s BackupAssist installation.
The heading at the top of the BackupAssist session will display the remote computer’s name. You can use this remote BackupAssist session to access the Backup, Restore, Settings and Remote tabs.
When you have finished using the remote session, select File > Exit.
MultiSite Manager Welcome menu
MultiSite Manager’s Welcome menu appears at the top right of the MultiSite Manager web application.
This menu has several options available, and each one is explained below.
Welcome
Displays an overview of the MultiSite Manager setup process and has a link to the setup guide.
Edit Setup
Allows you to change the MultiSite Manager authentication information and HTTPS / Port settings. These options are documented in detail in the MultiSite Manager Setup Guide.
User accounts
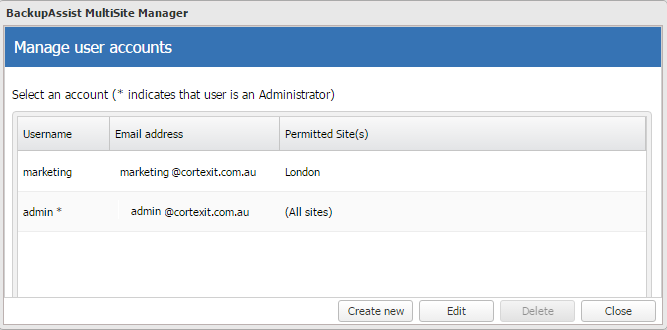
MultiSite Manager is set up using an administrator’s account. This account can access the User accounts menu to edit and create user accounts. User accounts can only manage the sites assigned to them by the administrator and will only receive notifications from those sites. When the MultiSite Manager administrator selects the User accounts option, a pop up screen will display the current user accounts.
When you are logged into MultiSite Manager using a user account, an Edit Account option will be available instead of Manage Accounts. Edit Account allows the user to change their password.
Create new
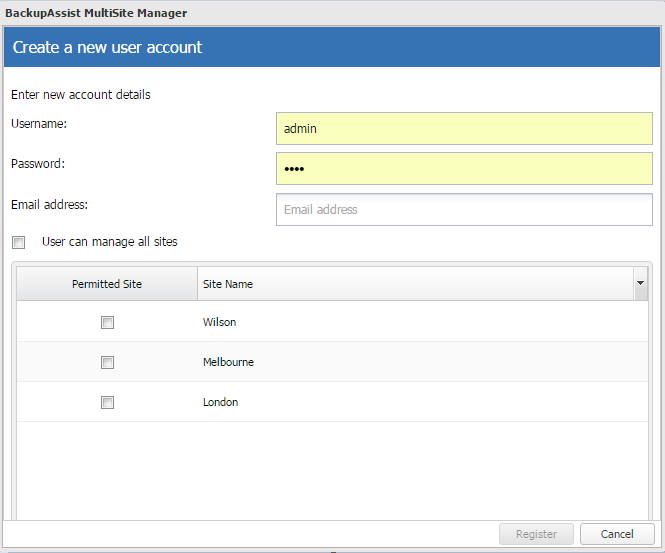
Selecting Create new opens the Create a new user account dialog. This is used to create user accounts and assign access to the required sites.
To create an account:
- Enter the username and password into the fields provided.
- Enter an email address into the field provided.
- Tick the sites that the user account is to have access to.
- Select Register.
All of the fields must be completed before you can register the new account.
Edit
Selecting an existing user account and then the Edit button will open the Edit account dialog. This dialog is used to change the user account’s password, and to change the sites that the account can manage.
Delete
Selecting an existing user account and then the Delete button will delete the selected account.
Warning: Users with user accounts should not have access to the machine that MultiSite Manager is installed on. For security reasons, they should access MultiSite Manager’s web interface from another machine. Only users who use the administrator account should be able to access the machine that MultiSite Manager is installed on.
Edit account
When you are logged into MultiSite Manager using a normal user account, an Edit Account option will be available instead of User Accounts. Edit Account allows a user to change their own details.
Email server settings
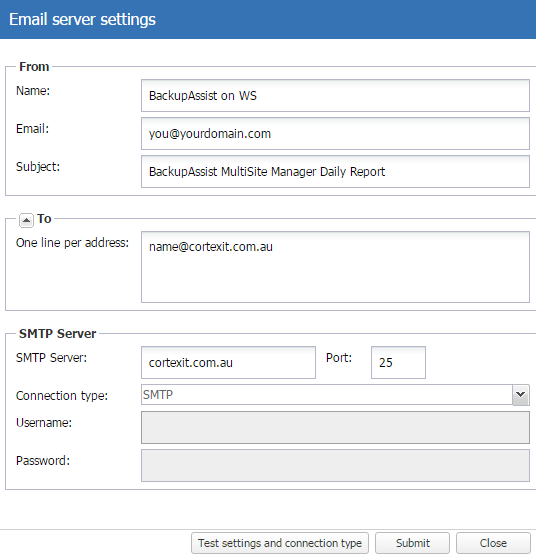
This option is available for the MultiSite Manager administrator to set up the Email server. The server is used for the Global Email Report in the Reports tab, and the Site Email Report on the Site Alerts tab.
From and To
The From and To fields apply to the Global Email Report. Site specific emails use the From and To defined in the Site Email Report dialog on the Site Alerts tab.
SMTP Server
- Enter the mail server’s domain name and port.
- Select the connection type used by the mail server.
- Enter the username and password of the mail account to be used to send the emails.
- Use the Test settings and connection type button, if you want to send a test email.
Support
The Support option allows you to send a support request to BackupAssist Technical Support. You can also select and send diagnostics for the MultiSite Manager’s computer. To provide diagnostic information for BackupAssist computers in a site, select the Support button from the Manage Site level.
License info
Provides information about the MultiSite Manager’s license subscription.
About
Displays the currently installed version of MultiSite Manager.
Logout
Selecting logout will take you back to the MultiSite Manager login screen.
