This guide explains how to set up and configure MultiSite Manager, an application that is installed onto the computer that will manage your BackupAssist Classic computers. This computer will be the MultiSite Manager and you can interface with it using a web browser.
Operating System requirements
MultiSite Manager can be installed onto the following operating systems.
- Windows Server 2016 - Supported from v9.5
- Windows Server 2012 / 2012 R2
- Windows Server 2008 / 2008 R2 64-bit
- Windows 10 64-bit
- Windows 8 / 8.1 64-bit
- Windows 7 32-bit / 64-bit
Technical requirements
- The MultiSite Manager’s computer requires a globally reachable hostname or IP address.
- MultiSite Manager communication over the internet should be secured using MultiSite Manager HTTPS and Certificates.
- All remotely managed BackupAssist computers and Site Controllers must have internet access.
- MultiSite Manager can administer BackupAssist Classic v9 and later installations.
Remote session requirements
MultiSite Manager can open a remote BackupAssist installation, and run it as a local session on the computer running the MultiSite Manager web application. This feature uses Microsoft Remote Desktop.
- Microsoft Remote Desktop must be enabled on a computer before MultiSite Manager can connect to it and initiate a remote session.
- BackupAssist will automatically enable Remote Desktop for you, when you select Enable Remote Management, in the Remote Setup screen.
- If you use the Remote Session feature to access a Windows 7 or 8 workstation, you will be presented with a full Microsoft Remote Desktop session, which is used to open BackupAssist.
Supported web browsers
The following web browsers are supported by the MultiSite Manager’s web application:
- Microsoft Internet Explorer 9 and above.
- Mozilla Firefox 12.0 and above.
- Google Chrome 19.0 and above. Does not support Chrome on iOS.
Support for Windows Server 2003 is explained on our Windows 2003 page.
License and version requirements
- The MultiSite Manager’s computer requires an active MultiSite Manager license subscription.
- A Site Controller needs BackupAssist Classic v9 or later with a valid BackupCare (formerly Upgrade Protection) subscription.
- A BackupAssist computer (managed by MultiSite Manager) needs BackupAssist Classic v9 or later with a valid BackupCare (formerly Upgrade Protection) subscription.
To learn more about licensing, see MultiSite Manager Licensing
Implementation overview
All of the computers to be managed by MultiSite Manager are grouped into sites, which are LANs containing the managed BackupAssist Classic computers. One computer in each site is made a Site Controller, which connects to the MultiSite Manager and communicates on behalf of its site. All other BackupAssist computers in the site are added to the Site Controller.
How MultiSite Manager is implemented
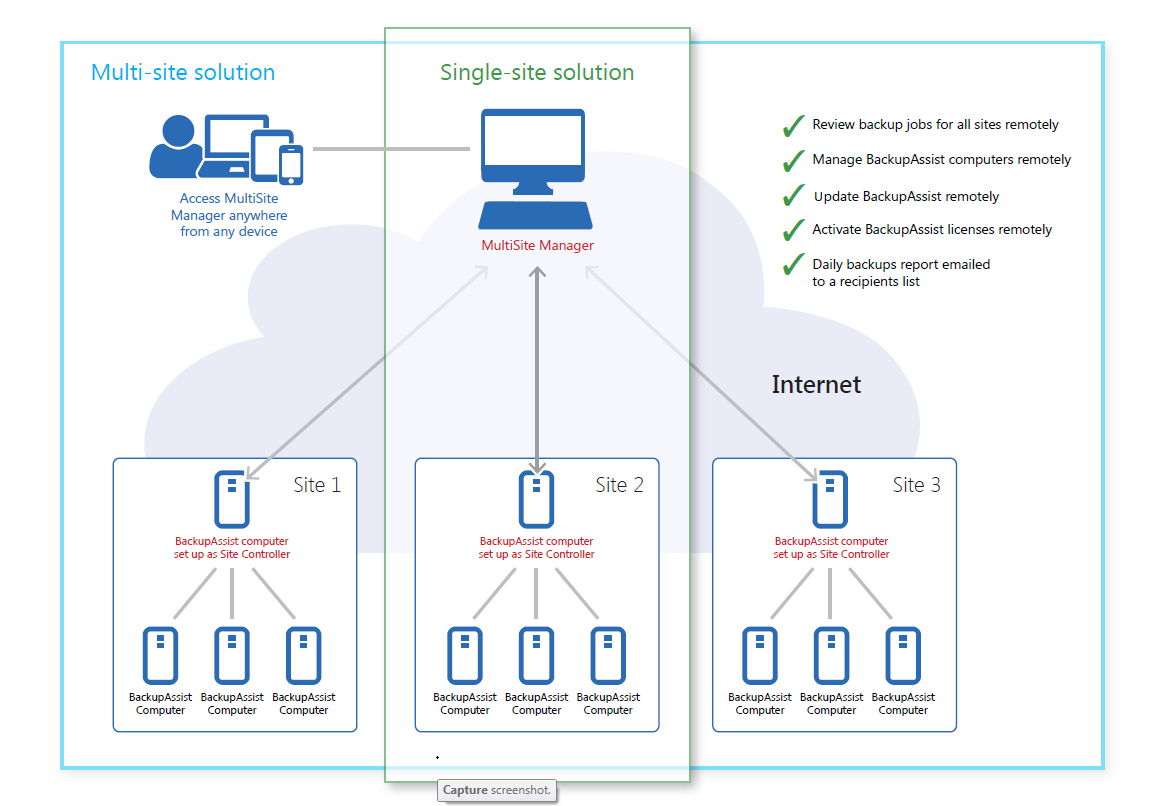
MultiSite Manager can be used for both single-site and multi-site implementations.
- Single-site: each BackupAssist computer is connected to a single Site Controller, and that Site Controller is connected to the MultiSite Manager.
- Multiple Sites: each BackupAssist computer is connected to the Site Controller for their site. The Site Controllers are all connected to the MultiSite Manager.
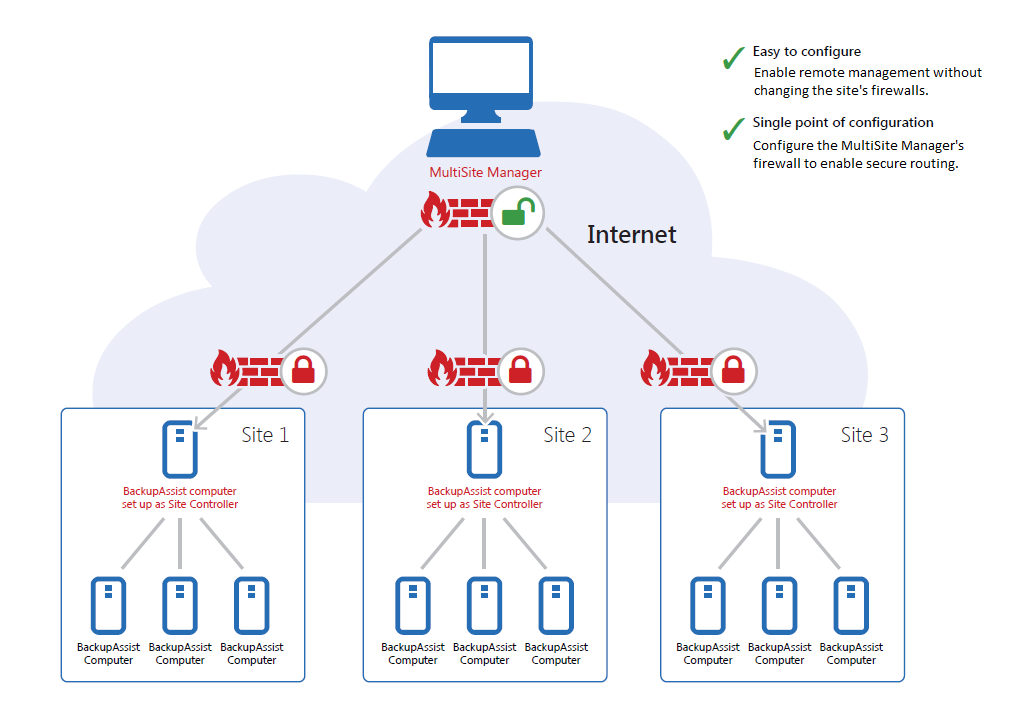
This graphic shows how a single-site solution is implemented—in the same way as a multi-site solution, but with just one site to manage. The Site Controller computer can also run MultiSite Manager if required.
Implementation considerations:
- MultiSite Manager is installed and configured on a computer. It does not require BackupAssist.
- The Site Controller is a BackupAssist computer. It is registered to the MultiSite Manager using the BackupAssist Remote tab’s Remote Setup window.
- BackupAssist 9.2 and later computers are automatically detected by the Site Controller and added to the MultiSite Manager for remote management.
Implementation walk through
This walk through explains the sequence of steps that should be followed to implement a MultiSite Manager solution. These steps summarize the information found in the following sections of this guide.
Step 1: Set up a MultiSite Manager computer
- Select a computer to be your MultiSite Manager. This computer will need internet access, a globally reachable hostname or IP address and an SSL certificate assigned.
- Install MultiSite Manager onto this computer and run the initial setup when you first launch the MultiSite Manager web application. This setup includes creating the username and password.
MultiSite Manager can be installed onto a Site Controller, but the Site Controller will still need to be registered to the MultiSite Manager so that the computer can perform both roles.
Step 2: Set up a Site Controller for each site
These steps are performed on one computer in each site - the Site Controller. If there is only one BackupAssist computer in a site, that one computer will be the Site Controller.
- Select a BackupAssist computer to be the Site Controller for the site you want to set up.
- Install BackupAssist v9 or later onto the computer (if it’s not already running v9 or later).
- Run the BackupAssist Remote tab > Remote Setup. Select the Site Controller role and register the site to the MultiSite Manager.
- Open MultiSite Manager to approve the Site Controller registration.
Step 3: Add your BackupAssist computers
- Run the BackupAssist Remote tab > Remote Setup.
- Enable the computer for remote management with the automatic registration option selected.
- Open MultiSite Manager, and go to the site that you are adding the computer to.
- Select the Site Installations menu and select Add Other Installations to Site.
- In the dialog box that opens, select the BackupAssist computer and click Add Selected to Site.
If the Site Controller uses HTTPS on the LAN and the computer does not trust the certificate a manual registration must be performed using the steps in the MultiSite Manager solution setup section.
If the Site Controller or managed computers are not using BackupAssist v9.2 or later, a manual registration must be performed using the steps in the MultiSite Manager solution setup section.
MultiSite Manager installation
BackupAssist MultiSite Manager is a stand-alone product that is installed onto a computer that will become the MultiSite Manager. BackupAssist Classic does not need to be installed on this computer.
To install MultiSite Manager:
- Download the install file from the download page.
- When the download begins, select or confirm your download location and download the file.
- Run or double-click the install file. You may be prompted to confirm that you wish to run this program if your computer has security policies enabled.
- The installation wizard will start and begin preparing the MultiSite Manager files. Once the files are ready, you will be asked to confirm that you would like to install MultiSite Manager.
- The next screen will ask you to read the MultiSite Manager End User License Agreement. Once you have read the agreement, if you would like to proceed, select I accept the terms of the license agreement.
- The next screen will ask you to confirm or change the installation destination. If you would like to install MultiSite Manager on a location different to the one shown, use the Change button and browse to the required location and then select OK.
- The next screen will give you a chance to go back and modify your selections.
- Once MultiSite Manager has been installed, a completion screen will be displayed.
Once you have downloaded the install file, the file will run automatically, prompt you to run it or save to the selected destination, depending on your web browser and your web browser’s settings.
Click Next
Click Next
Click Next
Click Install
MultiSite Manager will now begin to install.
Click Finish
Once the install has completed, you can select Launch MultiSite Manager from your Start menu or desktop shortcut.
MultiSite Manager configuration
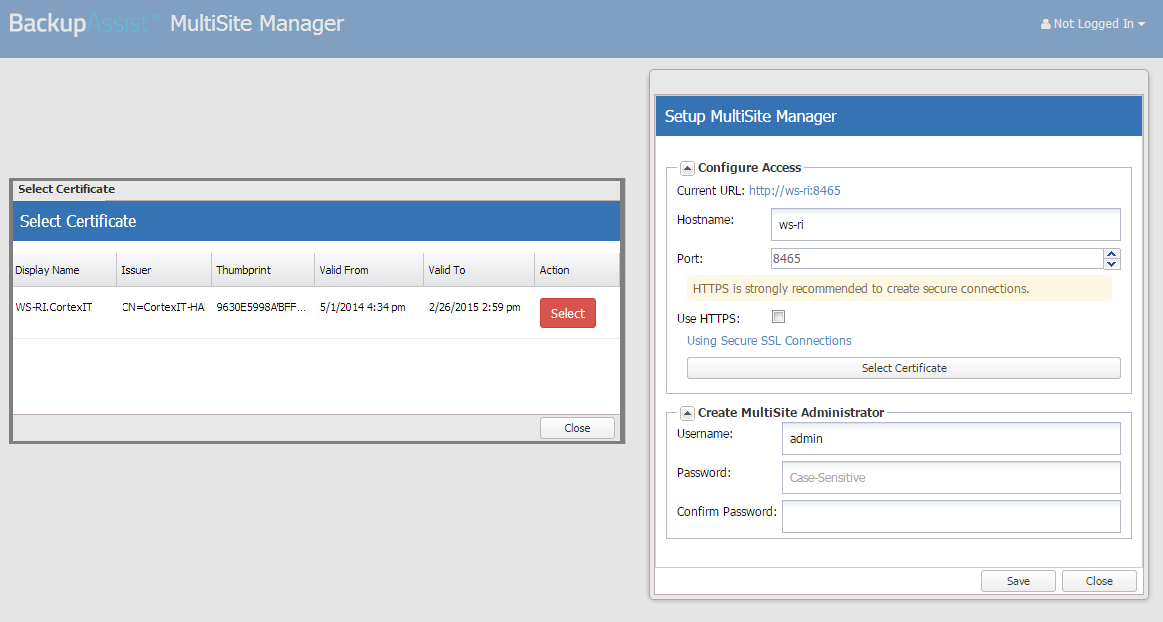
The first time you launch MultiSite Manager, you will be presented with a setup screen to create a Multisite Manager username and password, and an option to enable HTTPS communication.
Below is a list of MultiSite Manager's configurations. These should be reviewed and updated as required.
- Current URL displays the URL currently configured for MultiSite Manager.
- Hostname is an editable field that allows you to modify the hostname used by MultiSite Manager’s URL. This can be useful if you use HTTPS to secure your connections, and the hostname used by MultiSite Manager does not match the hostname in the certificate. The hostname in the URL used to open MultiSite Manager must match the hostname in the certificate’s FQDN. If they do not match, you will get a security warning that the connection is not trusted.
- The default Port setting is 8465. You can change this setting if required.
- Use HTTPS enables a secure connection over the internet between the MultiSite Manager and each Site Controller. If you select Use HTTPS, you will also need to select Use HTTPS when you register each Site Controller using BackupAssist’s Remote tab.
- Use the Create MultiSite Administrator fields to create a username and password for the MultiSite Manager web application. These credentials are used each time you log in.
- Select Save and the MultiSite Manager web application will open.
If you enter an invalid hostname, MultiSite Manager will not open. If this happens, you can modify the path in the browser’s address bar, then log in and change the hostname in the Edit setup screen.
If you select Use HTTPS, the Select Certificate button will become active. The button will display the SSL certificates available. When you select a certificate, the certificate’s hostname will be written to the Hostname field, unless you have already filled the field in.
To learn more about HTTPS, see MultiSite Manager HTTPS and Certificates
MultiSite Manager license registration
When you first install MultiSite Manager, you will have a free 30-day FREE trial of the product. After 30 days, you will need a MultiSite Manager’s license subscription. To purchase a MultiSite Manager license subscription, go to the BackupAssist Purchase page and select either a 12 or 24-month subscription. Once you have your license key, it will need to be registered with your MultiSite Manager installation, using the MultiSite Manager License info dialog.
To register a MultiSite Manager license:
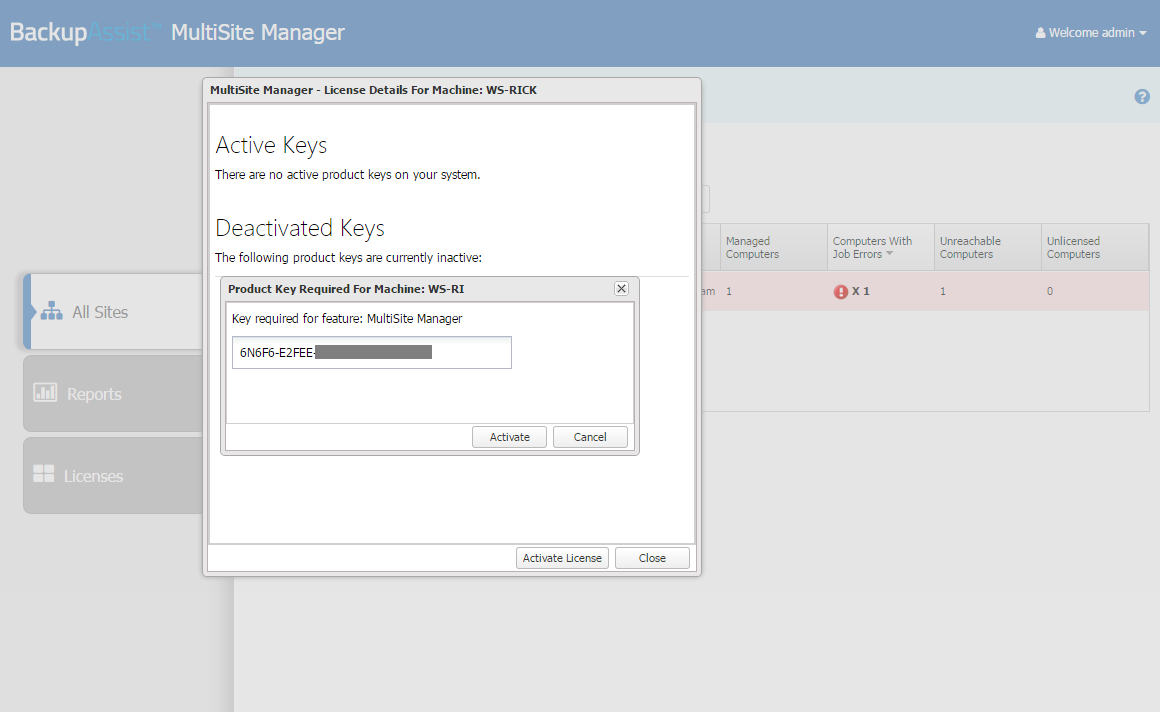
- Select License info from the MultiSite Manager Welcome menu.
- Select Activate license and enter your license key into the field provided.
- Select Activate, to complete the activation process.
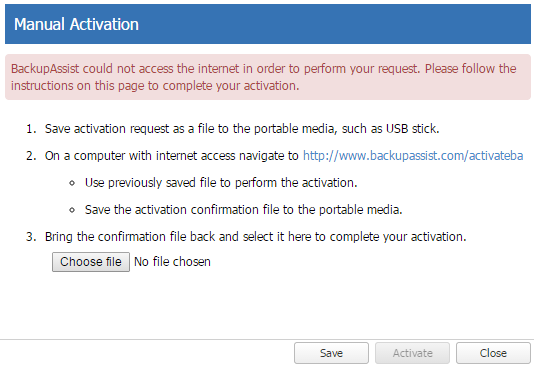
If the MultiSite Manager computer does not have internet access, selecting Activate will open a Manual Activation dialog.
To manually activate a license:
- Use the Save button to download an activation request file to a network location (that can be accessed by a computer with internet access) or a portable media, such as a USB stick.
- Using a computer with access to the activation request file and an internet connection, navigate to http://www.backupassist.com/activateba.
- From the activateba page, select Choose File to locate and open the activation request file.
- Select the Activate/Deactivate BackupAssist button to generate a return license key file.
- The activateba page will prompt you to right click a link on the page and download the return license key file to the portable media or network location.
- Return to the MultiSite Manager Manual Activation dialog and select Choose file to locate and open the return license key file.
- Select Activate and you will receive a message - License Successfully Activated.
Firewall and router configuration
To enable communication between the MultiSite Manager and each site over the internet, you need to make the following changes to your MultiSite Manager’s firewall and router. To administer multiple sites, you only need to make changes on the MultiSite Manager’s firewall and router/switch. You do not need to make any changes to the firewalls and routers on any of the remote sites.
The diagram below shows the connections between the MultiSite Manager, each of its Site Controllers and the computers in each site.
Firewall
If an external firewall device is used, then it needs to be configured to allow inbound traffic to the MultiSite Manager on the MultiSite Manager’s port (default 8465).
Router
A port-forwarding rule may need to be in place to ensure that the relevant traffic is passed to your MultiSite Manager.
Note: Only the MultiSite Manager computer requires changes to its firewall and router to enable secure connections between the different sites, over the internet.
MultiSite Manager solution setup
This section explains how to use BackupAssist’s Remote tab and MultiSite Manager to set up a managed BackupAssist Classic Computer and a Site Controller. A MultiSite Manager must be set up before a Site Controller can be registered to it. Once a Site Controller has been registered, BackupAssist computers can be added.
Enabling remote management:
To enable remote management:
- Select BackupAssist’s Remote tab.
- Select Remote Setup.
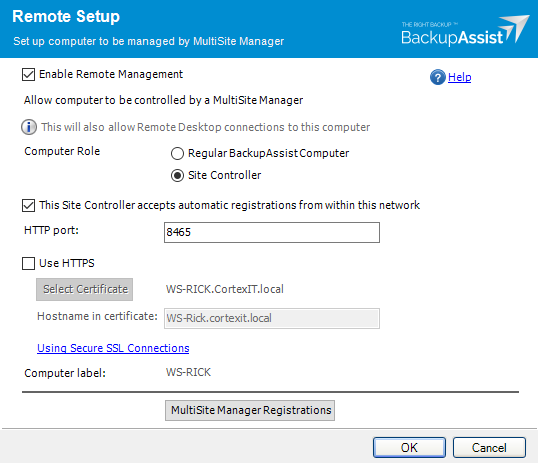
- Tick Enable Remote Management.
- Select Regular BackupAssist Computer or Site Controller from the Computer Role options.
One computer in each site (LAN) must be nominated as a Site Controller. The Site Controller will connect to the MultiSite Manager and communicate with it on behalf of the site.
The Computer Role selected will determine the Remote Setup options that are displayed.
Note: The next steps will depend on whether you selected a Regular BackupAssist Computer role or a Site Controller role.
Site Controller setup
To set up a Site Controller:
- Tick the box for This Site Controller accepts automatic registrations from within the network.
- The HTTP port field shows the port used for communicating with the Regular BackupAssist Computers inside the Site. The port is set to 8464 by default.
- Select Use HTTPS if you want to secure communication within the Site Controller’s site. You will also need to select Use HTTPS when you add each BackupAssist computer to the Site Controller.
- Select the MultiSite Manager Registration button to open the MultiSite Manager Registration window. This window can be used to add (or remove) the Site Controller from a MultiSite Manager.
- Select Register with MultiSite Manager.
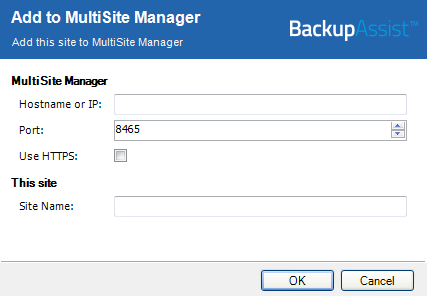
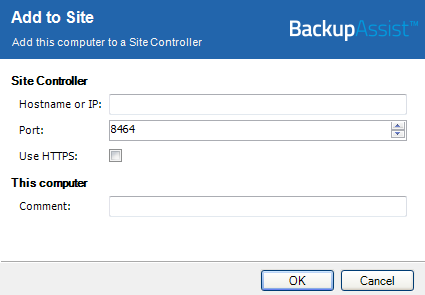
- Fill in the Add to MultiSite Manager fields.
- Enter either the MultiSite Manager’s Hostname or IP address.
- Use HTTPS must be ticked if HTTPS was selected during the MultiSite Manager setup to secure communication between the MultiSite Manager and each Site. To learn more, see Setup Guide
- Site Name is used to enter a unique name for the site. The site name will be displayed in the MultiSite Manager web application.
- Select OK to submit a registration request to the MultiSite Manager.
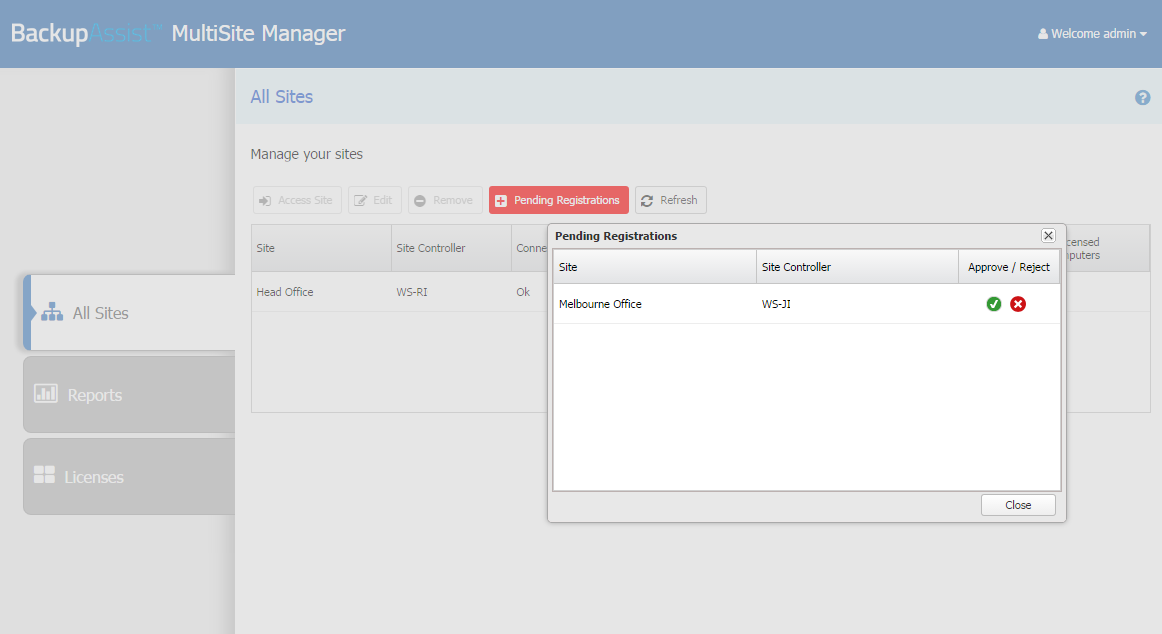
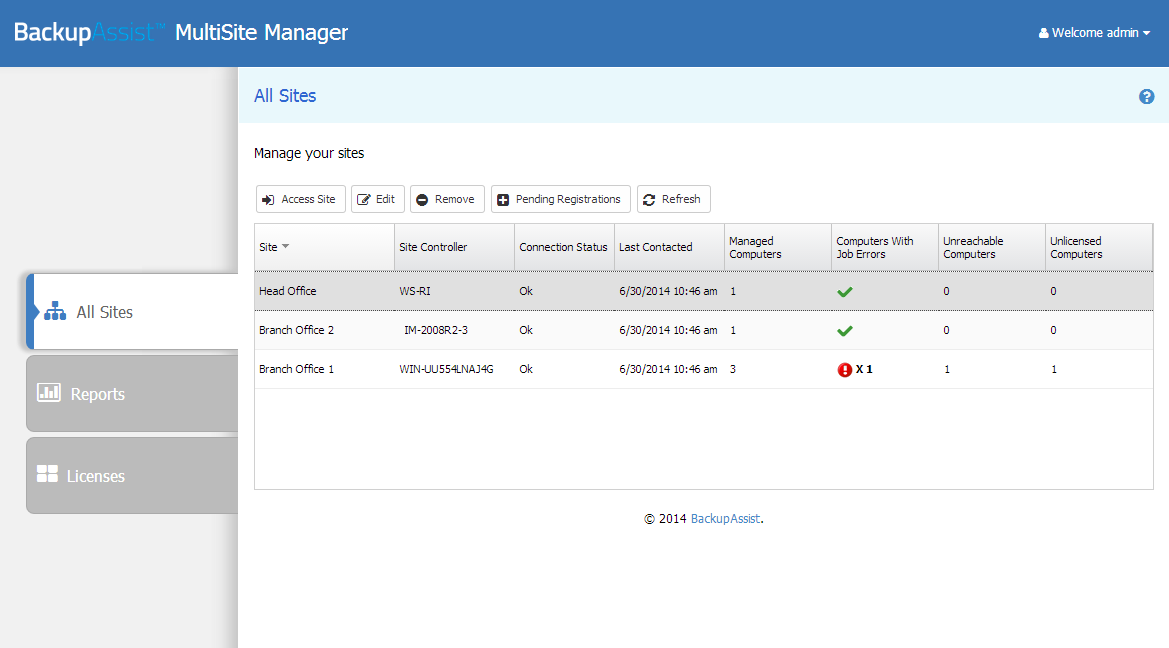
- Log into the MultiSite Manager web application and select the All Sites tab.
- Select Pending Registrations and click the tick next to the Site Controller that you want to approve.
If you select Use HTTPS, the Select Certificate button will become active. The button will display the SSL certificates available. To learn more, please view our online SSL certificates resource page.
The Hostname in certificate field lets you to enter the name of the certificate. This is necessary for automatic registrations of computers where a trusted certificate is used by the Site Controller.
Regular BackupAssist computer setup
To set up a Regular BackupAssist Computer:
- The option Enable automatic registration with Site controllers within this network should be ticked. It is enabled by default and will retain its settings if BackupAssist is upgraded.
- Log into the MultiSite Manager web application and select the Manage site tab for that site.
- Select Add Other Installations to Site from the menu to open the Add Other Installation to Site dialog.
- Tick the box next to the computer you want to add to the Site Controller.
- Select Add Selected To Site.
The Site Controller on the local area network can now detect the computer.
The computer will now appear in the Manage Site screen and can be remotely managed.
Manual registration
If the Site Controller uses HTTPS in its LAN and the computer does not trust the certificate, you will need to use the Site Controller Registration to manually register the computer.
If the Site Controller or managed computers are not using BackupAssist v9.2 or later, you will need to use the Site Controller Registration to manually register the computer.
To manually register a computer:
- Select the Site Controller Registration button to open the Site Controller Registration window. The window is used to add (or remove) a BackupAssist Computer to a Site Controller.
- Select Add to Site Controller and fill in the fields.
- Enter either the Site Controller’s Hostname or IP address.
- Use HTTPS must be ticked if the Site Controller has enabled HTTPS to secure communication within the site.
- Use the Comment field to enter a unique description. This will be displayed in the MultiSite Manager web application.
- Select OK.
Opening MultiSite Manager
Once you have set up MultiSite Manager you can open the application using either the shortcut on the computer that MultiSite Manager is installed on, or by entering the MultiSite Manager's FQDN and port into a web browser.
MultiSite Manager is opened using one of the following methods:
The desktop shortcut
This shortcut will appear when MultiSite Manager is installed.
Select the Windows Start button > All Programs > BackupAssist MultiSite Manager vX > BackupAssist MultiSite Manager.
Note: A browser warning will appear if you use HTTPS. You can dismiss / ignore this warning as the shortcut uses the computer name, rather than a FQDN from the HTTPS SSL certificate.
A web browser shortcut (favorite)
For computers that do not have MultiSite Manager installed, you can open the MultiSite Manager web application using a web browser. Just enter the MultiSite Manager URL using the following format - HTTP (or HTTPS) ://< the MultiSite Managers FQDN or routable IP address>: port/index.
For example - http://servername:8455/index.
This is the same URL used by the computer that has MultiSite Manager installed.
When the web application opens in your browser, you will be prompted to enter a username and password. Once you are authenticated, the full UI will be displayed as shown in the screenshot below.
Note: If you have forgotten your username or password, you can select Forgot Password? This will prompt you to enter your MultiSite Manager account’s email address, and send you a link. Selecting the link will open a MultiSite Manager password reset page.
Navigating MultiSite Manager
MultiSite Manager has tabs down the side. The top tab will display either All Sites or Manage Site. The names and contents of tabs 2 and 3 will depend on whether All Sites or Manage Site is selected. You can use the breadcrumbs at the top of the UI to navigate back.
MultiSite Manager Navigation table
| Tab | Tab Name | Displays | Specific features | ||
| 1 | All Sites | All managed sites |
|
||
| 2 | Reports | MultiSite Manager reports and report configurations |
|
||
| 3 | Licenses | Licenses of all BackupAssist installations on all sites | Info only | ||
| 1 | Manage Site |
|
|
||
| 2 | Site Alerts | All Alerts for the site |
|
||
| 3 | Site Licenses | All BackupAssist licenses in the site |
|
MultiSite Manager accounts and mail server
Once you have set up MultiSite Manager, the sites and the managed computers, your MultiSite Manager solution is ready to use. You can now set up a mail server for email notifications and create accounts for users to log into MultiSite Manager with different levels of access. To set up user accounts, a mail server and notifications, see the MultiSite Manager User Guide.
