Hyper-V Server backups should be created using System Protection, which uses block level imaging and is better at handling large files. System Protection also has set up steps specifically designed for Hyper-V. You can use Cloud Backup, File Protection and File Archiving, but they do not provide a Hyper-V Server recovery option.
Operating systems supported
BackupAssist supports Hyper-V Server on the following operating systems:
- Windows Server 2016
- Windows Server 2012 R2
- Windows Server 2012
- Windows Server 2008 R2
- Windows Server 2008
The listed operating systems includes Server Core and Hyper-V Server versions of those operating systems.
Hyper-V protection pre-requisites
- Windows Server Backup. If Windows Server Backup is not installed, BackupAssist will provide a prompt to install it when the first backup job is created.
- For Windows Server 2008/2008 R2 the partition size of the disks being backed up should be less than 2TB
Cluster Shared Volume support
In a CSV environment, BackupAssist must be installed and licensed on each host.
To learn about BackupAssist CSV support, see Hyper-V in a CSV environment
Windows Server 2012 Feature support
Windows Server 2012 introduces the CSVFS format, which allows a cluster to differentiate CSV storage from NTFS storage. BackupAssist’s support for these and other feature is listed below:
- BackupAssist can back up Hyper-V guests located on CSV storage using the CSVFS file system.
- BackupAssist supports SMB 3.0 servers as a CSVFS backup destination.
- BackupAssist does not support backups of CSVFS and NTFS locations in the same snapshot. E.g. It’s not possible to back up a guest that uses CSV as well as a guest that uses an NTFS volume.
- BackupAssist supports Hyper-V Replica and can back up and restore a primary Hyper-V guest.
An online backup of a Hyper-V guest means backing up a Hyper-V guest while it is operating, without causing any interruptions to the guest. It is possible for some guests to back up online while other guests within the same Hyper-V backup are offline.
A number of guest criteria and configurations are required before an online backup is possible. Below is a list of reasons why an online backup may not be supported and what you can do about it.
- The Hyper-V Integration Service is not installed for that guest
- The Backup Integration service is not enabled for the guest correctly
- The guest is using a dynamically initialized disk or has a non NTFS partition
- The guests operating system does not support online backups through VSS
- The physical space on the host is insufficient for a complete snapshot
- SCSI controller's on guest when running on Server 2012 R2 host
You will need to install Hyper-V Integration Services on the host, and enable it on the guest. The host and guest VSS writers can then work together to create online, application-consistent backups.
To make sure this service is enabled correctly, right click on the guest machine and select Settings. Under Settings, browse under Management for Integration Services and in the main window you will see Backup (volume snapshot) listed. Make sure there is a tick in this.
This means a dynamic guest (as viewed from within the VM) as shown by the point 3 screen shot. For this scenario, please refer to Microsoft TechNet, which provides the following guidance. “All disks being used by the virtual machine are configured within the guest operating system as NTFS-formatted basic disks. Virtual machines that use dynamic disks or the FAT32 file system prevent an online backup from being performed.” To learn more, see Technet's VM blog.
Check that the Volume Shadow Copy service is started within the guest machine. This can be found under Control Panel > Administrative Tools > Services.
A guest can be forced into a saved state if there is not enough space on the physical disk to hold the snapshot completely, so a partial snapshot it taken and committed. While this is going on, the guest is placed into that state so that VSS can detect where it is up to.
Adding a SCSI controller can help when running Hyper-V on a Server 2012 R2 host. To learn more see the Technet forum.
Backing Hyper-V virtual machines, can become complicated once you factor in host data, volumes, domains, disks, VSS writers, services and the resulting issues that can arise. To keep the backups of your virtual machines as simple and robust as the environments themselves, we’ve put together a list of 10 tips for best practice Hyper-V backups.
Do not install other roles or applications on your Hyper-V host.
Your physical Hyper-V host server should only have one function, to be the Hyper-V host . It should not double as a file server, a DNS server or, even worse, an application server. Any non-Hyper-V software and data should be on another physical server or one of the Hyper-V guests. If you don’t follow this advice, you can complicate host level backups and affect the stability of the host server itself. Any problem with another role or application on the Hyper-V host can impact the guests. Even something as simple as a patch to an application could require a physical server reboot, and cause an outage for all of your Hyper-V guests (VMs) and the services they provide.
Only assign a single role or application to each guest
Each Hyper-V guest (VM) should only have a single role or application. It’s easy enough to make another guest, and dedicated environments are what make virtual machines so great. For backups, having only one role or application per guest makes it easier to: Recover guests and services in a managed way, allocate backup agents and licenses, perform granular restores of data inside of Hyper-V guests.
Focus on guest only Hyper-V backups
The Hyper-V host provides the platform, architecture and processes required to support and maintain your Hyper-V guests (VMs). Although it’s good to have a bare-metal backup of the entire physical server, backups of just the Hyper-V guests can also be useful as they contain all the data you need and use less space. For a recovery, you can reinstall the Hyper-V Server and use the backup to add the guests back. A mix of weekly full-metal archive backups and daily “guest only” backups can provide a good balance.
Enable Hyper-V integration services
Backup software can use a VSS snapshot to maintain a copy of data that has changed during the backup, so that all of the data in the backup reflects the data as it was at a single point in time – this is called crash-consistent. Application-consistent means a VSS-Aware application checks its own files in the VSS snapshot to make sure they are correct. For example, information in memory and uncompleted database transactions are included in the snapshot, making it more accurate and consistent. This is critical, especially for applications like Exchange and SQL.
Without Hyper-V Integration Services installed, a Hyper-V guest will not be aware of the backup job so you will only get a crash-consistent backup. When you install the Hyper-V Integration Services on the host, and enable it on the guest, the host and guest VSS writers can work together to create online, application-consistent backups of applications like Exchange and SQL, inside the Hyper-V guest.
Run the backup on the Hyper-V host server, not the guest
The easiest way to protect Hyper-V guests is to install your backup software on the Hyper-V host (physical server) and back up the guests from there. This way you can back up multiple guests using the same backup job, and have those guests in a single backup. This will also save money, because you only need one backup license. Some backup solutions may require a backup agent on each guest but BackupAssist only requires a single host license. As long as you have Hyper-V integration services installed, the Hyper-V VSS writer on the host, where the backup is running, can communicate with an application (Exchange, SQL) VSS writer on the guest, so that you have application-consistent backups of all guests - in a single backup.
To learn more about the VSS process, see VSS guide.
Do not back up a CSV device directly
If your guests use a cluster shared volume (CSV), do not back up the CSV device directly because the Hyper-V Server’s VSS writer will not be involved. Back up the Hyper-V Server so that the Hyper-V VSS writer is used to make application-consistent backups of data on the cluster shared volume.
Don’t put the Hyper-V host on the same domain as the guests
This safeguard applies when one of your Hyper-V guests (VMs) has the role of domain controller. If that domain controller guest goes down and the host is on the same domain, you may not be able to log into your Hyper-V Server.
Backup the whole volume
When performing a Hyper-V System Protection backup, it’s best to back up the whole volume. This can improve the performance of incremental image backups, and it makes the backups faster. If you follow this best practice, and backup the whole volume, you should have your non-production guests (VMs) on a different volume, so that you can exclude them from the backup. If you mix guest categories or guest files across volumes, both backups and restores become more complicated and less efficient.
Keep system and guest data on separate volumes
The volume you install Microsoft Hyper-V Server onto, and the volume used by the physical server’s operating system, should not be used to store Hyper-V guest data (VHDs). For example, if your physical server uses C: drive, your Hyper-V guests should not. They should have their own volumes, and those volumes should not contain system files, such as the physical server’s swap file. This is important for performance and to remove conflicts. It’s also important for backups because you want to be able to make “guest only” backups using complete volumes.
Use fixed virtual disks
The types of disks you use can have an impact on your Hyper-V host server’s performance and data integrity, both of which are important for backups. For this reason, your Hyper-V host server should use fixed virtual disks. Pass-through disks add complexity and don’t allow VM snapshots or Hyper-V replica, and dynamic and differencing disks add a performance and space overhead. Fixed disks enable better performance and data integrity. This means better backups.
BackupAssist 10 introduces support for two new Windows Server Hyper-V 2016 features: Nested Virtualization and Shielded VMs.
Nested Virtualization
Allows you to run a Hyper-V Server on a virtual machine that is itself running on a Hyper-V Server. BackupAssist can back up, restore and recover a nested VM as long as BackupAssist is installed on that VMs Hyper-V Server.
If BackupAssist is installed on a Hyper-V Server with nested VMs, it can perform the following functions for those VMs:
- Create backups of data and VSS applications, including application-consistent backups
- Perform restores, including Exchange Granular Restores and Hyper-V Granular Restores
- Perform recoveries, including Full VM Recoveries and Rapid VM Recoveries of VMs belonging to the Hyper-V Server that BackupAssist is installed on.
Note: BackupAssist cannot see VMs running on the VMs of the host it is installed on, and therefore cannot perform backups, restores and recoveries of those VMs. BackupAssist needs to be installed onto each Hyper-V Server that has the nested VMs that you want BackupAssist to protect.
Shielded VMs
Allows you to restrict access to Hyper-V guests so that they cannot be accessed by Hyper-V administrators. This means administrators cannot access a Shielded VMs contents, change its settings or copy or move it, unless the administrator has explicit permission to do so, and does so by authenticating through the Shielded VM.
BackupAssist can make backups of Shielded VMs, including application-consistent backups of Hyper-V servers, Exchange servers and SQL servers running on the Shielded VM.
Considerations:
- BackupAssist can perform a Full VM Recovery of a Shielded VM.
- BackupAssist can NOT perform a Rapid VM Recovery of a Shielded VM.
- Shielded VMs must be recovered to their original host or host cluster.
- Due to the nature of Shielded VM protection, BackupAssist can NOT perform granular restores of data from a VM, including granular Hyper-V and Exchange restores. You can only recover the entire VM.
- When you recover a Shielded VM, it will be recovered with its shielded protection and configurations intact.
- BackupAssist's Hyper-V tab will show a Shielded VM's icon as a VM with a shield symbol.
To learn about Hyper-V features and the Hyper-V tab, see Hyper-V Overview
To learn about best practices for implementing Hyper-V, see Hyper-V Implementation guide
How to create a Hyper-V backup job
Launch BackupAssist and follow the steps outlined below:
- Select the Backup tab
- Select Create a New Backup Job
- Select System Protection
If this is the first time you have created a backup job, you will be asked to provide a Backup User Identity. To learn more, see Backup User Identity - Selections
This step is used to select the Hyper-V host and guests to be backed up. If you want a full Hyper-V Server backup, select Microsoft Hyper-V VSS and the required data will be ticked. - To select all of the guests, tick the box next to Microsoft Hyper-V VSS.
- To select some of the guests, tick the box next to the guest in the Microsoft Hyper-V VSS list.
- Select Manage on the Backup tab.
- Select the backup job.
- Select Files and Applications from the left menu.
- De-select the volumes under Critical Volumes and Data and Backup Volumes. The guest selections under Microsoft Hyper-V VSS will stay selected.
- Select Apply changes and the guest only selection will be saved.
- Destination media
This step is used to select the type of media that you want to back your data up to. This step’s name will change to the media type selected, when you click Next. - Select a media for your backup destination.
- Select Enable BitLocker encryption if you want to encrypt your backup. BitLocker encryption is available on supported versions of Windows Server for External disk and RDX drive destinations. To learn more, see BitLocker Encryption guide
- Select Data container, if you want to use a VHD / VHDX as your backup destination. Before you select Data container, review the resource Data Container guide. This explains why you would use a Data container, and what the advantages and requirements are.
- Click Next.
- Schedule
This step is used to select when and how you want the backup job to run, and how long you would like the backup to be retained for. A selection of pre-configured schedules, called schemes, as well as a custom scheme, can be selected. - The schemes available will depend on the type of destination media selected in step 5.
- Clicking on a scheme will display information about the schedule used.
- Exchange VM Detection
- The Username and Password of an account that has access to the guest/s running Exchange.
- The Domain of the guest/s running Exchange.
- Hyper-V CSV Options
- The intermediate backup’s location must be a local disk.
- The intermediate backup’s disk is overwritten each time a backup is run.
- The image backup is taken from the whole staging disk.
- The staging drives and the backup destination shown are based on the selections made during the Set up destination step.
- Set up destination
This step is used to configure the location of the media selected in step 5. The options presented will change with the type of media selected. - A drive letter of the USB drive used to store the encryption key. An encryption key is saved for each encrypted drive, and is used to unlock the drive when you backup and restore data.
- A password that will allow you to manually access any drive encrypted by this job when you perform a restore or a recovery. This password is saved in the backup job.
- For an RDX or External disk destination, Use all available space will be selected by default. It is important to review this setting to ensure it is appropriate.
- For a Local hard drive and Network location, set the size manually by using the field provided, or select the Use all available space option.
- The size of a Data container cannot be changed once the backup job has run.
- Selecting Use all available space will allow the Data container to grow into the available space.
- Notifications
Once a backup job has completed, BackupAssist can send an email to inform selected recipients of the result. This email notification is enabled during the creation of the backup job, but you must also provide your mail server settings so that the notifications can be sent. To learn how to configure your mail server for BackupAssist, see Email server settings. Show more
To enable email notifications:
- Select Add an email report notification.
- Enter recipients into the Send reports to this email address field.
- Enter recipients into the Also send reports to this email address field. You can then use the drop down list to select the condition under which the email is sent.
- If you want to know when a backup media has been changed, select Add an email reminder notification and enter the email addresses to send the notifications to.
- Click Next.
To learn more, see Manage : Notifications
Note: After the backup job has been created, you can modify the notification's recipients, set additional notification conditions and include print and file notification types. To learn more, see Email address list.
- Prepare media
If you selected a portable media as your backup destination, you will be given the option to prepare and label it. The label allows BackupAssist to recognize the media and check that the correct media is being used on the correct day. For example, if you put an RDX drive in on Tuesday but it was labeled Wednesday, BackupAssist will warn you that the incorrect media was detected. - Let BackupAssist keep track of your media. Deselect this if you do not want to prepare and label your media.
- If the wrong media is inserted : Back up anyway and warn the users. This can be changed to Do not back up.
- If new or unrecognized media is inserted : Do not back up. This can be changed to Back up anyway and warn the users.
- Attach the removable media devices. If you can only attach one media at a time, repeat the steps for each media.
- Change the label's description if you do not want to use the default description.
- Select the drive designation.
- Select Prepare. This will initiate the preparation and labeling process.
- Name your backup
Provide a name for your backup job, and click Finish.
If you are using BitLocker encryption, the option will be Next. - Next steps
This step will be available if you selected Enable BitLocker encryption, so you can encrypt the removable drives. This step will also be available if you are making a backup of the entire system, so that you can make a bootable media.

The Selections step options
Microsoft Hyper-V VSS
This part of the Selections screen displays the Hyper-V guests on the server. Selecting a guest in the left pane will display the data required to back up that guest in the right pane. The data displayed will be the guest’s VHD and configuration file/s. If Microsoft Hyper-V VSS is not selected, failover or migrated guests may not be backed up. The Microsoft Hyper-V VSS selection is highly recommended for CSV environments.
Critical Volumes
This part of the Selections screen displays the volume(s) that Windows Server is installed on. You must select Critical Volumes if you want to be able to use the backup for a bare metal recovery.
Data and backup volumes
This part of the Selections screen displays the volumes that contain the guest VHDs. The VHD files (or virtual hard disk files) contain the virtual machine’s operating system, applications and data. The guests’ files should have their own volume and that volume should not contain system files, such as the physical server’s swap file.
Full VSS mode and Copy VSS mode
Full VSS mode is selected by default and means that VSS will clean up log files in the guest after the backup has been created. For example, the logs of an Exchange Server on a guest. If Copy VSS mode is selected, VSS will not perform a post backup cleanup and the size of logs will continue to grow and take up disk space.
Full Host or guest only backup
You will need to decide what Hyper-V data to back up - just the guests or the guests and the host.
Host backups are full system backups of the Hyper-V host server and guests, and includes the drive that Windows Server and Hyper-V Server are installed on. This backup will allow you to perform a recovery of the server, and allow you to restore files from the host. It will also allow you to restore full guests and, with the Hyper-V Advanced add-on, files from inside of quests.
To perform a Host backup, select Microsoft Hyper-V VSS and Critical Volumes.
Guest only backups back up selected guest VHDs and the host data each guest needs for an application-consistent restore. You will be able to restore full guests and, with the Hyper-V Advanced add-on, files from inside of quests, but you cannot restore host files. If the Hyper-V Server is only used for Hyper-V, the host files should only be system files, not user data. You will not be able to perform a bare metal recovery, but you can reinstall Windows with Hyper-V then restore the guests to the Hyper-V Server.
To perform a guest only backup, follow the Guest only backup process below.
To perform a guest only backup, you select the guest to be backed up, but including the required guest data is critical because you need to ensure that you are backing up both the guest’s VHD and configuration file, which may be on different volumes.
Microsoft Hyper-V VSS considerations
Selecting the guest will display the data required to back up that guest in the right pane. You will see the guest’s VHD/X and configuration (XML) file/s. The VHD and XML files of all guests to be backed up should be on the same volume, and that volume should only contain data that is to be backed up. For example, a guest’s VHD should not be on E:\ drive and its XML file on C:\.
Data and backup volumes considerations
This part of the Selections screen shows the volumes that contain the guest VHDs. The VHD files contain the virtual machine’s operating system, applications and data. Windows Server 2012 and later allows you to use VHD or VHDX. The guests’ files should have their own volume and that volume should not contain system files, such as the physical server’s swap file. This is important for performance and to remove conflicts. As we will explain later in this article, dedicated guest volumes are also important if you want to create guest only backups.
Guest volume configurations
VHD and XML files can end up on separate volumes because when creating a guest, the Specify Name and Location step, which determines the guests location, defaults to the local system volume in C:\Program files\ Microsoft\ Windows\Hyper-V. It is common for this default to be accepted. Later in the Connect Virtual Hard disk step, you specify the guests storage, where the VHD will go. If you select a different volume to the host, the VHD will be stored on a different volume and the XML files will still be stored on the system volume. This will result in the guest’s VHD and XML files being on separate volumes.
VHD and XML files can also end up on different volumes when the default local system volume is selected on both setup steps and the virtual machine’s VHD is configured for a different volume after it has been created.
We recommended configuring guests so that their VHD and XML files are on the same volume. To do this, the volume where the guest is to be stored should be selected in the Specify Name and Location and Connect Virtual Hard disk steps.
Note: The guests to be backed up should not share a volume with data that is not to be backed up.
How to select some or all guests
Guests must be selected under Microsoft Hyper-V VSS as follows:
Selecting any guest will select the volume that contains the guest’s VHD and the volume that contains the guest’s XML file(s). In a best practice configuration, the VHD and XML files will be on the same volume.
The host component folder under Microsoft Hyper-V VSS does not need to be selected, because the whole volume has been selected. Using the Hyper-V Server’s VSS section, ensures that both the guest VHD and XML files are included in the backup.
Note: If guests are not selected using the Hyper-V Server’s VSS section, BackupAssist will not be able to restore the guest and the VSS writer can not make an application-consistent backup of the guest, and any VSS applications inside it. You can restore a guest without its XML file(s) by creating a new guest and using a VHD only backup, but you must still configure the backup job using the Hyper-V Server’s VSS section so that the backup is application-consistent.
How to exclude non guest data
When you tick a guest in the Selections screen under Microsoft Hyper-V VSS, both the volume containing the guest VHD and the volume containing the guest’s XML configuration file(s) will be selected. The entire volume is selected because the backup job does not know what backup destination you are using. Some backup destinations (like RDX) do not support individual file backups, which means they cannot be used to back up just the guest VHD and configuration file(s).
Destinations that support VSS: Removable drives (e.g. external USB drive), local drives, network locations (e.g. iSCSI Target, network share, NAS device using a Data container), RDX drive using a data container.
If your backup destination supports VSS, you can de-select the data you don’t need AFTER the backup job has been created. Ideally, the guest volume will only contain guests to be backed up so the whole volume can be selected.
DO NOT use the Selections screen to de-select data.
Backing up a full volume is faster and stores more backup history. However, if you have data on the guest volume that you do not want to backup, or guest data on the system volume, you can deselect data after the backup job has been created, as long as the backup destination supports VSS.
De-select data as follows:
If you only select some guests on a volume and have Full VSS Mode selected, you will receive an Implicit selections warning when you save the changes. The warning appears because VSS thinks the whole volume is being backed up, and may clean up the logs of all guests on the volume, even guests that are not backed up. This can result in a VSS application losing data (truncating logs) on guests that were not backed up, and lead to data loss for those guests. If you select Ignore the warning, the additional guests’ host data will be added to the backup so that the relevant guests get backed up before data is lost.
Selecting Copy VSS Mode means that only your selections will be backed up and VSS applications will not clean up any data, so no data loss will occur. At least one Full VSS Mode backup must be performed on a regular basis, otherwise old data like Exchange log files will never be cleaned up.

Follow these steps to select a media:

Schedule considerations:
To learn more, see Backup Schedules
Select an appropriate scheme, and click Next.
If a Hyper-V guest runs an Exchange Server, use this step to provide authentication information for that guest. With this information, BackupAssist can see what guest contains the Exchange Server, even if it is on a different domain to the host.
With the guest authentication information, BackupAssist can create a backup catalog of the Exchange Server’s EDB files that the Exchange Granular add-on can use.
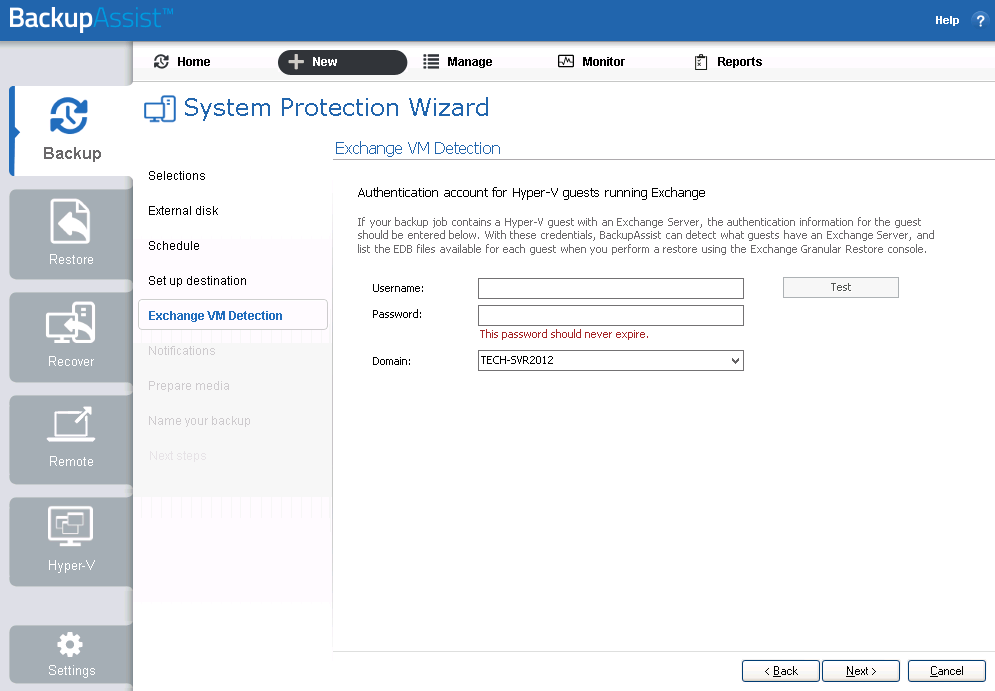
If more than one guest has an Exchange Server, then each guest with an Exchange Server should be on the same domain, and accessible using the same account. This account’s username, password and domain is entered in the Exchange VM detection screen.
Enter the following Exchange VM Detection authentication information, and select Next.
Note: A granular restore of Exchange data from a Hyper-V guest, requires both Hyper-V Advanced add-on (which will run automatically as part of the restore) and the Exchange Granular add-on licenses.
The Hyper-V CSV Options step will only appear if you have a CSV environment. This is used to configure an intermediate backup location, called a staging disk.

A staging disk is used to put the Hyper-V host and its guests into a single image backup (VHD file), even if they are on different volumes.
Hyper-V CSV staging disk considerations:
Note: The entire contents of the staging disk will imaged to the backup destination each time the backup is run. Check that the disk is both appropriate and prepared for this step. For more information, refer to the Backing up a CSV environment section of this user guide.
To learn more see Hyper-V in a CSV environment
Enter the drive to be used for the intermediate backup (staging disk), and click Next.BitLocker encryption setup

If you selected BitLocker encryption in step 5, you will need to provide:
Note: A USB flash drive containing the encryption key must connected to the server running BackupAssist, to allow BackupAssist to access the drive when you backup or restore data.
Note: It is important that you keep a copy of your password in a safe place, as we cannot retrieve passwords if they are lost or forgotten.
Data container setup

If you selected Data Container in step 5, you will need to configure the Data container.
Bootable Backup setup
If you are doing a bare-metal backup to an external hard disk, a Bootable Backup Media option will be displayed and selected by default. This feature allows your backup media to boot into a RecoverAssist recovery environment and recover the server, without a separate boot disk.
Destination check report
If you are using a Local media or a Local network destination, a Check destinationbutton will be available to check your backup destination for problems. After the checks have been completed, the results can be viewed by selecting the Report link. If you are using Removable media destinations, these checks are performed when you select Prepare on the Prepare Media step.
Configure your backup destination, and click Next.


Three selections are automatically selected on the Prepare media screen:
The removable media listed are based on the backup schedule you selected in step 6. Each media will have a default label name based on your backup schedule, a drive designation drop-down and a Prepare button. A Prepare button becomes selectable when its media is attached.
To prepare the media:
If you selected BitLocker encryption, the Prepare media button will mark those drives for encryption. The encryption process will be initiated by the final backup job creation step. To learn more, see BitLocker Encryption guide.
Destination check report
Once the prepare process has completed, a Report link will appear next to the Prepare button. This link opens the Destination Check report, which will advise if any problems were detected with the backup media. For System Protection backups, if the Make media bootable with RecoverAssist was selected in the Set up destination screen, the report will also advise if the media can or cannot be made bootable.
Once all of the media have been prepared, select Next.

Launch RecoverAssist builder
If this box is ticket, the RecoverAssist builder will open when you select Finish. The RecoverAssist builder will allow you to make a standalone bootable media or a bootable backup media. Attach the media and select the option required. You do not need to use this process to make a bootable backup; a backup will automatically be made bootable the first time the backup job runs if you left Bootable Backup Media selected in the Set up destination step.
To learn more about RecoverAssist, see Recover tab
Launch BitLocker encryption tool
If this box is ticked, the BitLocker Encryption tool will open when you select Finish. When the tool opens, you can use it to encrypt the drives. This should be done before the backup job runs, because if an unencrypted drive is used for a BitLocker backup job, the job will fail. The BitLocker encryption tool can run in the background after BackupAssist has been closed.
To learn about the BitLocker encryption tool and how to use it, see BitLocker Encryption guide
Your Hyper-V backup job has now been created.
Note: BackupAssist's reports can be used to review the results of each backup job. Backups should also so be checked by performing a test restore. Regular test restores should be part of your backup solution.
What's next
- To learn about monitoring backup jobs, see Monitor backups
- To learn about the other backup settings available, see Settings tab
- To learn about the options available when you edit a backup job, see Manage backup jobs