 Belgium
 Canada
 Germany
 Italy
Italy France
 Spain
Spain United Kingdom
Configuring BackupAssist for Rsync without SSH.
Required licenses
BackupAssist v5.1 or greater (recommend BackupAssist v6) and the BackupAssist for Rsync Add-on1
The difference between Rsync over SSH and Rsync Daemon
BackupAssist provides two options for running backups over an Rsync connection:
- Rsync over SSH
- Rsync Daemon.
Rsync over SSH runs Rsync via a secure shell (SSH, port 22), which means that all traffic over the internet is encrypted. User access control is modified by editing user accounts on the server.
Daemon mode runs Rsync as a normal TCP/IP service and internet traffic is not encrypted. User access control is modified by editing the Rsync.conf file.
Both Windows and Linux data hosts support Rsync over SSH. However, some NAS devices do not, and where this is the case, Daemon mode must be used instead. Even though your data is not encrypted, Daemon mode is still an acceptable solution provided a secure LAN/WAN (such as site-to-site VPN) is used.
When using Daemon mode, a common issue is that the process is not fully automatic - unlike Rsync over SSH, you can't just specify a directory to write to and away it goes. Rsync Daemon's require a module to be set up first to make it possible to specify the backup directory.
Prerequisites
Before attempting to create a Daemon module you must make sure that cwRsync is installed on the Rsync destination. You can download a copy of cwRsync from the BackupAssist website: http://www.backupassist.com/rsync/. In addition, the steps to install cwRsync successfully are located on page 9 of our Rsync whitepaper: http://www.backupassist.com/rsync/Setting_up_Rsync_Server.pdf.
Altering the rsyncd.conf file
First, you need to create the Daemon module to be able to connect to it. This is done by altering the rsyncd.conf file, which is located in C:\Program Files (x86)\ICW by default.
Open this file in a text editor, such as Notepad, and enter something similar to the following:
[test]
path = /cygdrive/c/backup_directory
read only = false
transfer logging = yes
The meaning of each line is as follows:
[test] - This is the name of the module you're creating. (It can be set to anything you choose).
path - This is the directory that you want to back up to on the Rsync server.
read only - This sets the 'path' (see above) to either be read/write or read only. Since we want to write the backup to this directory, it should always be set to 'False'.
transfer logging - Allows any transfer information to be logged for future reference. This can be set to either Yes or No.
Once you have finished editing the rsyncd.conf file, save it to the following location: C:\Program Files (x86)\ICW\etc.
Starting the Rsync Daemon on the Rsync Destination
Next, you need to make sure that the Rsync Daemon service is started correctly. This is the service used to control the Daemon connection and if not started correctly can cause connection errors.
To start the Rsync Daemon, follow these steps:
- Open a command prompt window by browsing to Start > Run > and typing cmd in the text field provided.
- In the command prompt Window, change directory by typing CD "C:\Program Files\ICW\bin" or CD "C:\Program Files (x86)\ICW\bin" on 64-bit machines.

- Start the Rsync Daemon by entering Rsync --daemon:
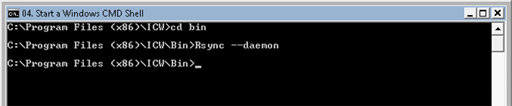
The Rsync Daemon should now be started and BackupAssist should be able to connect to it successfully.
Configuring BackupAssist to use the Rsync Module
The next step is to configure the BackupAssist client to perform a backup using Rsync. Install BackupAssist v5.1 or later2. You will have a free 30 day trial, but beyond this trial period, you will need to purchase a license for "BackupAssist" and "BackupAssist for Rsync Add-on" to continue using it.
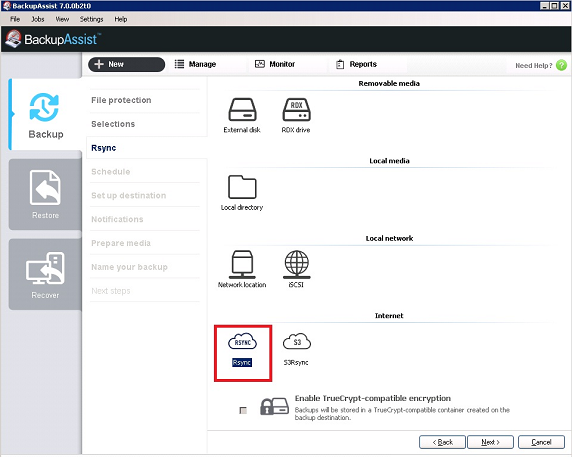
1. 2. 3. Select Rsync as your job type and click "Next‟ (see screenshot below):To create a new BackupAssist backup job:
- Launch the BackupAssist console and choose File protection
- After making your backup selections, click “Next”
- Select Rsync as your job type and click "Next‟ (see screenshot below):
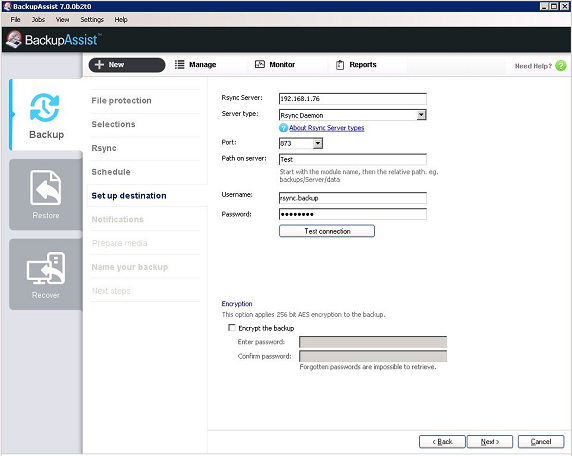
In the Rsync Server options section (see screenshot below):
- Enter your Rsync server name (or IP address), and choose "Rsync Daemon".
- Under "Path on server", type in the name of the Rsync module you created earlier (in this example 'Test').
- Enter the username and password that you want to connect to the Rsync server with.
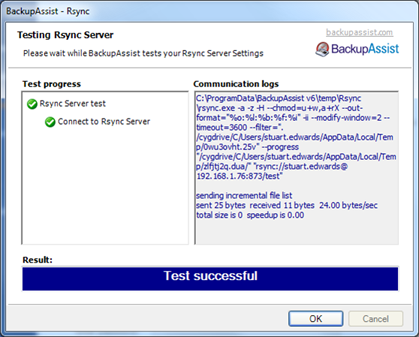
- Click the "Test connection...‟ button to test communication with the Rsync server.
If you've performed each step correctly, you should the test connection should pass and you will be on your way to performing backups using Rsync with BackupAssist!
If you have any questions about BackupAssist or setting up an Rsync backup, please contact us via email at support@backupassist.com. We'll be happy to help!
Notes
1. BackupAssist for Rsync is also available as a Standalone license for those wishing to perform Rsync/Internet backup only. A BackupAssist base license is not required if you are using a BackupAssist for Rsync Standalone license. You can read more about the difference between the two BackupAssist for Rsync license types here.
2. If you plan to purchase a new BackupAssist for Rsync Add-on license, you will require a BackupAssist v6 base license for this operation. Download a free trial at www.backupassist.com. Or upgrade your existing base license at http://www.backupassist.com/purchasing/purchase.php

