 Belgium
 Canada
 Germany
 Italy
Italy France
 Spain
Spain United Kingdom
Bare Metal Restoration
How to perform bare metal system restorations using ASR in Windows XP & 2003Contents
- Introduction
- System Recovery Options
- What is ASR?
- How does ASR work?
- ASR Considerations
- What is the System State
- Steps to Using ASR to Backup Your System
- Steps to Using ASR to Restore Your System
- Tests Conducted and Results
- References
Important Notice
The information and instructions contained within this document are specific to BackupAssist v3.x.x. While some of this information will be valid for other versions of BackupAssist we do not support the application of any steps or suggestions on versions other than v3.x.x
Introduction
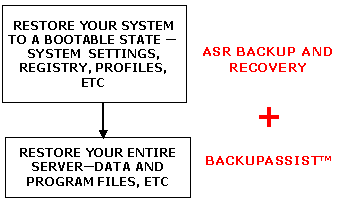
It is crucial to plan ahead and develop a standardized backup procedure that will allow for convenient, cost effective and timely restoration of your computer resources in the event of complete system failure or data loss. Bare Metal Restorations involve restoring a system to hardware that either has no installed software or corrupted/erroneous software. Bare Metal Restorations rebuild the storage configuration of your physical disks and retrieve and restore critical operating system files in order to allow the system to boot successfully.Windows XP and 2003 provide the facility to be able to manage and implement Bare Metal Restorations into your backup plan to safeguard your system against a serious failure through the use of Automated System Recovery (ASR). With a Bare Metal Restore utilizing the ASR, you can boot a machine using the Windows XP or 2003 CD, and then use an ASR floppy disk to recover the system directly from an ASR backup.
System Recovery Options
When restoring your system after a disaster, you have three different options (depending on your operating system):
| Restore Option | Process | Advantages/Disadvantages |
|---|---|---|
| Bare Metal Windows XP / 2003 Server Only | -Restore basic system from an ASR backup.
-Restore entire system and data from last backup. |
Fastest and most reliable - a secure and hassle free automated full restore of your system to its captured safe state, thus removing the lengthy configuration process entirely |
| OS Reinstall | - Install the OS. - Restore entire system and data from last backup. |
Intermediate - Ensures that all your previous settings and system state are restored but is a manual process that is more time consuming than Bare Metal. |
| Full Reinstall | - Install OS, system and applications. - Restore data from last backup. |
Time consuming - full reinstall of Windows, reconfigure all your settings (users, network, system, etc), reinstall all your additional software packages, and then perform a restoration of other backed up data files. |
What is ASR?
ASR is a new tool designed for use with the Windows Backup Utility (NTBackup.exe) and in conjunction with other backup programs like BackupAssist™. ASR replaces the Emergency Repair Disk feature from Windows NT 4.0 and 2000. The Emergency Repair Disk replaced missing or corrupt system files but did not format drives or reconfigure storage information - ASR always formats the boot volume and, if necessary, the system volume as well before restoring your system.The purpose of ASR is to help you automatically restore your system to a working state after a system failure. The ASR process utilizes an ASR floppy disk that contains storage and system definitions that allow you to restore your system to a safe state in the event of a disaster/failure. After an ASR restore completes, you can restore any additional data files that you had backed up previously, with software like BackupAssist™.
ASR should be a last resort after you have exhausted the other various recovery options available to Windows-based machines (rolling back drivers, system restore, safe mode, etc), as well as attempting to restore system state data from backups created by applications such as BackupAssist™.
Important: ASR, however, is something you should consider and incorporate early intro your backup plan to cover all bases.
How does ASR work?
Backing Up
The ASR in Windows XP and 2003 backs up the operating system boot volumes (The disk volume that contains the Windows Operating System - most likely C: Drive) and system volumes (the disk volume that has hardware-specific files to load Windows with BIOS) and the system state (see 'What is the system state?' for more information).
ASR then creates an ASR floppy disk (1.44MB) which stores all the critical system and storage information in order to initiate the ASR restore process and system recovery (see above).
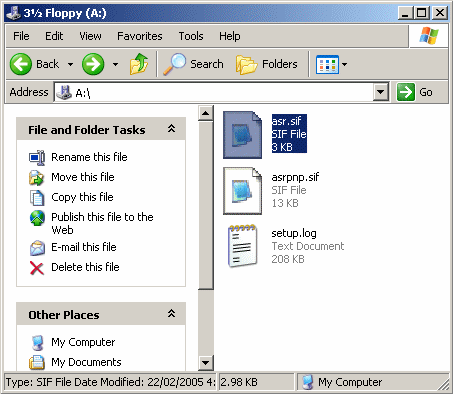
Note: If your ASR recovery floppy disk is lost or damaged, you can retrieve the necessary files (.sif files) from the WINDOWS\Repair directory on your system drive. You can additionally retrieve these files by restoring them from the backup media you used to perform the initial ASR backup on.
Important: The ASR will not backup or be able to restore additional program and data volume drives (extra partitions, hdds, external hdds, network drives, etc) - you need to backup this data using another backup application like BackupAssist™.
Restoring Locally
When the ASR restore is invoked via the ASR Floppy Disk created during the ASR backup, all of the critical system disk signatures and volumes (required by the operating system to boot) are restored. The system drive is then formatted before the restoration can commence.Important: Since the system drive is formatted as part of the ASR restore process you should not solely depend on ASR to backup and be able to restore user data files on the boot and system drives as once the format is complete, the data is lost. A wise secondary precaution would involve an additional backup of your system with BackupAssist™.
Once the critical disks are recreated and the system volume is formatted, ASR commences the installation of the Windows Operating System. During the operating system installation the Backup Utility (NTBackup.exe) is automatically launched and a restore action is invoked which restores the data originally backed up during the ASR Wizard. Any Plug and Play devices are also installed during the restore process.
Restoring Remotely
If your computer does not have a floppy disk drive you can utilize a Remote Installation Services (RIS) server to perform the ASR restore. RIS uses Pre-boot execution Environment (PXE) technology that enables computers without operating systems to conduct Windows installations through a TCP/IP networked connection. The client computer, however, must have a PXE-enabled network adapter for it to connect to the RIS server. More information about RIS can be obtained through Microsoft: Remote Operating System InstallationASR Considerations
There are certain guidelines and requirements that should be taken into consideration before commencing the ASR backup and restore process.Backing Up with ASR
- Perform the ASR backup regularly - in order to ensure you have an up-to-date backup of your system to restore from in the event of system failure, you should perform the ASR backup once a month or after any major change to the system.
- Ensure that your backup device will be available for the restoration process (tape drives, hard drive partitions, etc)
- File system conversions should be performed prior to the ASR backup process.
- Some resources (IEEE 1394, Jazz disks) may not be recognizable during the ASR restore so use other devices for the ASR backup (tape drives, hard drive partitions) to be safe.
- To perform an ASR backup you must be a member of the Administrators or Backup Operators group.
- Keep the ASR floppy disk secure and safe - you cannot use a floppy disk created at a different time or with a different set of backup media to that created during the initial ASR backup.
- Server clusters: run the ASR backup process on all nodes in the cluster, ensuring that the Cluster service is running at the time of backup. Also ensure that one of the nodes is listed as the owner of the quorum resource.
- ASR supports FAT16 volumes of up to 2.1GB only and does not support 4GB FAT16 partitions with a cluster size of 64K. Ensure that you convert 4GB FAT16 partitions to NTFS before you attempt to implement ASR into your backup plan.
Restoring with ASR
- The system you are restoring must have identical hardware to that of the system you performed the ASR backup on.
IE: if you performed the ASR backup on a drive of 80GB, your ASR restore must be on a drive of 80GB or greater in storage capacity. - If you had programs/applications installed on different drive partitions to that of the system volume (C: for example), the application data for these programs will not be restored.
Consequently, you need to backup and restore these files from a BackupAssist™ backup!
Note: An entry in the registry of these applications, however, will be restored from the system state data and you may have difficulty removing these programs (Control Panel > Add/Remove programs) if the actual application data has been removed from its original location.
What is the System State?
The ASR backup involves a complete backup of your boot and system volumes (where Windows has been installed to - typically the C: drive), as well as your system state.The system state backup involves the following:
- Registry, COM+ Class Registration database,
- Boot files, Certificate Services database
- Active Directory directory service, SYSVOL directory
- Cluster service information, IIS Metadirectory
- System files that are under Windows File Protection
The system state alone cannot be used to restore the entire system (which is why the ASR backs up system and boot volumes as well) and you cannot choose to backup or restore individual components of the system state because of dependency issues.
Steps to Using ASR to Backup Your System
- Launch the Windows Backup Utility (NTBackup.exe)
Start Menu > Accessories > System Tools > Backup - Switch to Advanced Mode
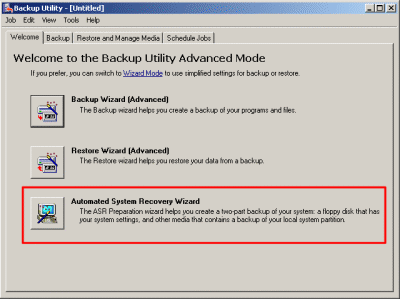
- Start the ASR Wizard (depicted above)
Welcome Tab > Automated System Recovery Wizard
OR
Tools > ASR Wizard - Select the media you want to backup to
Ensure that you have adequate space on your intended medium to do the backup - this will be dependent on how full your system drive is (C: typically).File
Input a meaningful filename and designate a location that is NOT your system volume (ie choose another partition, external hdd, etc) as the system volume will be formatted during the ASR restore process.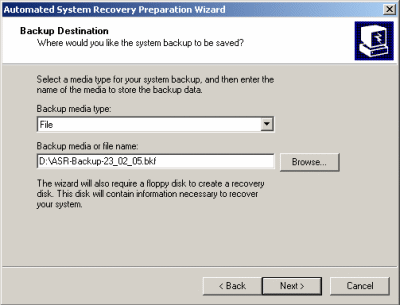
Tape
Choose your tape drive from the drop-down list (Backup media type) and leave New as the media name.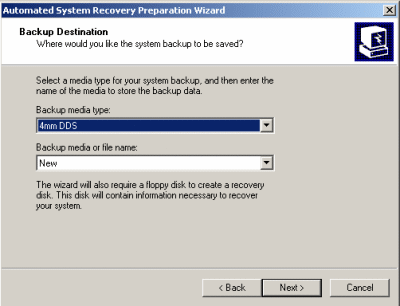
- Click Next and then Finish
The backup process will now commence, which may take some time to complete.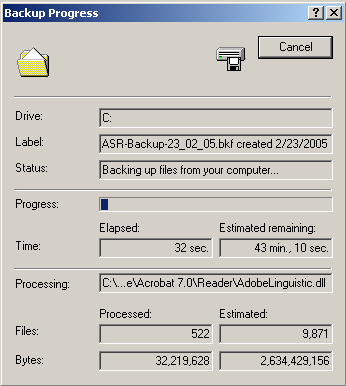
- Insert a 1.44MB floppy disk
When prompted, insert a 1.44MB floppy disk into the floppy drive so the ASR backup process can create the ASR recovery disk.
Steps to Using ASR to Restore Your System
Before you start
Ensure you have the following before you commence your ASR restoration:- Your ASR recovery floppy disk.
- Your backup media (tape drive, hdd, etc)
- Operating System installation CD.
- If you have a mass storage controller and require a separate driver file for it, copy the driver file to a floppy disk prior to the ASR restore process.
Once you have all these items you can commence the restoration:
- Insert the original operating system installation disc into the CD drive
- Reboot your computer
Ensure that your computer is set to boot from the CD-ROM drive within BIOS and press a key if prompted to boot from the CD-ROM drive. - Press F2 to run the ASR
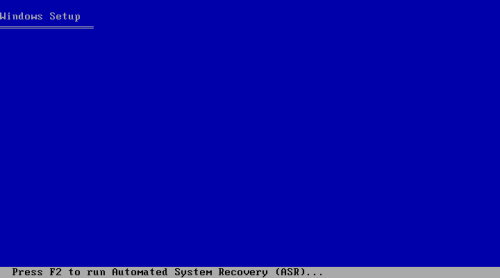
Once the system begins to boot from the operating system CD you will first be prompted to press F6 to install any RAID controllers (ignore this unless required), and then asked to press F2 to begin the ASR restore process.
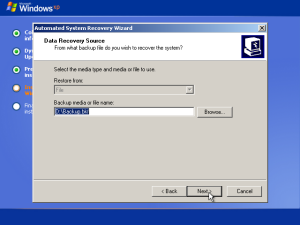
- Insert your ASR recovery floppy disk
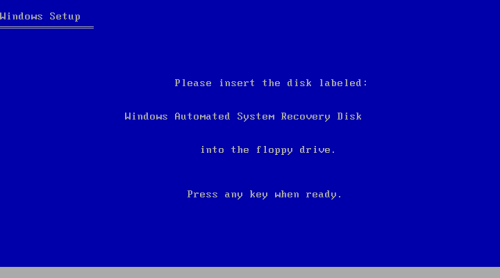
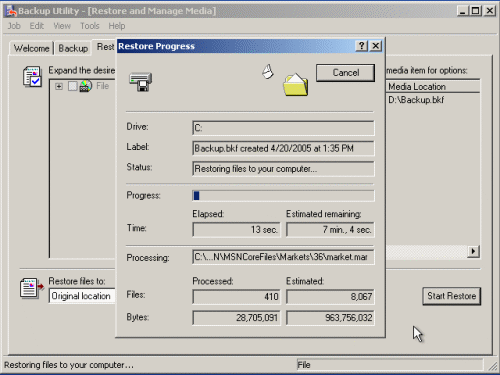
You will be prompted to insert the ASR recovery disk. Once the setup application has read the disk, the ASR recovery process commences, including a complete format of the system partition. After the format has completed, the operating system setup files are copied to the partition.
- Follow the directions on the screen
The system will reboot after the setup files have been copied. If you have a separate driver file for a mass storage controller, press F6 when prompted to after the system reboots. - Windows installation and ASR restoration
Once the system has rebooted, a quick Windows installation commences in which devices are installed and the network is automatically configured. The ASR Recovery Wizard will then launch (depicted below).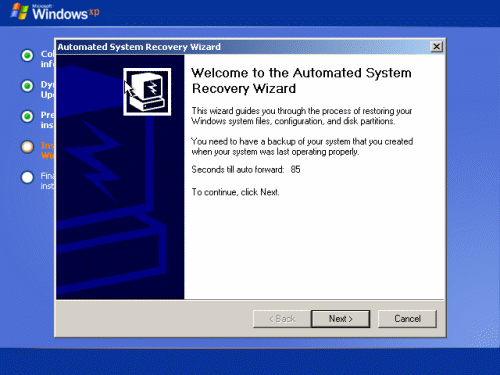
If no user interaction occurs, the ASR restore will commence automatically after 90 seconds and begin a restore (depicted below) of the data backed up during the ASR backup process - the system state and the system drive data.
Otherwise, you can click next and follow the prompts:

- ASR Restoration Complete Once the restore process has completed, your system will reboot and Windows should be fully operational and restored to its ASR backed up safe state.
Tests Conducted and Results
The following tests were conducted using ASR in our test labs:
| Operating System | Media Type | Results |
|---|---|---|
| Windows XP Pro | Tape: HPC1533A SCSI Sequential Device, 4mm DDS | ASR backup and restore completed successfully for a full system restoration. All previously installed programs on the system volume (C:\) were restored and operational as well as user profile information and data stores. |
| Windows XP Pro/ Windows 2003 Server | Tape: Seagate STT3401A, Travan | ASR Backup completed successfully, but we had a few complications during ASR restoration where the restoration could not begin - the tape drive was detected as 'Unrecognized' by NTBackup during the Windows installation phase and prevented the restoration from commencing. The ASR floppy disk records the medium and tape label of the backup media it requires for restoration and if the tape is not correctly recognized, the restoration cannot continue.
This problem occurred twice with Windows 2003 Server and once with Windows XP Professional. It was only with Windows XP that we were able to conduct a successful restoration. It is more than likely this was a hardware issue with the Travan drive which is notorious for being problematic, rather than an issue with the ASR restoration process itself. We were able to complete a full ASR restoration using the same drive for multiple successions. |
| Windows XP Pro | File: Local separate partition, D:\ | ASR backup and restore completed successfully for a full system restoration. All previously installed programs on the system volume (C:\) were restored and operational as well as user profile information and data stores.
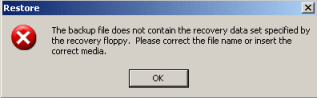
Note: If you attempt to manually operate the ASR Wizard during the Windows installation and choose a different .bkf file OR tape media to that created during the ASR backup, you will receive the error message in the below screenshot. You must ensure that the media you are attempting to complete the ASR restore with is the same as that which was created with the ASR floppy during the ASR backup process. We manually attempted to alter the asf.sif file on the ASR recovery floppy disk to point to a different .bkf file for restoration but the process resulted in the same error.
|
References
The following resources were investigated and utilized in the creation of this white paper:

