 Belgium
 Canada
 Germany
 Italy
Italy France
 Spain
Spain United Kingdom
BackupAssist SQL Add-on
BackupAssist Version 6
1. Requirements
1. BackupAssist v6
2. Windows 2000, XP, 2003, Vista, 7, or 2008/ R2
3. Microsoft SQL Server 2000, 2005, 2005, or 2008/R2 (including all variants: SQL Express, MSDE, etc)
- Note : to backup MSDE databases, BackupAssist should be installed on the actual machine running MSDE.
1.1 Remote SQL backup requirements:
To back up a remote SQL database you need to make sure that the SQL server accepts remote TCP/IP connections. To do this:
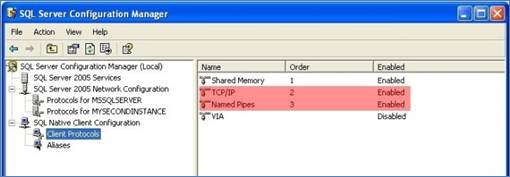
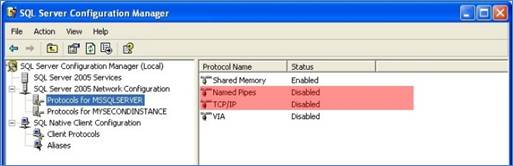
1. Go to Start > All Programs > SQL Server > SQL Server Configuration Manager.
2. Enable TPC/IP and Named Pipes for both Client protocols and Protocols for MSSQLSERVER:
3. You will then need to enable remote connections on your SQL Server. This setting can be found in your SQL Server's Enterprise Manager, under the properties of the server. You need to enable the "Allow remote connections to this server" found under "Connections".
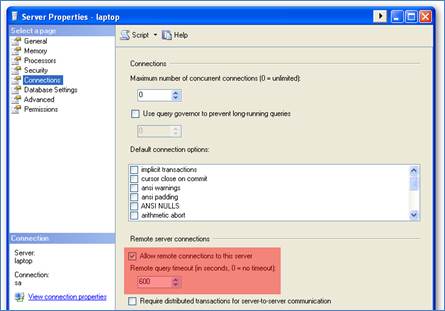
After completing these steps your SQL Server is ready to receive remote connections from BackupAssist.
2. Introduction
BackupAssist includes a specific backup engine that is specifically designed to allow users to backup / restore their SQL databases. Using the SQL engine, BackupAssist can perform live, online backups of your SQL Server databases and include these backups in your overall backup job (together with your files, system state, etc).
SQL Server backups are stored in the standard SQL Server Backup Format (.bak file format) , which allows you to perform a restoration of your entire SQL Server on any machine, without needing any additional software.
The SQL engine also allows users to restore their databases to a different SQL server.
Key features of the BackupAssist SQL Server Add-on:
- Backup both local and remote SQL Server databases
- "Live snapshot" of your databases, which means the SQL Server does not need to be taken offline during the back up.
- Easily schedule Transaction-log backups of SQL databases for near-continuous data protection and point-in-time restore.
- Restore an entire SQL server or individual databases using the built-in SQL Restore utility.
3. How the SQL Add-on works
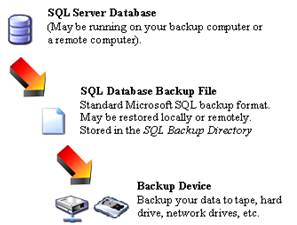
BackupAssist will login to your SQL server and perform a backup of the databases in .bak file format. These SQL backup files are then transferred to your backup device (tape, hard drive, network server, etc).
3.1 Backing up system databases
SQL system databases need to be backed up in addition to custom user databases, for you to be able to rebuild the entire SQL Server in the event of system or database failure.
The system databases vary depending on the version of SQL you are running, but generally include the following:
|
Master |
Records all the system-level information for an SQL Server instance. The master database is composed of important system tables and catalogs and is critical to your SQL server. If you are restoring your SQL server after a disaster or new installation, it is advised that you restore the master database before restoring any other database. The BackupAssist SQL Restore utility can be used to restore all other databases remotely but not the master database. If you need to restore the master database to a remote SQL server you should install BackupAssist on the server running SQL.
|
|
Msdb |
Used by the SQL server agent for scheduling alerts and jobs. The msdb database is used to store data, including scheduled job information, backup and restore history information and DTS packages (data transmission services). Usually the msdb database is rather small, and therefore full database backups provide a fast alternative to transaction log backups for this database. |
|
Model |
The model database is a template, used by Microsoft SQL Server when creating other databases, such as tempdb or user databases. When a new database is created, the entire contents of the model database is copied to the new database. If the master or msdb databases are rebuilt, the model database is also rebuilt and therefore changes are lost. |
|
Resource |
Is a read-only database that contains system objects included with SQL server 2005. The Resource database makes upgrading to a new version of SQL Server an easier and faster procedure. In earlier versions of SQL Server, upgrading required dropping and creating system objects. Because the Resource database file contains all system objects, an upgrade is now accomplished by copying the single Resource database file to the local server. Similarly, rolling back system object changes in a service pack only requires overwriting the current version of the Resource database with the older version. |
|
Tempdb |
Is a workspace for holding temporary objects or intermediate results sets. It is important to have regular backups of these system databases, however, it is not necessary to back up the tempdb system database because it is rebuilt each time SQL Server is started. When SQL Server is shut down, any data in tempdb is deleted permanently. For this reason, do not store any application specific data in the tempdb database. Leave it exclusively for use by SQL Server. |
3.2 Backing up user databases
User databases should be backed up on a regular basis.
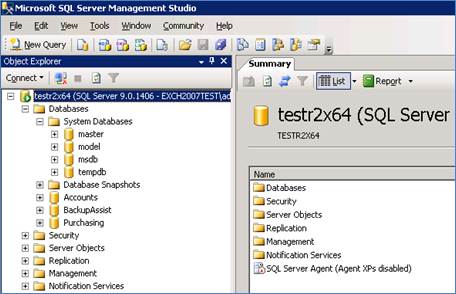
From the above example, you can see user databases like Accounts, BackupAssist, Purchasing, and so on.
4. Transaction Log backups
Transaction-log Backups of SQL server databases are only possible if the databases are configured using the Full or Bulk Logged recovery models option. For
additional in-depth information on SQL database recovery models, please refer to http://msdn.microsoft.com/en-us/library/ms175477.aspx .
SQL server utilizes a transaction log to track all of the modifications performed within a database. This log ensures both that the database is able to recover when abruptly interrupted (such as a loss of power) and that users are able to undo (or 'rollback') the results of a database transaction if required.
Each time the transaction log is backed up, SQL Server removes all of the committed transactions in the log and writes them to the backup media. Due to this incremental process, transaction logs are not cumulative and you must maintain a complete set of transaction logs reaching back to the most recent full or differential backup.
Every SQL Server database has a transaction log that records all transactions and the database modifications made by each transaction. The transaction log is a critical component of the database and, if there is a system failure, the transaction log might be required to restore your databases to a consistent state.
4.1 Restore operations supported by the Transaction Log
The transaction log supports the following operations:
- Recovery of individual transactions.
- Recovery of all incomplete transactions when SQL Server is started.
- Rolling a restored database, file, file group, or page forward to the point of failure.
For more information please refer to http://msdn.microsoft.com/en-us/library/ms190925.aspx
5. Configuring SQL database backups in BackupAssist
The BackupAssist SQL Add-on is required to perform backups of SQL databases. With the add-on you can perform FULL backups or Transactional backups of your SQL databases. SQL backups configured within an NTBackup Method job will only be full backups. To perform transaction log backups of your SQL databases, you need to create an SQL Method backup job, described as follows:
1. Go to File > Create new backup job in BackupAssist.
2. Select SQL as your backup method.
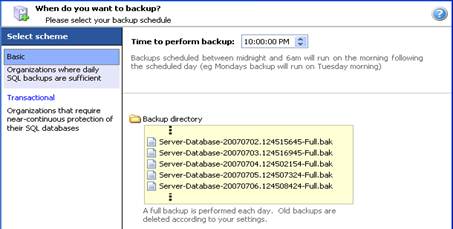
3. During the scheduling step you can choose either Basic (for full backups only) or Transactional for Full and Transaction Log backups.
4. During the destination step you can specify the directory where you want to store your SQL backup files.
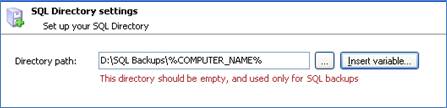
· The database backup works by logging into the SQL server and performing a database backup to file (in the .back file format).
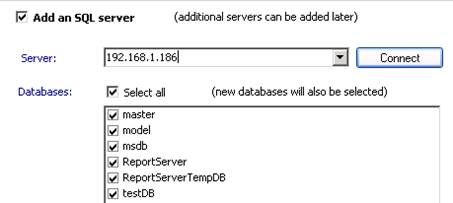
5. During the Files and Folders step can add the SQL server from which you want to backup databases
- Note : you can use either the IP address or the SQL server name.
- Note : once the job has been created you can access the SQL server tab of the job to add additional SQL Servers to backup.
6. The wizard will then guide you through rest of the steps to create your SQL backup job.
6. Restoring SQL databases
BackupAssist provides an inbuilt SQL Restore Utility that can be used to restore SQL databases to both local and remote SQL Servers. In addition, you can restore databases to a specific point in time provided that you have a transaction log backup of the relevant databases.
While you do need to have BackupAssist installed to use the restore utility, it does not have to be a licensed installation of the software. You can simply run SQLRestore.exe from the BackupAssist installation directory.
6.1 Running the SQL Restore Utility
1. Click Restore in the navigation bar.
2. Click SQL restore.
o Alternatively, run SQLRestore.exe from the directory where BackupAssist was installed.
3. The SQL Restore Utility will launch and attempt to detect for both local and remote SQL servers that can be restored to.
o Local server: select the local server you wish to restore to from the list of detected servers.
§ Note: If the SQL server you wish to restore to is not running or 'stopped', click Attempt to start. Any servers that cannot be started may indicate a fault with the server itself. You can only restore to SQL servers that are running. Consult your system administrator if any SQL servers will not start.
o Remote server: select the Restore a remote server radio button and choose a server from the drop-down list.
§ Note: if the remote server you want to restore to is not in the list or no remote servers were detected you can type the server's name or IP address directly into the field.
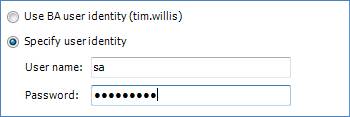
4. Click next and BackupAssist will attempt to connect to the SQL server using the BackupAssist user identity credentials.
o Note: if BackupAssist is unable to authenticate to the server you will be asked to input a valid username and password. If the SQL
server you are restoring to only accepts SQL authentication or requires a different Windows user uncheck Use the BackupAssist user identity and input a valid username and password.
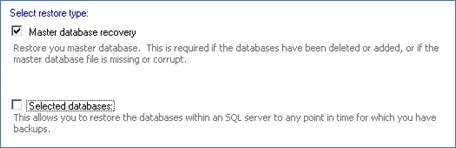
5. Select a restore type.
o Note: multiple restore types can be selected. The master database is restored first before selected databases.
6.2 Master database recovery
BackupAssist provides a utility for restoring the master database to a local SQL server in just a few simple steps. The master database is composed of important system tables and catalogs and is critical to your SQL server. If you are restoring your SQL server after a disaster or new installation, it is advised that you restore the master database before restoring any other database.
The restore utility can be used to restore all other databases remotely but not the master database. If you need to restore the master database to a remote SQL server you should install BackupAssist on the remote server itself. The installation does not need to be licensed to use the utility and you can even run SQLRestore.exe from the BackupAssist installation directory if the trial has expired.
To restore the master database:
1. Click Restore in the navigation bar.
2. Click SQL restore
o Alternatively, you can run SQLRestore.exe from the directory where BackupAssist was installed.
3. Choose the SQL server instance you wish to restore to from the list of local servers detected.
4. Check Master database recovery
o Note: if you want to restore additional databases as well as the master check Selected databases as well. The master database will be restored before all other databases.
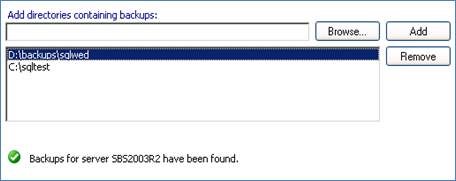
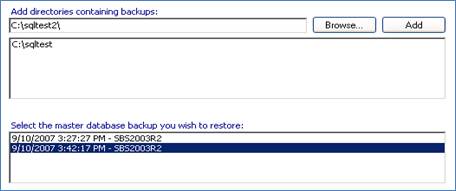
5. Specify the path where the master database backup file resides (in .BAK format) either by typing it directly in the Add directories containing backups field or by browsing for it.
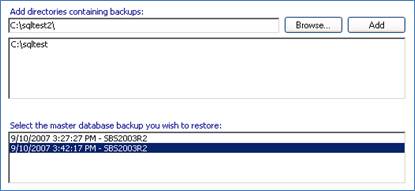
6. Click Add if the path was entered manually. You can add as many directories as you like. BackupAssist will search each directory added and determine which master database backups are available to restore from in date order.
7. Select the master database backup you want to restore from the list at the bottom of the window and click Next.
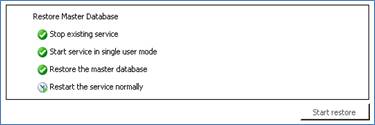
8. Click Start restore to the right of the window to restore the master database from the backup specified in the previous step. A list of steps is displayed that indicate the status of the restoration process. As the SQL service is stopped during the restore you should only perform this operation on an SQL Server that is not being accessed.
9. Once the master database restore is complete the list of databases at the bottom of the window is updated and should indicate that all databases are online. The SQL server can now continue with normal operations.
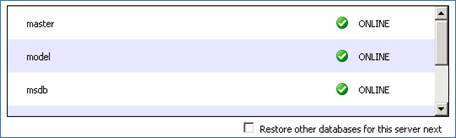
10. If any databases are listed as not being online (suspect or corrupt), or if you simply want to restore additional databases check Restore other databases for this server next at the bottom of the window; otherwise, click Finish.
7. Restoring selected SQL databases
BackupAssist provides a utility for restoring one or more SQL databases to either a local or remote SQL server in just a few simple steps. The utility also lets you restore a SQL database to a specific point in time, provided you have a transaction log backup to restore from.
The databases you wish to restore must already exist on the SQL server; if they do not you can either choose to use the SQL Restore Utility to restore the master database first, which will result in recreating all databases on the server, or you can manually recreate each database you wish to restore. If you are restoring your SQL server after a disaster or new installation, it is advised that you restore the master database before restoring any other database.
7.1 Restoring one or more databases:
1. Click Restore in the navigation bar.
2. Click SQL restore.
3. Choose the SQL server instance you wish to restore to from either the list of local or remote servers detected.
4. Check Selected databases
- Note : checking this option will not let you restore the master database. if you want to restore the master database check Master database recovery as well. The master database will be restored before other databases
5. Specify the path where the database backup files reside (in .BAK format) either by typing it directly in the Add directories containing backup's field or by browsing for it.
- Note: this is typically the SQL directory used in your BackupAssist backup job. Each database backup created is stored in the SQL directory in .BAK format (a separate file for each database) before being copied to the backup destination (tape drive, external hdd, REV drive, etc). If the backup files for your databases are not available you may need to first restore them from your backup media using NTBackup.
6. Click Add if the path was entered manually. You can add as many directories as you like. BackupAssist will search each directory added and determine if there are database backups that can be restored from.
7. Click Next and you will be presented with a list of databases that can be restored using the SQL backup files specified in the previous step. The list may take time to generate depending on the number of backup files.
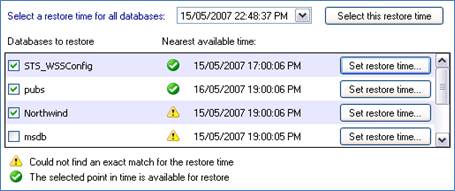
8. Check each database in the list that you wish to restore. To restore all databases to the same point in time, specify the time in the Restore time drop-down menu and click Search.
§ If the restore time specified is not available from the supplied backup files, a warning icon will appear to the right of the database and the nearest available time to that specified that the database can be restored to will be indicated.
§ If the restore time selected is available, a success icon will appear to the right of the database.
9. If you wish to specify a different restore time for each database individually, click Set restore time to the right of the appropriate database:

1) The available dates that the database can be restored to appear in bold on the calendar. Select one of these dates from the calendar.
2) A list of time ranges will appear in the Select a time range box. You can restore the database to any point in time between any of the time ranges listed.
3) Select a time range from the list and input a specific point in time to restore the database to in the Select a time from within that range field.
10. Once you have set the restore times for all databases you wish to restore click Next.
11. Click Start restore to the right of the window to restore all databases selected. Click Next once the restore process completes.
12. Future transaction log backups cannot be used to restore a database to a specific point in time until a full backup runs so it is recommended that you now run a full backup of the databases that were restored. Click Start full backup. Full backups of these databases will be stored in the same folder as the backup files you just restored from.
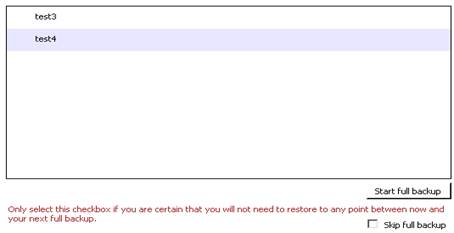
o If your backup schedule already includes a full backup as the next SQL backup and you are certain you will not need to restore these databases to a specific point in time between the restoration and the next full backup you can check Skip full backup and click Finish.
References
· For additional information regarding recovering your SQL databases to a certain point in time and creation of multiple recovery points, please refer the following article on the Microsoft Knowledge base:
http://msdn.microsoft.com/en-us/library/ms175078.aspx .
· Tips for scheduling and testing SQL server backups:
· SQL system databases explanations:
http://vyaskn.tripod.com/sql_server_administration_best_practices.htm
· MSDN knowledge base on recovery paths:

