 Belgium
 Canada
 Germany
 Italy
Italy France
 Spain
Spain United Kingdom
Central Administration
BackupAssist Central Administration allows you to securely manage all of your BackupAssist installations from a web console, within your local area network (LAN).
The Central Administration console is a web interface from which you can enable, disable, start, stop and monitor all backup jobs on your LAN.
The console can also be used to start a remote session to any BackupAssist installation on your LAN. The session provides access to:
- The Backup tab so you can create and modify your backup jobs.
- The Settings tab so you can modify your BackupAssist settings.
- The Restore tab to run the BackupAssist Restore Console, the SQL Restore tool the Hyper-V Granular Restore tool.
Online User Guide
Central Administration overview
To be remotely managed, a BackupAssist installation must have Central Administration enabled and configured under the Remote tab. The configurations include a URL that is used to open the Central Administration console in a web browser. You only need to select the URL of one of your Central Administration enabled computers, and it will in turn connect to the other BackupAssist installations.
- The computer you run the web console from, is called the client computer.
- The computer whose URL you use is called the host computer.
The other computers (BackupAssist installations) are added to the host computer using the Central Administration console. These computers are called nodes. The host computer will remember and authenticate the computers that have been added to the console. For that reason, it is recommended that you choose one computer to be your host computer and use it every the time.
When you use the Central Administration web console to start a remote session, the host computer (whose URL you are using) will transfer the configuration file required to open the connection. You will then communicate directly with the node computer you have opened the remote session to.
Configuring Central Administration
This section explains how to enable and configure Central Administration, and the settings that are available.
To enable Central Administration:
1. Start BackupAssist.
2. Select the Remote tab, and then select Central Administration Setup.

Central Administration Setup
3. Tick Enable Central Administration: For security reasons, Central Administration access is not enabled by default.
4. HTTP port: The web connection uses port 8464 and is configurable.
HTTPS provides a secure socket connection when you launch Central Administration in your web browser. To use HTTPS, you need a digital SSL Certificate, which your network’s Systems Administrator will have to generate and configure. This is a technical process that requires an understanding of your local network, server and internet provider.
5. Create remote administrator: Use these fields to create a login for the Central Administration web console. These credentials are used internally by BackupAssist, and they are not associated with any user account on the local computer or on any domain.
6. Open in browser: This is the URL that can be used to open the Central Administration console.
7. Tick, Enable remote console access. This option allows your BackupAssist console to be remotely accessed across your local area network.
The option, Open ports on the Windows Firewall, will be selected and should remain checked. This will allow communication between the web browser and host computer.
Using Central Administration
Once Central Administration is enabled on the host, you will be able to access it from anywhere on your local network using a web browser. To open the Central Administration console:
- Type the URL (the Open in Browser URL setting), of a BackupAssist installation that you are going to administer, into your web browser. This link should be saved as a favorite.
- Sign in with the credentials created the in Central Administration Setup screen.
Alternatively, if you have BackupAssist installed on the computer that you are running the console from, you can open the BackupAssist Remote tab and select Launch Central Administration.
Computers screen - All Computers view
The default view when you use the Central Administration console is a list of all managed computers. To view and administer a computer, you need to add it to the console using this screen. The host computer you have connected to will remember the node computers that you add.
- Each computer added must have the Central Administration Setup screen configured.
- Only installations of BackupAssist v7 can be managed using Central Administration.
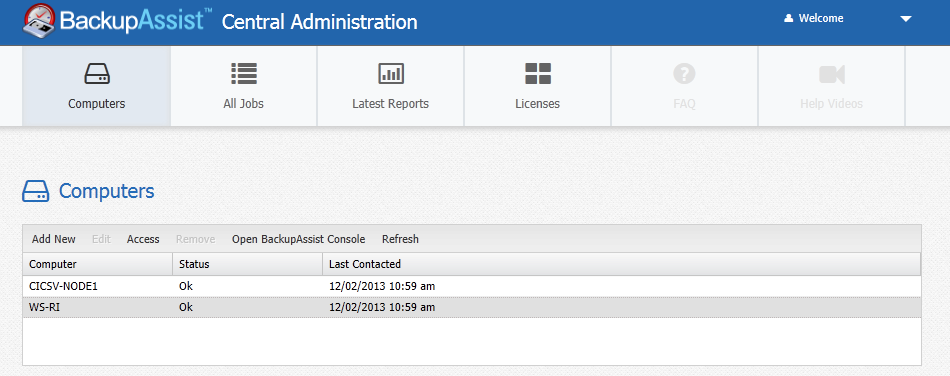
Central Administration web console - main screen
To add additional BackupAssist installs / computers to Central Administration:
1. Click Add New, and the Add new Computer dialogue box will appear.
2. Enter the credentials that were created locally on that computer.
After adding the computer, it will appear in the managed computers list. It will also be included in the consolidated reporting and licensing sections. Use the drop down list at the end of any column, to modify what columns are displayed.
If you select Open BackupAssist Console, you will start a remote session to that computer's BackupAssist installation. See the, Remote Control of BackupAssist section, for how to use this feature.
Computers screen - Single Computer view
If you select Access, or double-click on a computer, the BackupAssist and system information for that computer will be displayed within the following tabs: Manage, Reports, System Info, Support and License.
Below are descriptions for each of these tabs:
Manage : This tab will display all of the backup jobs on the selected computer. The following menu items are available to administer the backup jobs:
- Edit: This option will initiate a Remote Console session.
- Enable job & Disable job: Available for each selected backup job on the machine.
- View Reports: Provides a summary of past backup reports. Each report listed can be opened.
- Run job & Cancel job: To interactively start and stop a backup job.
- Launch Job Monitor: Displays a summary of the last backup job run. This window will automatically open when Run Job is selected and display the job’s progress in real-time.
- Refresh: The backup jobs displayed and their status is automatically updated. Selecting Refresh will force an immediate update.
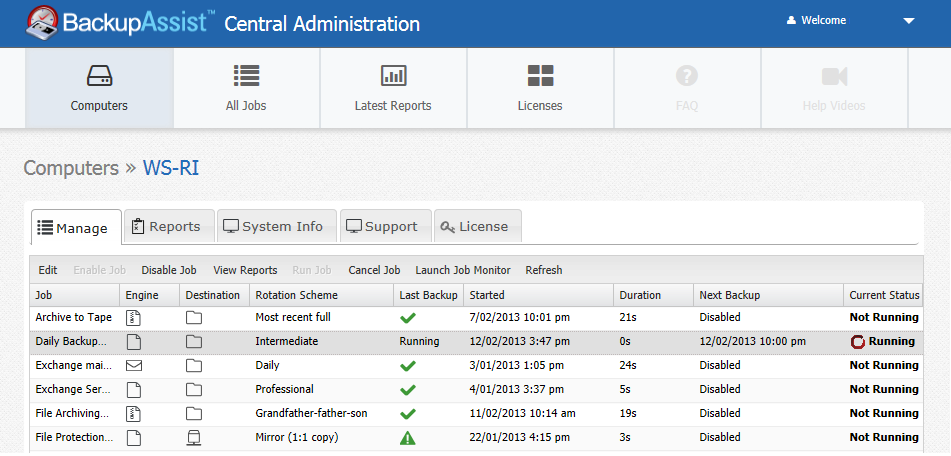
Central Administration web console - computer information screen
Reports: This tab lists all reports, for all backup jobs, that have been run on the selected computer. Select view or double click the report to display its contents.
System info : This tab will display system information such as the operating system and BackupAssist version installed on the selected computer.
Support : This tab allows you to send an email with a diagnostic file from the selected computer to BackupAssist support.
License : This tab displays the status of the BackupAssist license, and add-on licenses, for the selected computer's installation of BackupAssist.
All Jobs screen
This screen displays a list of all backup jobs on all computers connected to the Central Administration console. From this single interface, all backup jobs on your LAN can be run and monitored.
The following menu selections are available to administer these backup jobs:
- Edit: This option will initiate a Remote Console session.
- Enable job & Disable job: Available for each selected backup job on the machine.
- View Reports: Provides a summary of past backup reports. Each report listed can be opened.
- Run job & Cancel job: To interactively start and stop a backup job.
- Launch Job Monitor: Displays a summary of the last backup job run. This window will automatically open when Run Job is selected and display the job’s progress in real-time.
- Refresh: The backup jobs displayed and their status is automatically updated. Selecting Refresh will force an immediate update.
Latest Reports screen
The Latest Reports screen displays the backup reports of all machines connected to the Central Administration console. From this single interface, the reports for all installations of BackupAssist on your LAN can be viewed and sorted in one place.
Each report is listed with the date it was generated, the name of the backup job, the name of the computer the backup job ran on, the label of the media used and the result of the backup job. Selecting each column will sort the list by that column.
View: If you select a backup job and click View, the backup report will open. You can also open the backup report by double-clicking on the report.
Licenses screen
This screen displays the status of ALL BackupAssist licenses on you LAN, by computer, for each computer connected to the Central Administration console.
BackupAssist requires a license once the initial trial period has expired. Please contact your local BackupAssist reseller or distributor for pricing information, or visit www.BackupAssist.com.
Not sure which licenses you need? See the BackupAssist Licensing Guidelines for help.
Remote Control of BackupAssist
Central Administration can be used to open a remote BackupAssist session on another computer. The session will give you access to:
- The Backup tab so you can create and modify your backup jobs.
- The Settings tab so you can modify your BackupAssist settings.
- The Restore tab to run the BackupAssist Restore Console, the SQL Restore tool the Hyper-V Granular Restore tool.
Remote session requirements
Below are the requirements of both the local client computer that you are running the Central Administration console from, and the computer that you are opening the remote session to.
- The Central Administration console must have the computer that you are opening the remote session to, added to it.
- The client computer that you are running the Central Administration console from must have BackupAssist or the BackupAssist Remote Console Client installed. If neither is installed, you will be prompted to download and install the Remote Console Client, before you can start the remote session.
- The client computer running the Central Administration console must be on the same local area network (LAN) as the node computer (BackupAssist installation) that it is connecting to. This is because the remote session looks for computers on the local subnet.
- Only installations of BackupAssist v7 or later can be managed using Central Administration.
The Remote Console Client can be downloaded for free from the BackupAssist downloads page. It enables a computer without BackupAssist installed to open a remote session and manage computers that do have BackupAssist installed.
- Each BackupAssist installation must have the Central Administration Setup configured locally under the BackupAssist Settings Tab. See the Central Administration Setup section for instructions.

Central Administration web console - computer information screen
Initiating a remote session
To start a remote BackupAssist session:
1. Open the Central Administration consol.
- Type the URL (the Open in Browser URL setting), of the BackupAssist installation that you are going to use as the host, into your web browser. This link should be saved as a favorite.
- Alternatively, if you have BackupAssist installed on the computer that you are running the console from, you can open the BackupAssist Remote tab and select Launch Central Administration..
The computer initiating the remote session must have BackupAssist or the Remote Console Client installed. If neither is installed, you will be able to Download and Install the Remote Console Client when you start a remote session. The client does not require a BackupAssist licence.
2. Select the computer that you want to remotely connect to from the Central Administration console's Computers screen.
3. Select, Open BackupAssist Console. If the Open BackupAssist Console is greyed out, review the Central Administration settings.
4. The first time you start a remote session, a window will open and ask you to confirm that you have BackupAssist or the Remote Console Client installed.
- If you do not have BackupAssist or the Remote Console Client installed, select Download and Install Now. This will download and install the Remote Console Client. Once you have installed this client, you do not need to manually run it.
- If you have either BackupAssist or the Remote Console Client installed, select Continue.
- Tick the box next to, Remote Access is enabled on this machine, if you do not want to see this message again.
The Remote Console Client starts automatically when you initiate a remote session using the Central Administration Console. The Remote Console Client is not used to open the Central Administration Console.
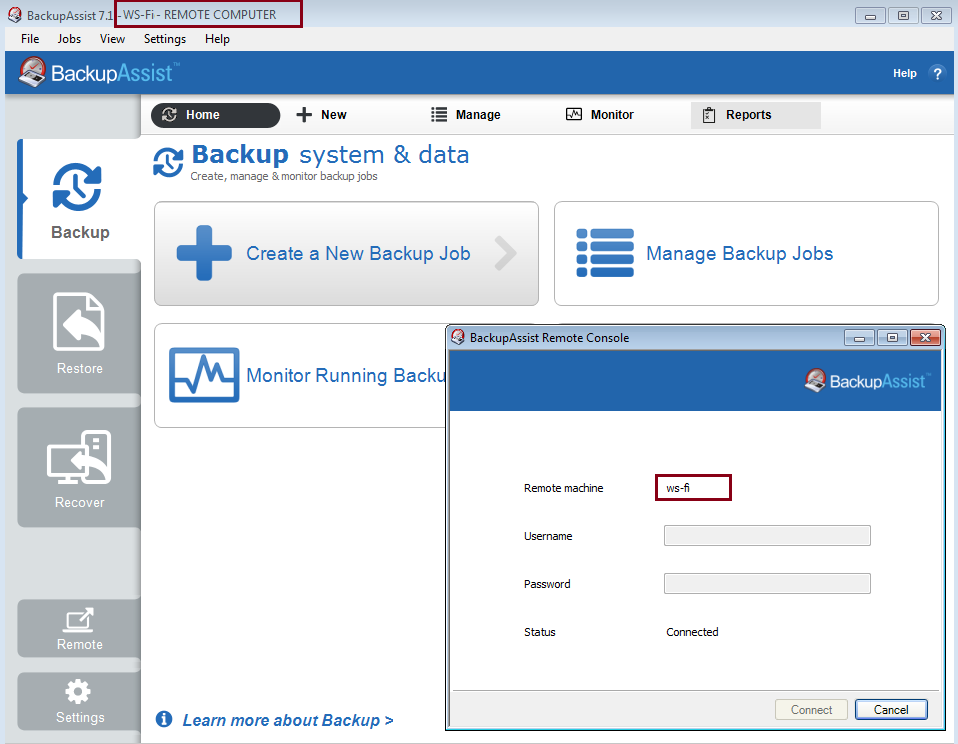
6. Start the remote session. Once you have opened the .BAR file, a small window will open and initiate a connection. When the connection is ready, the Status will display Connected and the remote session will start. BackupAssist will open on the local client computer (running the console), but it will be a remote session of the node computer’s BackupAssist installation.
The small connection window must be left open while using the remote BackupAssist session. Central Administration authenticates the connection but after period of inactivity re-authentication may be required. The connection window includes a username and password field for this purpose. Use the credentials specified in Central Administration Setup on the host computer, if required.
The BackupAssist session will have REMOTE COMPUTER appended to the node computer’s name on the title bar. You can access the Backup, Restore and Settings tabs on the remote BackupAssist installation.
Central Administration - Remote session selection
When you have finished administering the computer, select File then Exit to end the session.
The Remote console client
The Remote Console Client is used to facilitate a remote session, when using the Central Administration Console, if you do not have a local copy of BackupAssist installed.
To install the Remote Console Client:
1. Go to http://www.backupassist.com/BackupAssist/download.php
2. Download Remote Console Client v7.x.x.
The download steps will depend on your web browser's security configurations.
3. Open the downloaded installation file setupRemoteConsoleClient_7.x.x
4. Confirm the licence agreement and destination as prompted, to complete the installation process.
Once you have installed the Remote Console Client, you do not need to manually run it.
Important : The Remote Console Client starts automatically when you initiate a remote session using the Central Administration Console . The Remote Console Client is not used to open the Central Administration Console.
See the Remote console Client FAQ , for more information
Central Administration & BackupAssist
Central Administration is a single site remote management solution for BackupAssist v7 installations. BackupAssist v8 installations are remotely managed with a product called MultiSite Manager. BackupAssist MultiSite Manager includes additional features such as wide area network support, remote installation, email reports and remote license management.
Central Administration does not support the remote management of BackupAssist v8 installations. This section takes a closer look at what this means and what your options are.
- Can I upgrade to BackupAssist v8 if I am using Central Administration?
- What will happen if upgrade a BackupAssist v7 installation to BackupAssist v8?
- The Remote Session feature will no longer work.
- Only Enabled backup jobs will appear.
- You will not be able to disable backup jobs.
- The BackupAssist v8 Remote setup screen will be disabled. The remote settings used will be the settings retained from the previous v7 installation.
Central Administration does not support the remote management of BackupAssist v8. We recommend that you use Central Administration with BackupAssist v7. If you want to upgrade your computers to BackupAssist v8, you will need MultiSite Manager to manage them remotely.
Although BackupAssist v8 is not officially supported by Central Administration, a BackupAssist v8 installation (after a migration from v7), will report to the Central Administration console with limitations.
We are aware of the following limitations:
If you would like to revert to BackupAssist v7, you can perform an uninstall of BackupAssist v8 and then re-install BackupAssist v7, which is still available from our download site.
Important: When you go back to an earlier version, any new settings or backup jobs created after you upgraded to v8, will not be picked up by the v7 installation. For this reason, you should perform an export of your BackupAssist v8 settings before uninstalling, using the menu selection File > Export settings ... This will provide a copy of your settings that can be imported again after you reinstall BackupAssist v7.

