Amazon S3 storage guide
Amazon Web Services (AWS) S3 cloud storage can be used as a backup destination by BackupAssist ER. To use this cloud storage, you need to create an AWS account, then log into the AWS management console to set up the storage and get the security keys that BackupAssist ER will use.
AWS account
To create an AWS account, go to https://aws.amazon.com and select Create an AWS account. Creating an account involves providing business information and there are free account options available. Once you have created your account, you can log into the AWS console and manage your storage.
To learn how your choices affect the costs of storage, see our Estimating cloud storage guide.
AWS containers
The AWS solution for storing data is called the Simple Storage Service or S3. S3 uses storage containers (called buckets), and each backup job will back up to its own container. Access to each container is managed by an Identity Access Management account (IAM), which provides a set of security keys that each backup job uses to locate and access its S3 bucket each time it runs.
IAM accounts and access keys
Your backup job can use an existing IAM account or you can create a new IAM account for the job to use. If you create a new IAM account, you will be provided with an Access key ID and a Secret Access Key. If you use an existing IAM account, you will need to generate a new Access key ID and a Secret Access Key. Both of these processes are explained below.
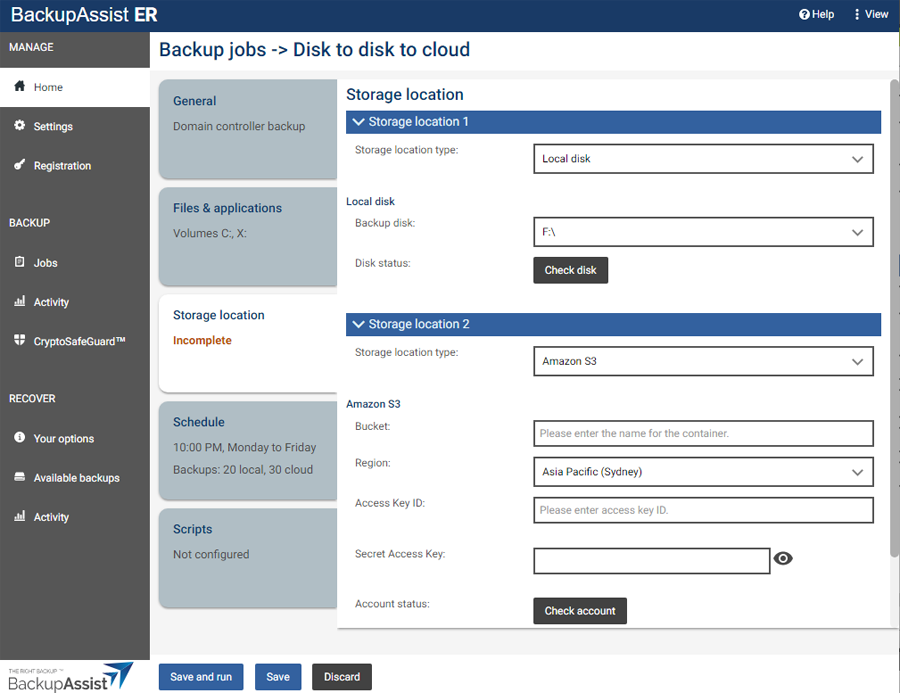
These keys are entered into the backup job's Storage location tab so that the backup job can create and access its S3 bucket.
Note
When you enter the storage location information in a BackupAssist ER job and click Check account, BackupAssist ER will use the IAM security keys to access the S3 storage and create a bucket for that job.
Using AWS with BackupAssist ER
The only information a BackupAssist ER job needs to back up to AWS are the 2 keys generated by the IAM account that the job will use. This section explains how to create an IAM account and how to get the 2 keys for a new or existing IAM account.
To learn more, see the official AWS documentation .
How to create an IAM account
If you do not already have an IAM account for your backup job, you will need to create one and get a copy of the Access key ID and a Secret Access Key.
To create an IAM account and get the keys:
-
Log into the AWS web console.
-
Choose Services from the top menu.
-
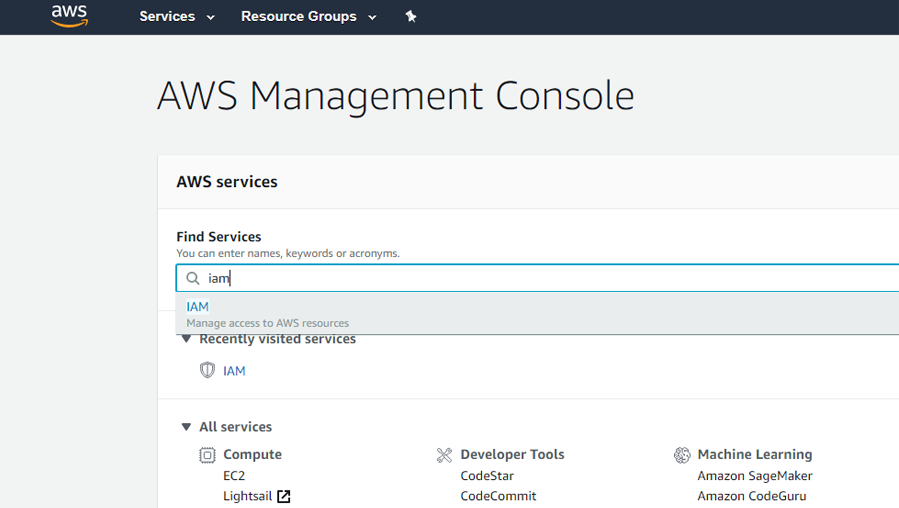
Select IAM.
You can select IAM from the index of All services, or search for IAM using the Find Services field.
-
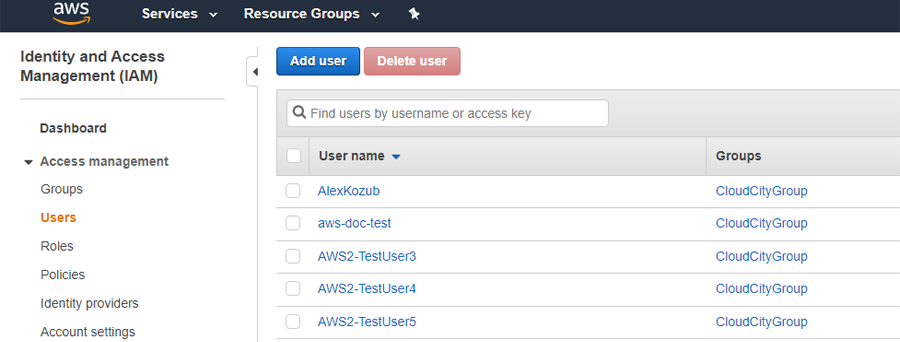
Select Users from the left menu.
-
Select Add user.
-
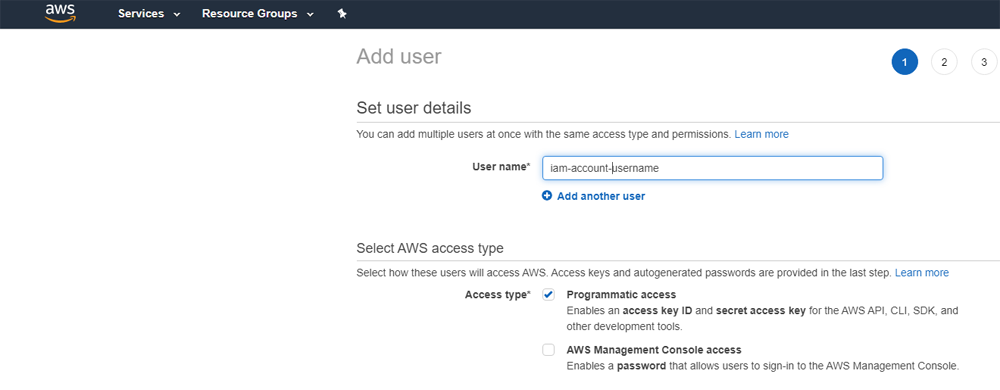
Set user details for the IAM account.
- Type in a name for the account into the User name field.
- Tick Programmatic access.
- Click Next:Permissions.
-
Set permissions for the account
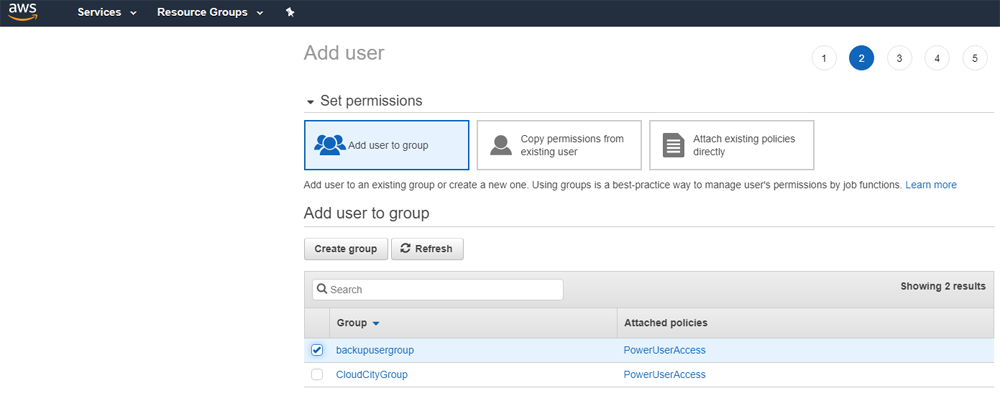
The account you create will need an access policy that allows it to add and remove data at the destination. For example, the PowerUserAccess policy. Use the Attach existing policies directly menu option to tick the policy you want to use with this account. If you are using multiple IAM accounts for your backup jobs, it is best to create a group with a policy, and add the IAM account to that group.
In the screenshot below, the Create group option was used to enter a group name and select the policy that the group will use. The Add user to group page was then used to add that group to the new IAM user.
Warning
PowerUserAccess enables full access to AWS services and resources. Because of this, some users may want to restrict the access that the IAM account gives. To do this, you can create a custom AWS access policy to add to the IAM account that the backup job will use.
-
Click Next:Review.
-
Review your settings and click Create User.
An Access key ID and a Secret Access Key will be created and displayed with a link to download the keys in a CSV file.
-
Save the CSV file.
The final step is to save the CSV file containing an Access key ID and a Secret Access Key, or manually copy the keys to a safe location. These keys will be used by BackupAssist ER to create a cloud container (bucket) and to access that container each time the job runs. You will need to refer to this CSV file when you create the backup job.
Warning
Do not lose this CSV file as this is the only time you can view or save a copy of the secret access key.
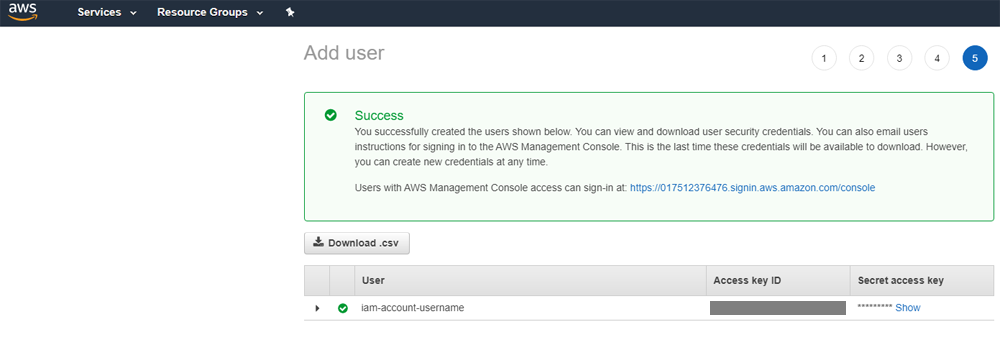
These keys can now be entered into the storage location tab when you create a disk to disk to cloud backup job.
To get a key from an existing account
If you want to use an existing IAM account for a new backup job, you need to generate a new Access key ID and a Secret Access Key. This section explains how to generate those keys.
To create new access keys:
-
Log into the AWS web console.
-
Select Services from the top menu.
-
Select IAM from the Security, Identity & Compliance.
You can select IAM from the index of All services, or search for IAM using the Find Services field.
-
Select Users from the left menu.
-
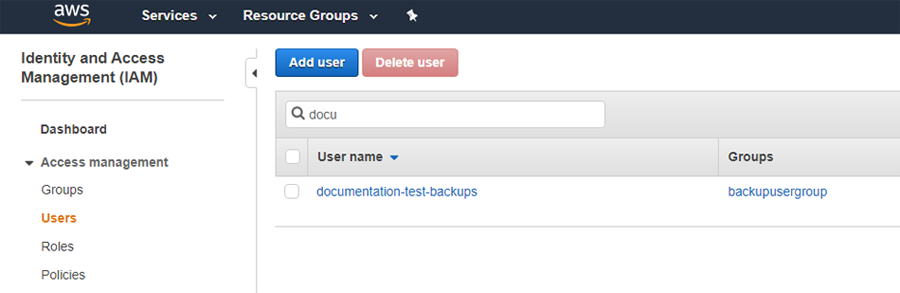
Select the IAM account.
-
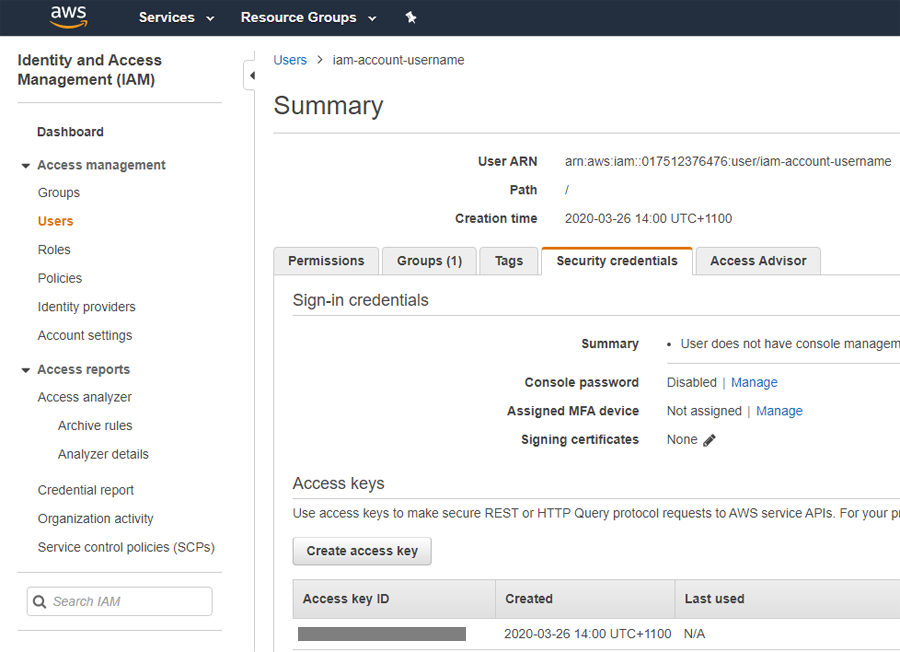
Select the Security credentials tab.
-
Click Create access key.
An Access key ID and a Secret Access Key will be created and displayed with a link to download the keys in a CSV file.
-
Save the CSV file.
The final step is to save the CSV file containing an Access key ID and a Secret Access Key, or manually copy the keys to a safe location. These keys will be used by BackupAssist ER to create a cloud container (bucket) and to access that container each time the job runs. You will need to refer to this CSV file when you create the backup job.
Warning
Do not lose this CSV file as this is the only time you can view or save a copy of the secret access key.
These keys can now be entered into the storage location tab when you create a disk to disk to cloud backup job.
To learn more, see the official AWS documentation.
Backing up to Amazon S3 with BackupAssist ER
To create a BackupAssist ER Cloud backup job using Amazon S3 storage, follow the steps in the Create a local and cloud backup guide.
When filling in the Storage Location tab, complete the following Amazon S3 configurations for Storage location 2 (S3 cloud):
-
Bucket - Enter a name for your S3 bucket. BackupAssist ER will use this name to create the bucket. Provide a different name for each job because each job will use its own bucket. This name needs to be globally unique across all AWS users ( not just your own account) and can only use lower-case characters, numbers, periods and dashes. To learn more about the naming conventions see Amazon's naming guide.
-
Region - Select the region for the data center where you want your cloud storage to be based.
-
Access Key ID & Secret Access Key - enter the keys for the IAM account that you want BackupAssist ER to use for this job. These keys are in the CSV file that you downloaded during the IAM account creation process. There is no way to view the Secret Access Key after the IAM account creation page has been closed.
-
Account status - Select the Check account button. This step uses the information provided to test the connection to the cloud destination, and then creates the cloud container that the backup job will use.
-
Throttle speed - This option is used to set the average upload speed limit. To set the average speed, tick the box next to Set the average speed, then enter the value by typing it in or using the up / down arrows. When the limit is set, the instantaneous speed can go over or under that limit, but the average speed (over time) would stay under the defined limit.