
Do you have a Backup User Identity? We’re not talking about the type of backup identity with a fake passport and tickets to Mexico. Rather, the kind you need to perform backup jobs properly.
Backup jobs, by their very nature, require an account with read access to the data source, and full read-write access to the backup’s destination. In short, the permission to copy what it needs to copy, and transfer it to where it needs to go.
For many reasons, it’s highly recommended you create a dedicated backup account solely for this purpose. After all, you don’t want to delete someone’s account when they leave your organization and then realize that was being used to perform your backups, right?
Since it’s a dedicated user account, it makes sense to name it something like “Backup User” to set it apart from your other accounts.
Regardless of if you create a dedicated backup account or use another one, this account’s permissions will be validated both when the backup user identity is first entered, and whenever the backup job is executed.
So what happens if you don’t put the account details in, or you enter one with insufficient permissions? The backup will fail (due to not having the read/write access), and you’ll see an error in the backup report.
Making the Account
• You need to make a Windows user account with the access required to the source data and backup destination. This access may also need to take into account domain level access.
• For applications like Exchange, Hyper-V, SQL and DNS, you will also need to check the account access required to access the data as documented by Microsoft and Microsoft Technet, and test that the access is sufficient.
• You should use a dedicated account and name it something appropriate like “Backup User”.
• You will also need to be mindful if the account password is set to expire, the password will need to be updated in BackupAssist before the password expires. If you don’t and it expires, all backup jobs will fail.
Configuring a Backup User Identity in BackupAssist
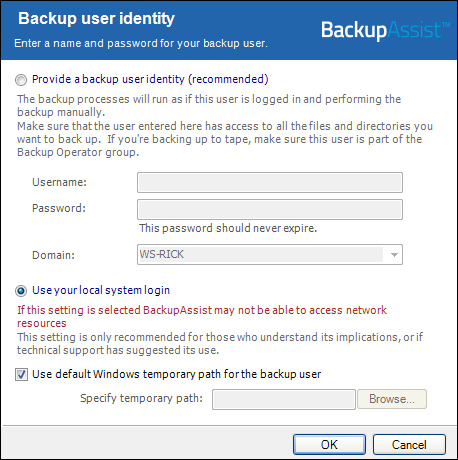
- First, start BackupAssist and select the Settings tab.
- Select Backup User Identity.
- Select Provide a Backup User Identity. You should only select Use Your Local System Login if this is requested by the BackupAssist technical support team.
- Enter the Username and Password of the Backup User Identity account you created.
- Either type the domain name for the user directly, or select it from the domain drop-down menu. If the account you’ve created is not a member of a domain, simply select the computer name of the machine, or leave the domain field blank.
- Click OK.
You’re almost done! You should test to see your Backup User Identity is properly set up by running a test backup job.


