
Before attempting to restore files and folders using Windows Server Backup from a drive image backup created with BackupAssist, make sure of the following:
- You are completing the restore with Windows Server 2008. Windows Vista only provides support for drive volume restore.
- The backup you wish to restore from is located on either an external hard drive or a remote shared folder (eg. on a NAS device). You cannot restore individual files and folders from a drive image backup located on a DVD or removable media.
- To recover files and folders you must be a member of the Backup Operators or Administrators group, or you must have been delegated the appropriate authority.
To restore files and folders with Windows Server 2008 Backup:
- Click Restore in the navigation bar.
- Click Imaging engine restore. Windows Server Backup will then launch.
- Click Recover under the Actions pane.
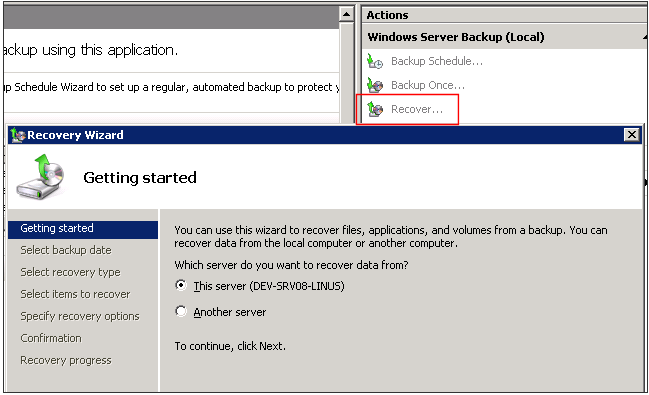
- Specify whether you are restoring files from backups created on this computer or another computer, and click Next.
If you are restoring files and folders from backups stored on another computer, complete the following:- Specify whether the backup that you want to restore from is on a local drive or a remote shared folder (eg. NAS device).
- If you are restoring from a local drive, select the location of the backup from the drop-down list. If you are recovering from a remote shared folder, type the path to the folder that contains the backup. In the folder, the backup should be stored at
\\<RemoteSharedFolder>\WindowsImageBackup\<ComputerName>\<YourBackup>.
- If you are restoring from a backup created on this computer, select the location of the backup from the drop-down list, and click Next.
- Select the date from the calendar and the time from the drop-down list of the backup you want to restore from. If you are recovering from this computer and the backup you select is stored on a DVD or removable media drive, you will be prompted to insert the relevant media. Then click Next.
- Click Files and folders, and click Next.
- Under Available items, expand the list until the folder you want is visible. Click a folder to display its contents and click each item that you want to restore, and then click Next.
Note: use the SHIFT and CTRL keys to select a group or specific set of items to recover. - Under Recovery destination, complete one of the following, and click Next:
- Click Original location.
- Click Another location. Then, type the path to the location, or click Browse to select it.
- Under When Backup finds existing files and folders, click one of the following, and click Next:
- Create copies so I have both versions of the file or folder
- Overwrite existing files with recovered files
- Don’t recover those existing files and folders
- Review the details, and click Recover to restore the selected items.
- You can then view the status of the recovery operation and whether or not it was successfully completed.
To learn about restoring and recovering Windows Server 2008 using specialist software, visit BackupAssist.


