 Belgium
 Canada
 Germany
 Italy
Italy France
 Spain
Spain United Kingdom
The new BackupAssist v6 Restore Console
More flexibility when restoring your data
The BackupAssist Restore Console is designed to provide you with a faster, easier way to restore data from backups you have created using the various engines inside of BackupAssist, including:
You'll find the Restore Console saves you a great deal of time and frustration because it eliminates manual processing and searching through catalogues to find the specific backups you need. It also saves you from having to copy files back to their original location and automates your restore processes for these specific types of backup jobs.
Data that can be restored using the BackupAssist Restore Console
Using the BackupAssist Restore Console you can restore:
- Files and folders from File Replication, Zip, Rsync and even Imaging backups.
- VSS applications (Exchange, SQL, SharePoint, etc) from File Replication, Zip, Rsync and Imaging backups
- System State from File Replication, Zip and Imaging* backups.
- Exchange mailboxes and public folders from Exchange Mailbox Add-on backups.
*Imaging jobs running on Windows Server 2008 R2 only (excludes jobs backing up to REV/rdx drives)
Two ways of restoring your data
The Restore Console allows you to choose from two ways of restoring data:
- Restoring from a particular backup - specify the backup job and date to recover files and folders.
- Free search - where you can search all your backups for particular files, see what version history you have for each file and restore one or more versions of the files you choose.
Restoring from a particular backup
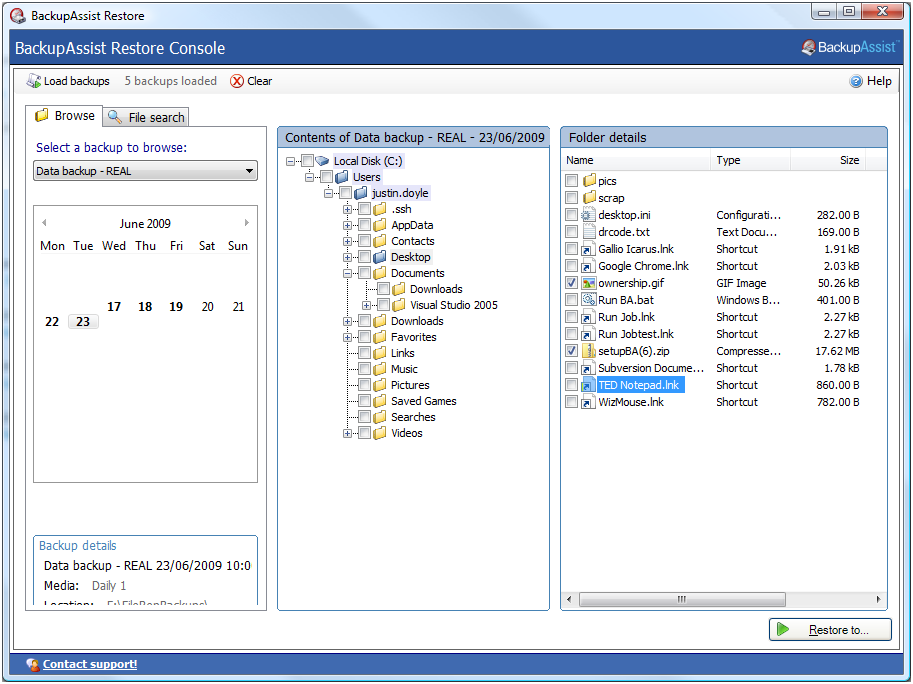
The BackupAssist Restore Console makes it easy for you to select files and folders to restore. You can see which days you have backups for at a glance. Then it's a simple matter of selecting the data you wish to restore from any particular date!
Free search
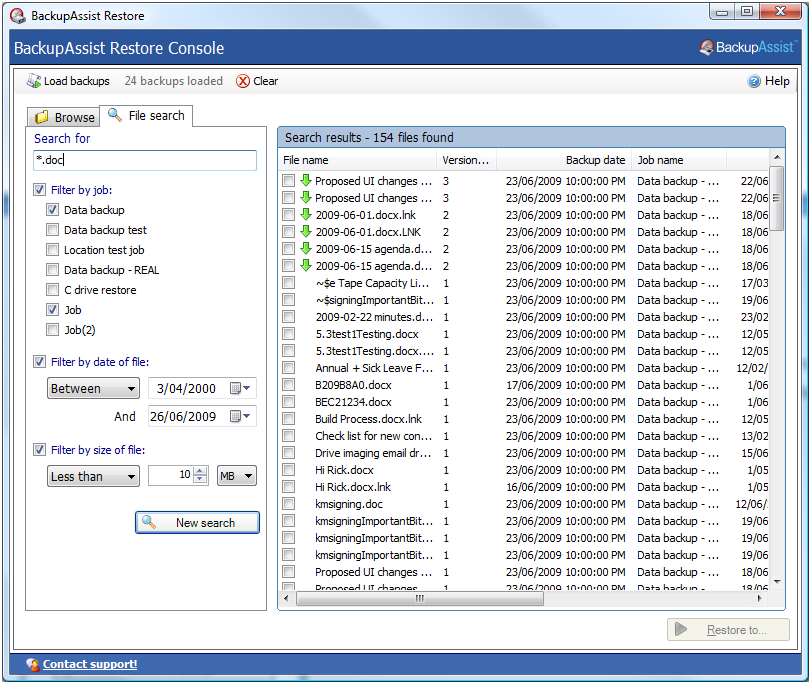
The Restore Console also makes it easy to locate the specific file you need, simply by clicking on the 'File search' tab. It gives you the option of choosing how you would like to search:
- For files backed up in particular jobs.
- Files created before, after of between certain dates you specify.
- Or you can simply search for files of a certain size.
BackupAssist keeps an index of all the files in each backup, so your searches using BackupAssist's Restore Console are a lot quicker than the usual method of searching through all your backups, one by one.
The screen above illustrates how you can search all the backups you've loaded simultaneously. On the right you can see the results of your search at a glance and easily choose the files you need!
The  icon
icon
This icon is designed to make it easy to choose which version of a document you wish to restore. So if you've changed a document and decide you want to go back to an earlier version, BackupAssist makes the process fast and simple!
If you're searching for a particular file that was created a while ago, it's likely that file will turn up quite a few times in your backup histories, making it difficult to tell which version you need to restore. BackupAssist makes it easier to find the version you want by eliminating all the identical copies - so if it finds an identical file with the same name and the same location, it will only show you the file copies that have been changed, instead of multiple backups of the same file.
When it does find a copy that's been changed, you'll see the ![]() icon and a number showing how many different versions of that file BackupAssist has found. Clicking on the
icon and a number showing how many different versions of that file BackupAssist has found. Clicking on the ![]() will take you to a list of the different versions of that file and tells you when each backup was made. From there it's easy to choose the version you need and you can restore one, two, or all of those versions if you like.
will take you to a list of the different versions of that file and tells you when each backup was made. From there it's easy to choose the version you need and you can restore one, two, or all of those versions if you like.
Fast recovery - catalogues stored on local hard drive
BackupAssist keeps a catalogue of the backups it creates on your local hard drive and on the backup device itself. That means you won't need to waste time plugging in all your backup devices in order to search or browse your backups for a specific backup or file!
The record contains information on what was backed up, when it was backed up and where it was backed up to. So all you have to do is browse your backup catalogue and when you find what you need to restore, BackupAssist will simply ask you to plug in the appropriate backup device so it can retrieve your data.
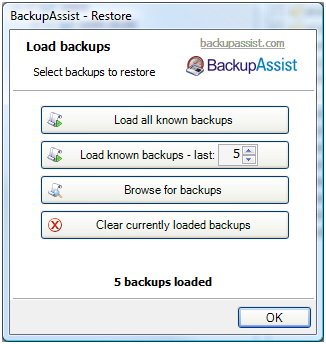
If you want to look through all the backups you've made, just click 'Load all known backups' and search or navigate through them as you wish. Or if you prefer, you can choose to only search through the most recent backups. BackupAssist lets you to choose the search method that's easiest for you.
Retrieve files from other machines and locations the easy way
The BackupAssist Restore Console allows you to browse for and load a backup that was made on another machine. You can also browse to a backup that's been moved from its original location. For example: you can copy a backup from an Rsync server to a USB drive and restore from that drive just by browsing to it in the Restore Console menu. BackupAssist will search the folder or drive you've browsed to and load any backups it finds there, so there is no need to point to exactly the right spot. No matter where it is, BackupAssist will retrieve your data quickly.
Restoring is as simple as 1-2-3
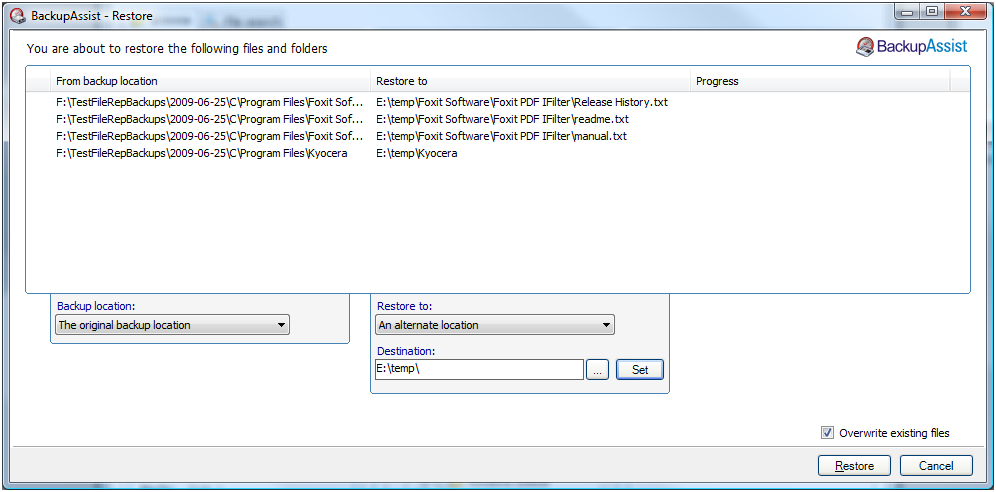
- Click on the 'Restore to...' to go to the confirmation screen. (Here you can choose to restore your backup to the original location, or select another location. You can also change the backup location if you've copied the backup to a USB or local drive and would rather restore from there. )
- Once you've made your choice, just click 'Restore' to begin the restore process.
- BackupAssist will ask you to insert any backup media required.
It's that easy!

