 Belgium
 Canada
 Germany
 Italy
Italy France
 Spain
Spain United Kingdom
Manually transferring a public key to an
rsync destination for secure authentication.
When backing up with rsync over an SSH connection using BackupAssist, the connection is established using public key cryptography. This involves using a pair of keys (private and public), which are generated using a special algorithm, to make authentication secure without requiring a username or password.
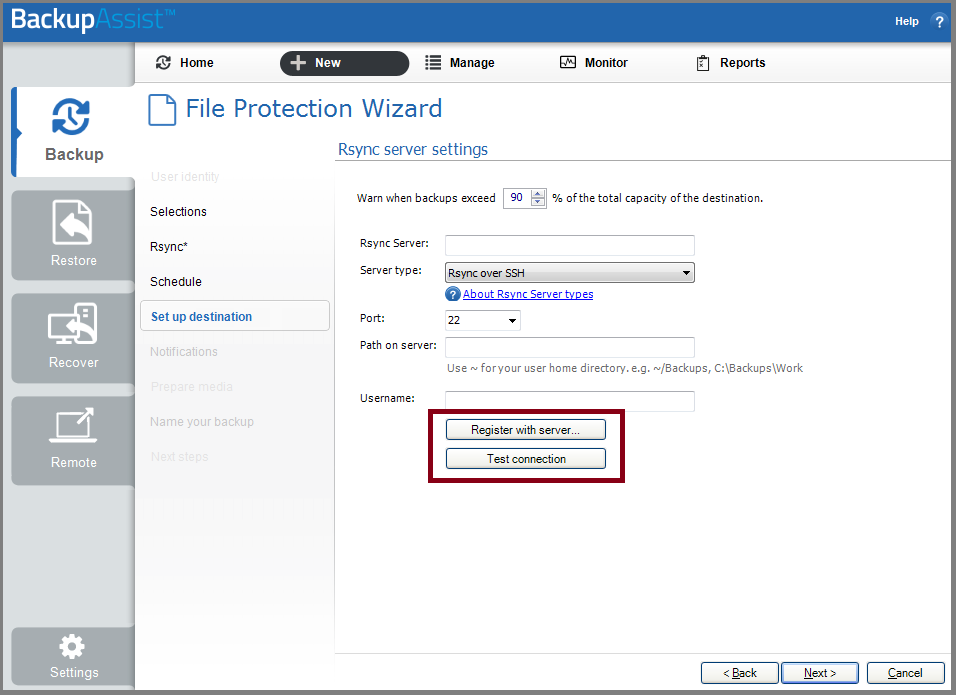
When setting up your rsync backup job in BackupAssist, when you click the Register with server... button (shown below), BackupAssist will attempt to generate the required authentication keys and store them in the appropriate locations, with the public key being copied to the rsync destination.
In some instances BackupAssist is not be able to upload the public key to the rsync destination. This article explains how to identify such cases as well as how to transfer the public key manually.
Determining whether public key transfer was successful
Even if registration to the rsync server is successful, you may you receive a 'SSH authentication failed' error after clicking the Test connection... button.
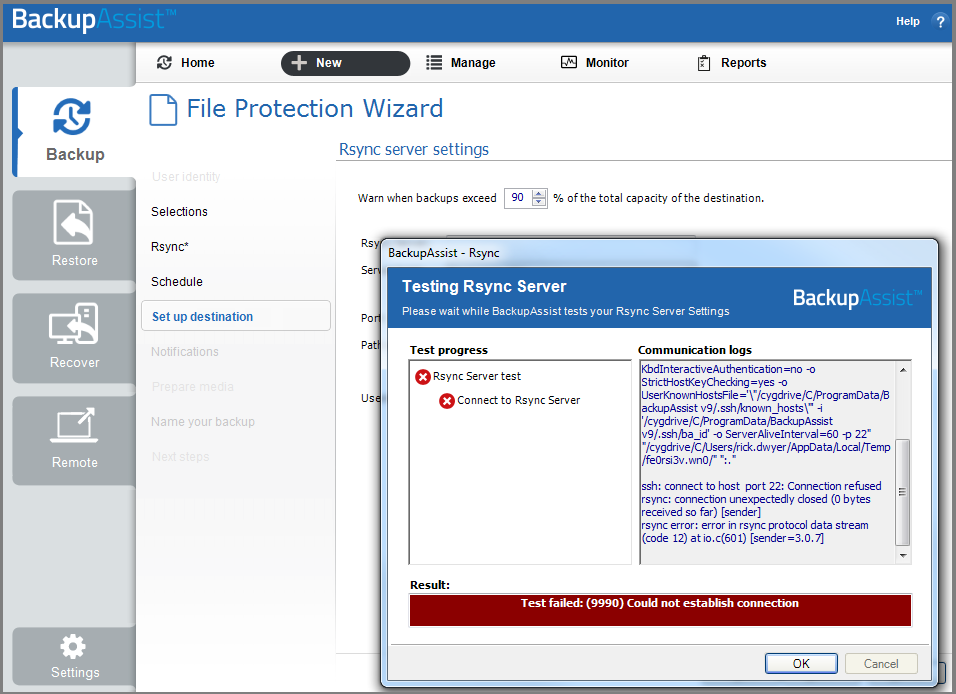
Failure to upload the public key can happen for a variety of reasons, such as insufficient permissions on the public key destination folder or a security setting on your rsync server. To resolve this issue you can transfer the public key file to the rsync server manually.
Manually transferring a public key to the rsync server
Important note: while a public key can be safely copied and distributed anywhere, the private key needs to remain private. If someone obtains your private key, they can use it to impersonate the user and gain access to your rsync server.
- First, click the Register with server... button to create the pair of authentication keys:
- Find a file called ba_id.pub on the system running BackupAssist. By default, this file is located in the following folder:
- Server 2003: C:\Documents and Settings\All Users\Application Data\BackupAssist vX\.ssh
- Server 2008 and later: C:\ProgramData\BackupAssist vX\.ssh
Note: 'vX' refers to the version of BackupAssist you have installed. - Once you have located the ba_id.pub file, copy it to your rsync server
Note: the location you copy to does not matter at this stage.
- On your rsync server find the location of the .ssh folder.
Note: this folder is commonly found in the /home/<sshuser> folder on your rsync server (where <sshuser> is the user that was entered in BackupAssist to authenticate to your rsync server), but can be in a different location depending on your setup. - If a file named authorized_keys exists in the .ssh folder:
- Open the authorized_keys and the ba_id.pub files in a text editor.
- Copy the contents of ba_id.pub and paste it into the authorized_keys file.
- [Optional] For security reasons, ssh will not allow authentication if the .ssh folder and authorized_keys file are readable and writable by other users. To make sure permissions are correct, run the following commands:
chmod 700 .ssh
chmod 600 .ssh/authorized_keys - Now, test the connection to your rsync server in BackupAssist by clicking the Test connection button:
- BackupAssist should now authenticate to your rsync server successfully:
Conclusion
When backing up with rsync over an SSH connection using BackupAssist, a public/private authentication key pair is created, which is used to make a secure connection to the rsync destination.
If you experience an authentication error when testing the connection to your rsync server it may be because BackupAssist was unable to transfer the public key to the destination server. If this is the case, you can manually copy the contents of the ba_id.pub file residing on the machine running BackupAssist and paste it into the authorized_keys file on your Rsync Server. Alternatively, if the authorized_keys file does not already exist on your rsync server, you can rename the ba_id.pub file to authorized_keys and move it to the .ssh folder. This should allow BackupAssist to successfully connect and authenticate to your rsync data host.
If you have any questions about this article or have other concerns you would like us to address, please email us at support@backupassist.com
Kind regards,
The BackupAssist Team

