 Belgium
 Canada
 Germany
 Italy
Italy France
 Spain
Spain United Kingdom
How to append multiple backups to tape using the BackupAssist Zip Engine.
In addition to the many features offered in the BackupAssist Zip Engine, such as compression and AES-256 encryption, you can now append multiple backups to the same tape. In previous versions of BackupAssist, a Zip backup would always overwrite existing data on your tape. The ability to append multiple backups to the same tape has been the subject of several feature requests, and in BackupAssist v6.2.0 we have added this feature to give you even more flexibility when it comes to implementing a backup strategy.
When should you use the append option?
One example might be when you have a job configured to back up a small amount data - such as the System State and a collection of files - that does not change often, to tape. With the append feature you can configure this job to back up to the same tape for an entire week and this way you still retain an historical record of the changes made to the data during the course of the week, without you having to change the tape every day. Running backups in this way eliminates the possibility of someone forgetting to insert the next backup tape, which can result in missing a backup, and it can save you money, as you do not need to purchase a separate tape for each day of the week to back up such a small set of data.
Caveats/warnings
- Relying on a single tape with a series of appended backups is a risk. If the tape is lost or damaged, you could lose an entire week's worth of data. If you do choose to append backups to the same tape, we recommend that you consider having at least one other form of redundancy for your data by regularly backing up your critical data to another destination.
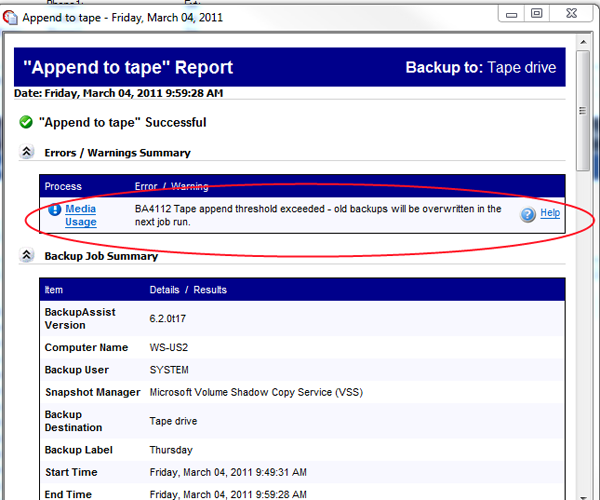
- If there is not enough space available to complete the next append, the tape's contents will be overwritten during the next backup. You will receive a warning in your backup report when an overwrite has been scheduled (see step 3 under 'Testing the append option' for more details).
Requirements
- BackupAssist version 6.2.0 or later
- A BackupAssist license and a Zip to Tape Add-on license. Pricing information is available here: http://www.backupassist.com/purchasing/purchase.php
Instructions for setting up append backups to tape
The following steps outline how to set up append backups with BackupAssist v6.2.0. For more detailed information about BackupAssist's Zip Engine, please see our Zip Engine product tour page: http://www.backupassist.com/BackupAssist/tour_Zip.html
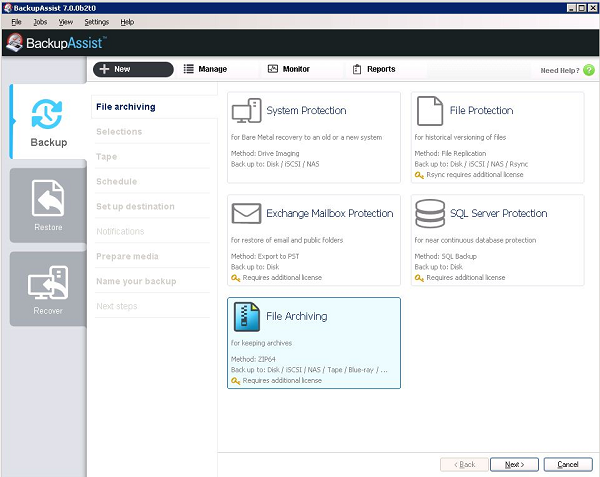
- Create a new job in BackupAssist by accessing the 'New' tab and select 'File archiving' and click Next.
- Make your backup selections and click Next
- Select 'tape' as your backup destination and click Next.
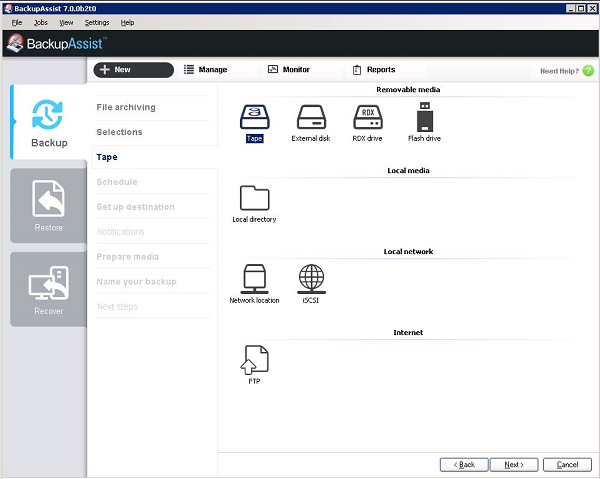
- Select your backup scheme and click Next
- Click Next and configure the tape drive destination settings as per the screenshot below:
- Enable the Append backup option.

- Use the slider to set the percentage of free space that must be available on the tape for BackupAssist to attempt an append. At the end of each backup, BackupAssist will determine if the tape has enough space for a further backup to be appended to it. If the amount of free space is less than the percentage you have set, you will receive a warning in your backup report indicating that the next backup will overwrite the entire contents of your tape. We recommend a default value of 50%, which means that BackupAssist will only attempt to append the next backup if the used space on the tape was less than 50%.
- Note: if append is not enabled, BackupAssist will overwrite the contents of your tape every time a backup runs.
- Enable Encrypt the backup if you want to set a password that must be entered to restore from your tape, and then click Next.
-
Now you can configure your scheduling options. When deciding on a scheme, consider what other backup methods and jobs you have configured in addition to your tape backup job. If you have another job configured that backs up your critical data to disk on a regular basis, then when using the append option on your tape backup job you might want to choose the N-week daily scheme:

This scheme can be customized to perform a full overwrite backup on Monday and then append backups for the rest of the week to the same tape, which is rotated once a week using 4 tapes. - Click Next and finish creating your job. Once the job has been created, you can customize your schedule should you want to configure other backup types, such as Differential and Incremental. To do this, select Scheduling from the left menu and then click Customize schedule near the top of the window:

- Here you can decide the method of backup for each day:
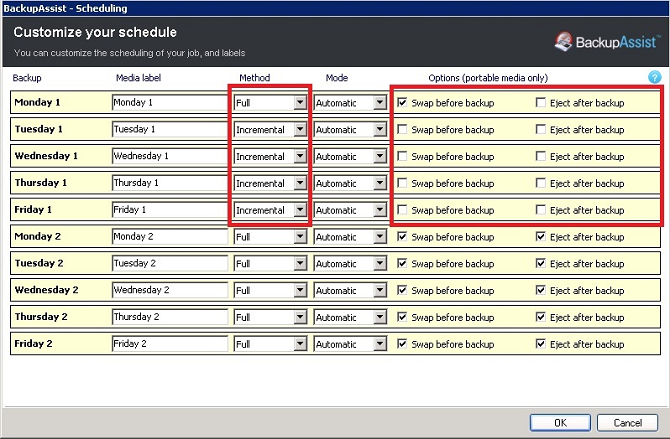
These changes should be repeated for each week in the schedule.
Testing the append option
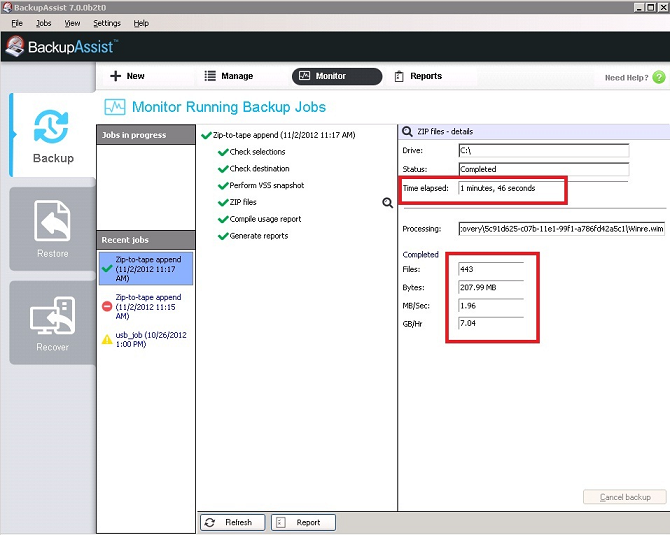
- The following test involved an append backup job set up using the schedule outlined in the instructions above (step 7). The monitor screen shows an initial backup of less than 1 GB of data, taking just under 7 minutes to complete.
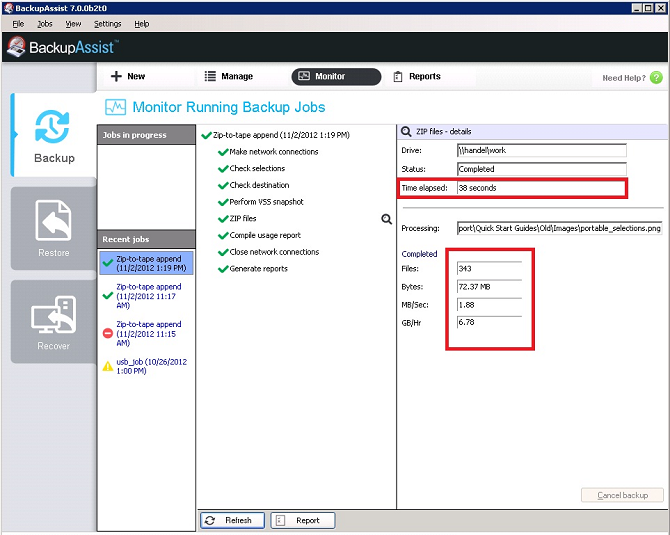
- A second backup was run, which included an additional 72 MB of data. As you can see, only the additional data was appended to the tape.
- If you run a backup that exceeds the percentage threshold of free space you have selected (the default and recommended setting is 50%), you will see the following warning in your backup report to inform you that the next backup will overwrite the contents of the tape:
If you decide that the append option not suitable, you can edit the job and disable it on the Destination tab.
Summary
- You can now append multiple backups to a single tape. This can help eliminate human error as you no longer have to change tapes as regularly, which means you can also potentially save money by not having to purchase additional tape media.
- To use the append feature you require: BackupAssist v6.2.0 or later, a BackupAssist license and a Zip To Tape Add-on license.
- If you want to upgrade from a previous version of BackupAssist, you can determine whether you qualify for a free upgrade by visiting our Purchasing page clicking the Upgrades/Renewals tab and entering your key under the "Check your existing BackupAssist license" section.
We hope this new feature in BackupAssist v6.2.0 is of benefit to you and that this article has helped you configure your append backup in BackupAssist. If you need any assistance or have any questions about this feature, please email us at ![]() .
.
Kind regards,
The BackupAssist Team

