 Belgium
 Canada
 Germany
 Italy
Italy France
 Spain
Spain United Kingdom
Using iSCSI with BackupAssist
BackupAssist can back up data to an iSCSI storage device (target). This capability provides a level of flexibility not found in other solutions such as Windows Server Backup, which cannot back up to iSCSI devices.
How to create an iSCSI target, how to back up to an iSCSI target and how to use iSCSI in a system recovery are explained in this document.
Online Guide
Introduction
iSCSI is a technology designed to provide access to data on a remote system over the TCP/IP protocol. It does this by sending SCSI type commands across TCP/IP which in turn allows the local machine to treat the network drive as a locally connected device. Because of this, a lot of remote storage restrictions are removed.
When implemented correctly, iSCSI backups should be able to out-perform many of the other backup destinations that are available for commercial use.
BackupAssist is compatible with iSCSI targets implemented on most common distributions of Linux and Unix, as well as all versions of Windows from Server 2008 onwards. All newer style NAS devices come with iSCSI as a standard feature, however it is advised to confirm this with the hardware vendor prior to purchase to avoid disappointment.
Terminology
- iSCSI Target : The storage area created using iSCSI, for your backup's destination.
- iSCSI Initiator: Acts as a connector to your iSCSI target by sending commands over the network.
- LUN: Stands for Logical Unit Number. This allows you to separate the physical drive on the iSCSI host into individual targets. Each target can then be used for a specific backup job.
- iSCSI Portal: The physical hardware that will be your backup destination. This is usually a PC/server or a dedicated NAS device.
Advantages of iSCSI
- Faster transfer speeds than other network based storage devices.
- Allows for incremental images to be stored on a NAS device. When backing up to a network share, there isn't the presence of a snapshot manager which means that only one backup can be stored on the NAS at one time. However this limitation isn't present when using an iSCSI destination.
- Can be used to perform a recovery with BackupAssist. Windows Server Backup doesn't allow for recovery from an iSCSI target.
Supported environments
BackupAssist versions 6.4 and later, are able to support iSCSI destinations on the following systems:
- Windows Vista, 7 and 8
- Windows Server 2008/R2 and 2012/R2
-
Small Business Server 2008 and 2011
iSCSI best practices with BackupAssist
- Use one iSCSI target for each backup job: We have found that running multiple backups to one iSCSI target can and will cause data corruption.
- Use a dedicated iSCSI target for your backups: If you want to use the iSCSI device for file storage as well, have this set up within a different iSCSI target to that of your backups.
- Allow BackupAssist to connect/disconnect your iSCSI device
- iSCSI target access: Consider limiting access to your iSCSI target by only allowing a select group of IP addresses to connect or use CHAP or IPsec authentication.
Using OpenFiler as an iSCSI Target
OpenFiler is an open source operating system that is used for network-attached storage. It has a configurable, web-based user management system, which essentially turns a regular computer into a network attached storage (NAS) device with an underlying Linux operating system (known as a software NAS).
You can find more details on OpenFiler by visiting their website: www.openfiler.com.
Installing OpenFiler
Pre-requisites
To be able to install and run OpenFiler successfully, make sure you have the following available:
- Optical media (CD/DVD) created with the OpenFiler ISO. This can be downloaded from here.
- A PC / server that has a network card installed.
- Two physical hard drives. The drive to be used as the system drive requires at least 10GB capacity.
Note: We found that having two physical drives (one for installing OpenFiler on and the other to use for backup data) was easiest from a configuration standpoint. It's also the 'best practice' configuration as indicated by the developers of OpenFiler.
Installing OpenFiler - Graphical installation
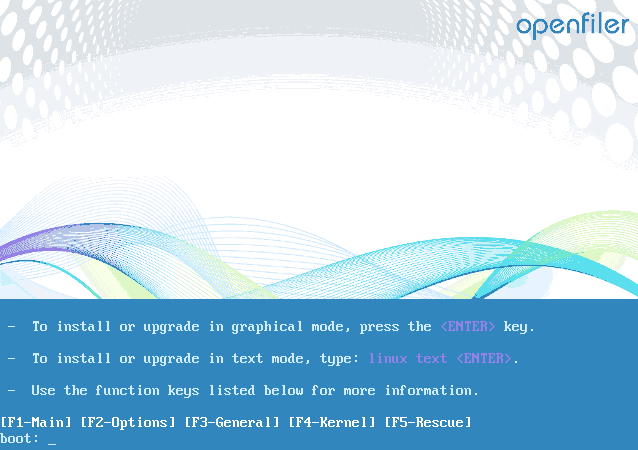
1. Place your optical media into the CD/DVD drive that you will install from. The system should then boot off the CD/DVD.
2. When the welcome screen appears, press Enter to install using the graphical mode.
3. Click Next in the bottom right hand corner of the opening page.
4. Select the keyboard type that you're using for the install from the options available.
5. A warning will appear stating that the drive will be formatted and all data will be lost. Select Yes to proceed with the installation.
6. You will now need to select which drive to install OpenFiler on. In our example we will be installing it on /dev/sda.
7. A warning will now appear stating that you are going to remove all partitions and data from the drive. Select Yes to proceed with installation.
8. On the next screen, click on the Edit button to bring up the network interface settings.
a. Ensure the tick box next to Enable IPv4 Support is checked.
b. Select the radio button next to Manual Configuration.
c. Enter the IP address you want to use for your OpenFiler installation and the network subnet under the Netmask.
d. Disable the check box next to IPv6.
e. Click OK to commit these settings.
9. Select manually under Hostname and enter the name that you want your OpenFiler machine to be known as.
10. Fill out the Miscellaneous Settings as required and then click OK once completed.
- Gateway : This is the IP address used to connect OpenFiler to the Internet/outside network.
- Primary DNS : The IP address of the DNS Server you want OpenFiler to use.
- Secondary DNS: The IP address of an alternative DNS server you wish for OpenFiler to use. This option can be left blank.
11. Select the relevant time zone and click Next.
12. Enter the password for the Root account within OpenFiler.
The installation wizard is now complete - click Next to begin the installation.
13. Once the installation has completed, the CD will be automatically ejected and you will need to re-boot your system.
Once the system re-boots fully, you should then have access to OpenFiler in command line format (see screen shot below). The OpenFiler installation is now complete.
Note : Make sure to write down the Web Administration GUI IP address.
Configuring OpenFiler as an iSCSI Target
Once you have correctly installed OpenFiler, you will be able to access the web administration interface. To be able to run the web administration interface, you'll need the Web Administration GUI IP address, as listed when you access your OpenFiler machine locally from the command line.
In the example we're using https:\\192.168.1.160:446 is the web administration IP address.
1. Open your web browser and enter the web administration IP address.
Note : In some browsers you may receive an Untrusted Connection or security certificate warning. There isn't a security issue and you'll need to accept this to configure your iSCSI target.
2. The web administration UI login page should now appear (as shown to the right).
Enter the Username and Password. The default settings are:
Username :OpenFiler
Password : password
3. Once you've logged in, the Status screen will be displayed.
4. Browse to the Services screen.
5. Enable and start iSCSI target and iSCSI Initiator services.
6. Browse to the System screen.
7. Scroll to the bottom to add a Network Access Configuration section.
8. Fill in the details required to create a new network access configuration.
- Name : This is used for your own personal identification of the machine BackupAssist is on. It does not require any matching or special entry.
- Network/Host: Is the IP address of the system you are running BackupAssist on.
- Netmask : The subnet mask of the machine you're using.
During our testing, we found if you used 255.255.255.0 that the iSCSI target would not be detected. Using 255.255.255.255 allowed for the iSCSI target to be detected successfully.
- Type : Leave this as the default Share.
9. Click on update to create the network access.
10. Browse to the Volumes screen. You should now be prompted to create a new volume group.
11. Fill in the Volume Group Name field with a value of your choice.
12. Select the physical volume(s) that you want to be part of the volume group by checking the tick box next to the relevant drive.
In our example, the volume /dev/sdb1 is going to be a part of volume group 'iscsi_vg'.
13. Click Add volume group to complete the process with the details added.
14. Click on the Add volume option under Volumes section to the right hand side.
15. You now need to create a volume within the volume group that you just created.
- Volume Name : Identifier for the name of the volume you are creating. This can be set to anything.
- Volume Description : A brief outline of the purpose of the volume (if it's not obvious from the Volume name you entered above). This field can be left blank.
- Require Space (MB) : Specified size of the volume you are creating in megabytes. The maximum is the amount of space available on the physical volume. However, you can divide these into multiple volumes if you are backing up multiple machines to avoid conflicts.
- File System/Volume Type : Change this setting to block (iSCSI,FC,etc).
16. Click on Create to create the volume.
17. Click on the iSCSI Targets option under Volumes section to the right hand side.
18. Click on the Add button to create a new iSCSI target. Once you have created your iSCSI target click on the LUN Mapping tab.
19. The LUN Mapping tab allows for you to point the volume you created in step 13 to the iSCSI target you created in step 16.
The variable options in this screen are as follows:
- R/W Mode : This is the permissions to the volume. The default option is full read/write permissions. This is the option that is required in this particular setup.
- Transfer Mode : The difference between blockio and fileio is the way caching is used on the target. Transfer rates seem to be improved using blockio over fileio in our environment.
20. Click on Map to create the relationship between the volume and iSCSI target.
21. Browse to the Network ACL tab as this will allow you to specify which machines will be able to detect the iSCSI target you've created.
Change the Access option to either:
- Allow : This will let the IP address specified under Network/Host to access the iSCSI target.
- Deny : IP address will not be able to detect the target when searching for valid iSCSI targets.
22. Once you have made your selection, click Update to commit your change.
If you've made it this far, then you should now be able to configure BackupAssist to use your iSCSI target as a backup destination.
Creating a backup on an iSCSI target
Once you have your iSCSI target configured, BackupAssist will be able to use it as a valid backup destination for File Archiving, File Protection and System Protection backups.
The steps in this section can apply to each of the three backup types named above. For instructions specific to the backup type you intend to use, refer to the applicable whitepaper (e.g. System Protection whitepaper).
Launch BackupAssist and follow the steps outlined below:
1. Select the Backup tab, and click Create a new backup Job
2. Select System Protection, File Protection or File Archiving.
3. Selections: Select the data to back up to your iSCSI target, and click Next.
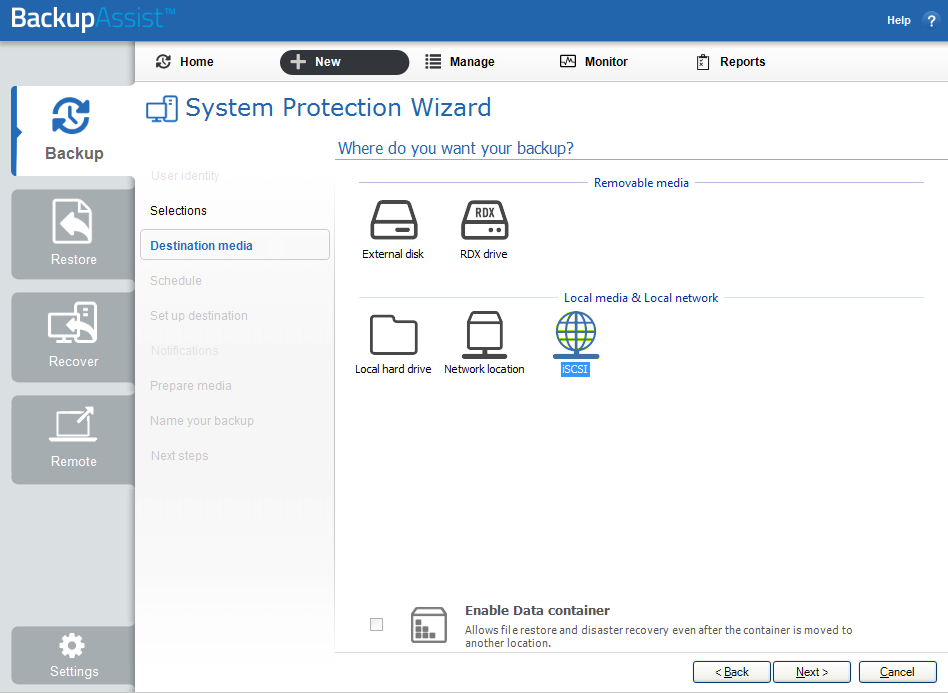
4. Destination media: The destination screen is used to select the type of media that you want to back your data up to. This step's name will change to the media type selected, when you click next.
Select iSCSI (under Local media & Local network), and click Next.
5. Schedule: This screen is used to select when and how you would like the backup job to run, and how long you would like the backup to be retained for. A selection of pre-configured schedules, called schemes, will be displayed. Select an appropriate scheme, and click Next.
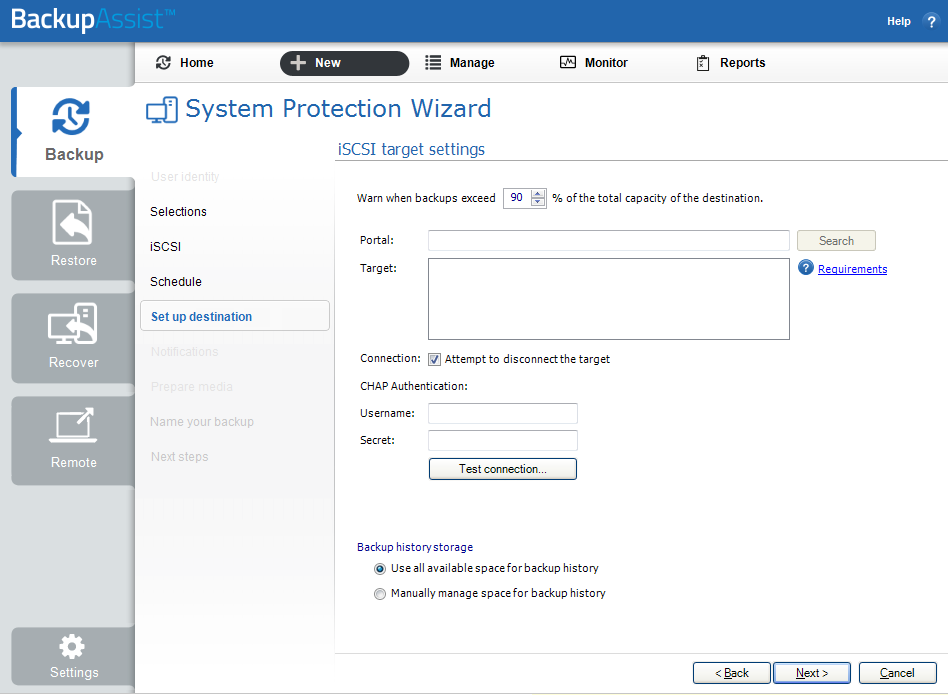
6. Set up destination: This screen is used to configure the location of the media that you selected in step 4.
Configure your iSCSI destination using the details below, and click Next.
-
a. Portal: Enter your iSCSI Target / Portal IP address in the text box provided, and click Search. This
should produce an option under the iSCSI Target after a few seconds.
b. Target: Select the target that you want to run the backup to. Be aware that the operating system will not always be able to disconnect a target and this is not an error in the software.
c. Connection: Tick this box if you want BackupAssist to attempt to disconnect the iSCSI target once it has finished initializing and testing the connection.
d. CHAP: Enter a username and secret (password) if your iSCSI target has CHAP authentication enabled. If CHAP is not enabled then you can leave this blank.
e. Test connection: Before using an iSCSI target for the first time, it must be initialized. Click the Test connection button to have BackupAssist connect and initialize the target.
7. Notifications: Once a backup job has completed, BackupAssist can send an email to inform selected recipients of the result. This email notification can be enabled during the creation of a backup job, if the mail server has been configured.
8. Prepare media: This step will be skipped because iSCSI is not a removable media.
9. Name your backup: Provide a name for your backup job, and click Finish.
Your iSCSI backup job has now been created.
Recovery from an iSCSI target
If you want to recover your computer using an iSCSI device, you need to be able to detect and access the iSCSI device, using a recovery environment like RecoverAssist.
This section explains how to do perform a recovery using a bootable RecoverAssist media and a BackupAssist System Protection (image) backup. File Archiving and File Protection backups cannot be used to perform a recovery.
Restore vs. Recovery
A restore is the process of accessing a backup and restoring it to the original (or a new) location, if your data is lost, corrupted or if you want an earlier version of that data. However, if your computer cannot start itself, you may need to perform a recovery.
A recovery is the process by which a computer is recovered after hardware has been replaced or an operating system failure has occurred, and your computer can no longer start itself. To perform a recovery you need a bootable media to start your computer, and an image backup that the bootable media can use to recover your operating system, data and applications.
Only System Protection can create the image backup used in the recovery process. It can also create a backup of your data so it can be restored onto a functioning computer. These two capabilities make System Protection a powerful and versatile backup solution.
For more information on data recovery, see the System Recovery guide.
Recovery requirements
The recovery process will begin by starting your computer using a bootable RecoverAssist media. The RecoverAssist media will then create a recovery environment on your computer, which will access your iSCSI device and the System Protection (image) backup stored there.
You must have both of these items to perform a recovery:
- The RecoverAssist bootable media
The media must be created with the same operating system as the one on the image backup.
- A System Protection backup (on your iSCSI device)
The bare-metal option must have been selected during the creation of the backup for the image to work. Your computer will be recovered to the environment that existed when the image was made. The RecoverAssist environment will use the image backup on your iSCSI device to recover the computer's operating system, configurations, and any applications and data that were selected when the backup was made.
Recovery process using iSCSI
The following steps explain how to use RecoverAssist's bootable recovery media, and a backup stored on an iSCSI target:
1. Connect the RecoverAssist media to the computer to be recovered.
2. Start the computer and boot from the RecoverAssist media.
Your computer should detect the RecoverAssist media and begin the boot process. Understanding the boot process can assist if a problem is encountered. The process is described below:
BIOS stage - The computer will access its BIOS (a chip containing basic hardware settings) and detect the hardware needed to start the computer. It will display some of the steps onscreen and beep to confirm it has run successfully. Additional beeps can indicate a problem detecting necessary hardware.
O/S stage - Once the computer has completed the BIOS stage, it will look for the location of the operating system boot files. The BIOS will be configured with a device order, to search for these files. Most computers will have a default order of optical drive, C:\drive, USB device. The attached bootable media must be configured in this BIOS setting, and should be listed before the C drive. To check or change your boot media order, you need to access the configurations by pressing a key during the BIOS stage. The key stroke required may be displayed in screen during the BIOS post process, or noted in your hardware / server documentation.
3. RecoverAssist Environment menu
Once your computer has booted from your RecoverAssist media, the RecoverAssist recovery environment will load and present you with the following menu.
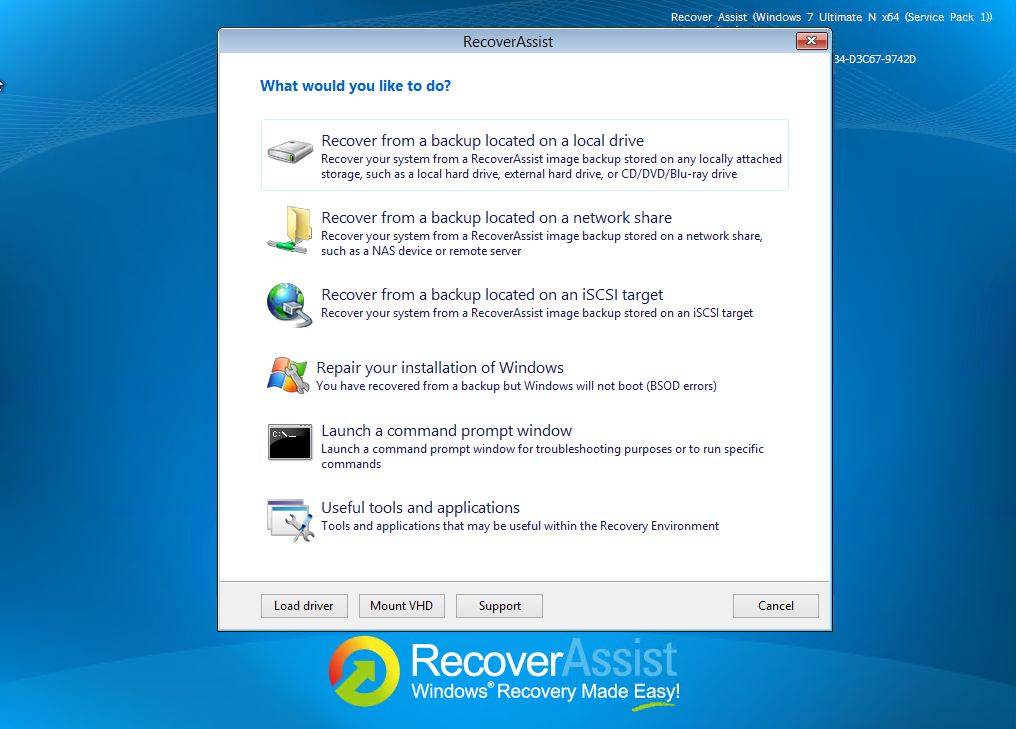
Select Recover from a backup located on an iSCSI target.
4. The Specify network settings window will open.
Select either Obtain IP address automatically or Set IP address manually. If you choose to set the IP address manually, you will need to fill in the following sections:
- IP Address : This is the IP that you wish to issue the system you are running the recovery on.
- Mask : The subnet that you want the system to be part of (usually 255.255.255.0).
- Gateway : This is the IP address to connect the system to the internet/outside networks.
- DNS : The IP address of the DNS Server you want the machine to use.
Select Next once the settings are completed.
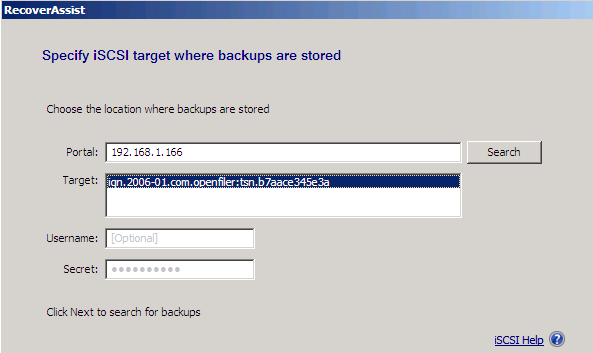
5. The Specify iSCSI target where backups are stored window will open.
- Type the location of the iSCSI target into Portal. This can be the IP address or domain name.
- Click Search, and a list of available targets should appear. From the list of targets available under Target, select the one that contains the backup you want to use.
Optional: Add the username and password if the destination is password protected under Username and Secrets.
Click Next to proceed.
6. RecoverAssist will now attempt to locate valid image backups located on the target. Click Finish to proceed.
7. The Select a system image backup window will open
Select either use the latest available system image (recommended) or Select a system image. Once you have selected which image you wish to restore, click Next.
8. The Choose additional restore options windows will open.
If you have to install drivers or wish to exclude disks from being restored, you can choose to on this screen. Once you have completed this select Next to proceed.
9. Confirm your settings on the final screen and click on the Finish button.
10. The Recovery Environment will ask you whether you want to format the disks and restore the backups you have chosen. Click on the OK button. Your bare-metal restore should begin. Once done, your system should reboot and Windows will load.

