 Belgium
 Canada
 Germany
 Italy
Italy France
 Spain
Spain United Kingdom
BackupAssist v8 - backup verification
Backup Verification is available for File Protection, File Archiving and System Protection backup jobs for BackupAssist v8. Backup Verification is NOT enabled by default.
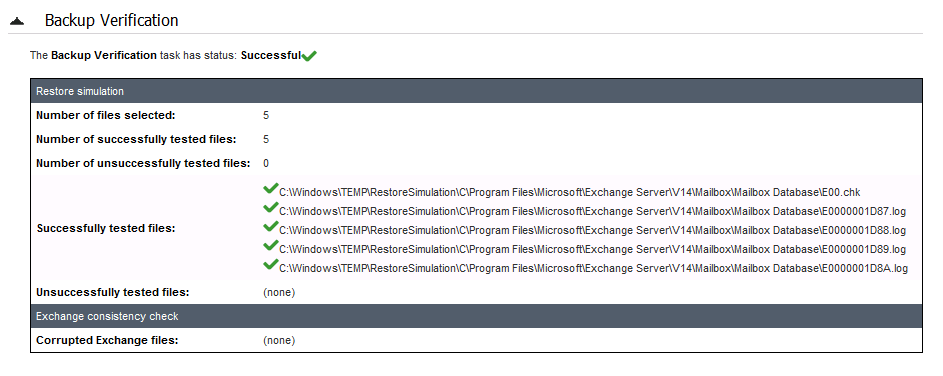
.When enabled, Backup Verification will perform the following steps to simulate a restore:
- Access the backup destination.
- Check the backup catalogue's integrity.
- Open and read a sample of the backup files.
If you want all files backed up to be verified, enable the Full option using the Manage job menu.
Backup verification is an automated process for testing backups. A manual restore is the only way to fully test a backup and regular manual restores should be part of any backup solution
Online Guide
Backup verification for server applications
Server applications use large files and databases and require a specialized verification process.
The application backup verifications available are:
- Exchange Server backup verification
- Hyper-V Server backup verification
An Exchange Server backup verification will acces the backup destination, open the Exchange EDB file and perform a consistency check.
Hyper-V backup verification will check the integrity of each guest VHD and its data, and test-mount the VHDs.
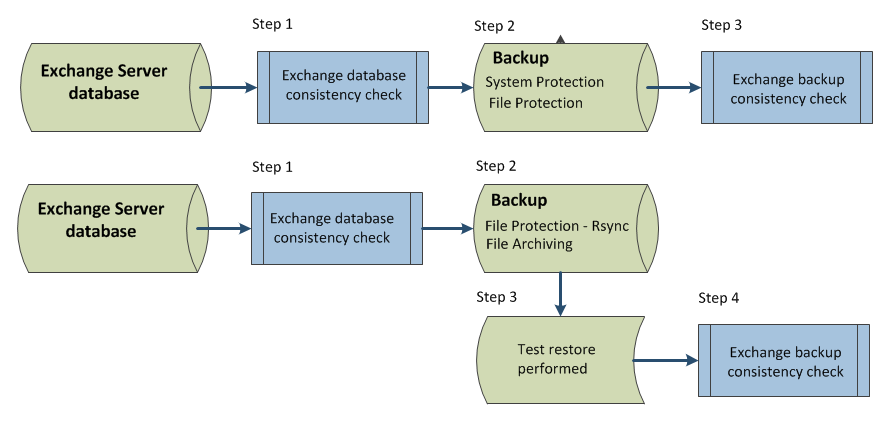
Verification takes longer for File Archiving and Rsync backups, because large application files must be restored to a temporary folder.
Backup verification management
Each File Archiving, File Protection and System Protection backup job has a Backup Verification selection available in the BackupAssist Manage menu.
- When you select Backup verification, the options available will depend on the backup type. E.g. If you are backing up a Hyper-V Server, the Hyper-V verification options will be available.
- The configurations made in the Backup verification screen only apply to the selected backup job.

To access Backup verification
- Select the Manage menu from the BackupAssist Backup tab.
- Select the backup job that you want to modify.
- Select Edit from the top menu.
- Select Backup Verification from the options.
The following sections are available to modify your Backup verifications
For all backups
This section is used to enable or disable all backup verifications. You can also select Full backup verification and verify all of the data that was backed up.
For Hyper-V Server backups
This section is used to enable or disable both the un-mounted VHD integrity check, and the test-mount of the VHD. You can also enable verification for File Archiving and Rsync Hyper-V backups.
For Exchange Server backups
This section is used to enable or disable the verification of Exchange database files. You can also enable backup verification for File Archiving and Rsync backups of your Exchange Server.
Temporary storage
A temporary location is used to verify File Archiving and Rsync backups of Hyper-V and Exchange Servers. Use this setting to change the temporary location. ALL data in the temporary folder will be deleted.
Backup verification reporting
When a backup job runs, the BackupAssist Monitor running backup jobs screen will display the Backup Verification check while it runs.
- The verification results will be displayed in the Backup Verification section of the backup report.
- Any errors or problems will be displayed in the Backup Verification section of the backup report.
Backup verification FAQ
During the Beta release of BackupAssist v8, we received some great questions via email and through our distributer webinars. This FAQ draws on many of those questions, along with the answers provided by our team of developers.
Can you start another backup job, while the backup verification is still running?
Other backups will not run during the backup verification, because the verification process is part of the backup job. Once the job (and its verification process) has completed, the next backup job will run. If you have enabled concurrent backups, they will run the same way they currently do.
What happens during catalogue verification?
The verification process involves reading the backup catalogue, and taking the information from the catalogue to perform a restore simulation. The restore simulation will read the data as if it was doing a restore, but no actual restore takes place. For Hyper-V and Exchange, additional verifications can be performed, such as mounting a Hyper-V guest and checking an Exchange database - and these verifications also begin with reading the backup catalogue.
How does backup verification work for File Archiving and Rsync backups?
For normal data (files, folders etc.), File Archiving and Rsync destination backups will be verified in the same way as other backup types.
For Hyper-V and Exchange backups however, the process is different. File Archiving backups need to be uncompressed and Rsync backups need to be moved to a local host. This means both File Archiving and Rsync backups need to copy their data to a temporary location.
This requires more time and space and is therefore not enabled by default. You must manually enable verification for File Archiving and Rsync backups of Exchange and Hyper-V Servers. You can also change the default temporary location used to perform this verification.
How much space is required to verify a File Archiving or Rsync backup?
If you want to verify a File Archiving or Rsync backup of a Hyper-V or Exchange Server, the space required is equal to the size of the data. For example, if your Exchange Server has a 20 GB database, you will need to provide 20 GB of free space at the temporary location for the verification to run. After the verification, all data in the temporary location is deleted. For this reason, the temporary location’s folder should only be used for backup verification.
The temporary location is only required by File Archiving and Rsync destination backups. System Protection is our recommended backup type for Hyper-V and Exchange Servers.
Can I manually trigger a backup verification at any time?
No, the backup verification process can only be run by a backup job at the end of a backup.

