 Belgium
 Canada
 Germany
 Italy
Italy France
 Spain
Spain United Kingdom
 Exchange Protection
BackupAssist provides comprehensive Exchange Protection by creating backups that can be used to restore an Exchange Server, an Exchange information store database, Exchange storage groups, mailboxes and individual mail items like emails, contacts and appointments.
BackupAssist can use File Protection, File Archiving and System Protection backups to:
- Restore your Exchange Server and databases using the Integrated Restore Console.
- Restore individual mail items using the Exchange Granular Restore Console.
Licensing
Exchange Servers can be backed up using System Protection, File Protection and Files Archiving backups. Exchange Servers can be restored using the Integrated Restore Console. These features require a BackupAssist license, once the initial trial period has expired.
Exchange Granular Restore Console requires the Exchange Granular Restore Add-on license. Please contact your local BackupAssist reseller or distributor for pricing information, or visit www.BackupAssist.com.
For license key activation / deactivation instructions, visit our Licensing BackupAssist page.
Online user guide
Exchange Server Protection overview
BackupAssist File Protection, File Archiving and System Protection backups use the Microsoft Volume Shadow Copy service (VSS) to back up your Exchange Server while it is running. BackupAssist can use these backups to perform a complete restore of your Microsoft Exchange Server or individual storage groups.
Supported platforms
To back up and restore your Exchange Server databases using BackupAssist you need:
- Windows Server 2008 / 2008 R2, 2012 / 2012 R2, 2016 (from v9.5 - does not include CSV support)
- Windows Small Business Server (SBS) 2008 or 2011
- Microsoft Exchange Server 2007, 2010, 2013 and 2016 (from v9.2)
Requirements by platform
The tables below are a reference for the combinations of Windows operating systems and Exchange Servers that can be used to provide Exchange Server Protection using BackupAssist.
Windows Server VSS support for BackupAssist backup types: required for Exchange database backups.
|
Windows 7, 8.1 &10 |
Windows Server 2008/R2 |
Windows Server 2012/R2 |
Windows Server 2016 (from v9.5) |
|
|
File Protection |
|
|
|
|
|
File Archiving |
|
|
|
|
|
System Protection |
|
|
|
|
Requirements :
- If BackupAssist is running on a 32-bit operating system, download and install the Exchange Server 2007 Management Tools (32-bit).
- If BackupAssist is running on a 64-bit operating system, install the Exchange Server 2007 Management Tools (64-bit) from the installation disk or setup file used to install Exchange 2007 on your remote server.
- If you installed Service Pack 1 after installing Exchange Server 2007 the change should not be required.
- If you have installed a version of Exchange Server 2007 that came pre-packaged with Exchange 2007 Service Pack 1, you will need to make an alteration to the registry due to a change made by Microsoft.
Use this Microsoft downloads link for additional information.
To backup the Exchange Information Store of a remote server isn't supported on Windows Server 2008 and 2012, you must install BackupAssist locally on the Exchange Server and purchase a separate BackupAssist license.
Exchange Granular Restore Add-on overview
The Exchange Granular Restore (EGR) console allows you to restore mail items using Direct Exchange Injection. The backups used can be created by System Protection, File Protection or File Archiving. This means the backup you use to protect your Exchange Server can also be used to restore mail items.
Supported platforms
Exchange Granular Restore supports the following versions of Microsoft Exchange:
- Exchange Server 2016 (from v9.2)
- Exchange Server 2013
- Exchange Server 2010
- Exchange Server 2007
Requirements
- BackupAssist 7.2 or later must be installed on the Exchange Server.
- RAM: 256-1024 MB, depends on mail store size and OS version
- May require free space on disk 1.5x the size of mail data being processed.
Backup type support
Exchange Granular Restore supports the following backup types:
- System Protection
- File Protection
- File Archiving
Restore options
The Exchange Granular Restore Add-on can restore the following items:
- Mailboxes, mail folders and emails (cannot be encrypted)
- Folders
- File attachments
- Contacts, Notes, Tasks and appointments
Journals, emails attached in other emails and embedded email objects are currently not supported.
Performance
Exchange Granular Restore is tested for optimal performance up to the following dataset sizes.
- Database size: 500 Gb / Mailbox size: 100 Gb
- Number of messages in one mailbox - 100,000, in the database - 2,000,000.
- Number of mailboxes in the database: 2,000
Creating an Exchange Backup
The following instructions describe how to create an Exchange Server backup job, using BackupAssist. These backups can be used to restore your Exchange Server and to restore individual mail items.
To enable the Exchange 2007 VSS writer, please refer to this blog article.
To back up Exchange on a Hyper-V guest for EGR, review the Exchange Server Backup Management > Files and applications section.
Launch BackupAssist and follow the steps outlined below:
1. Select the Backup tab, and click Create a new backup Job
2. Select System Protection, File Protection or File Archiving.
If this is the first time you have created a backup job, you will be asked to provide a Backup user identity if one has not been defined. See the section above, BackupAssist settings , for guidance.
The following instructions use System Protection to explain the Exchange VSS back up process.
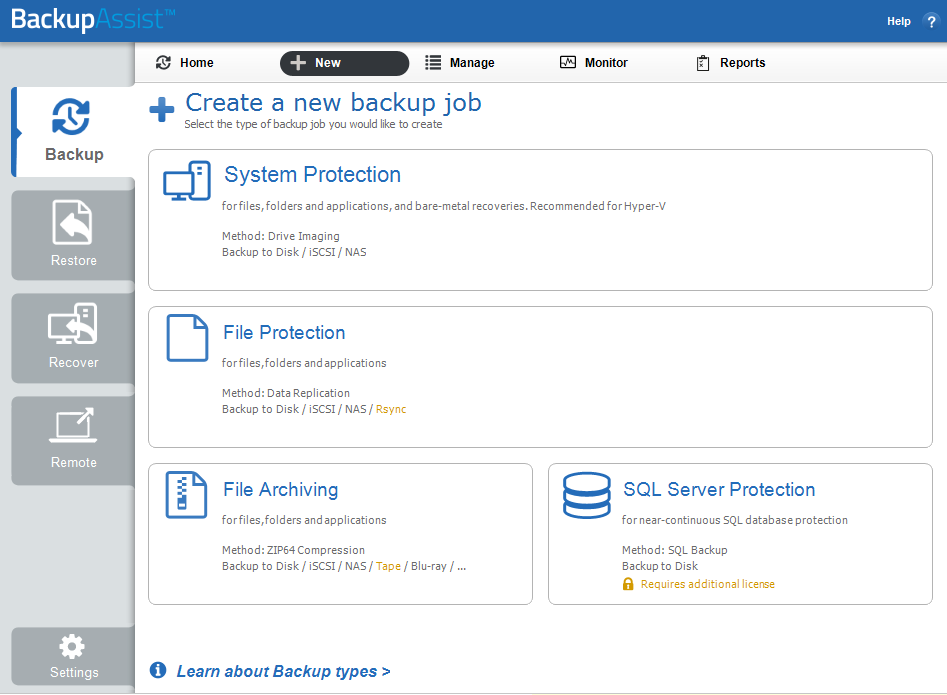
Backup type selection screen
Back up instructions specific to each backup type, can be found in these user guides:
3. Selections
The selections screen is used to select the data and applications that you would like to back up. Any local Exchange Servers detected will be displayed here as application containers.
An Exchange VM Detection tab will be available if you are backing up an Exchange VM guest. To learn more about this feature, see the Backup Considerations section.
You can select an entire VSS application or choose individual components. To back up your Exchange Server, select the Microsoft Exchange container.
If your local Exchange Server is not listed in the Selections screen, try restarting Exchange and the VSS service and click the Refresh button in BackupAssist.
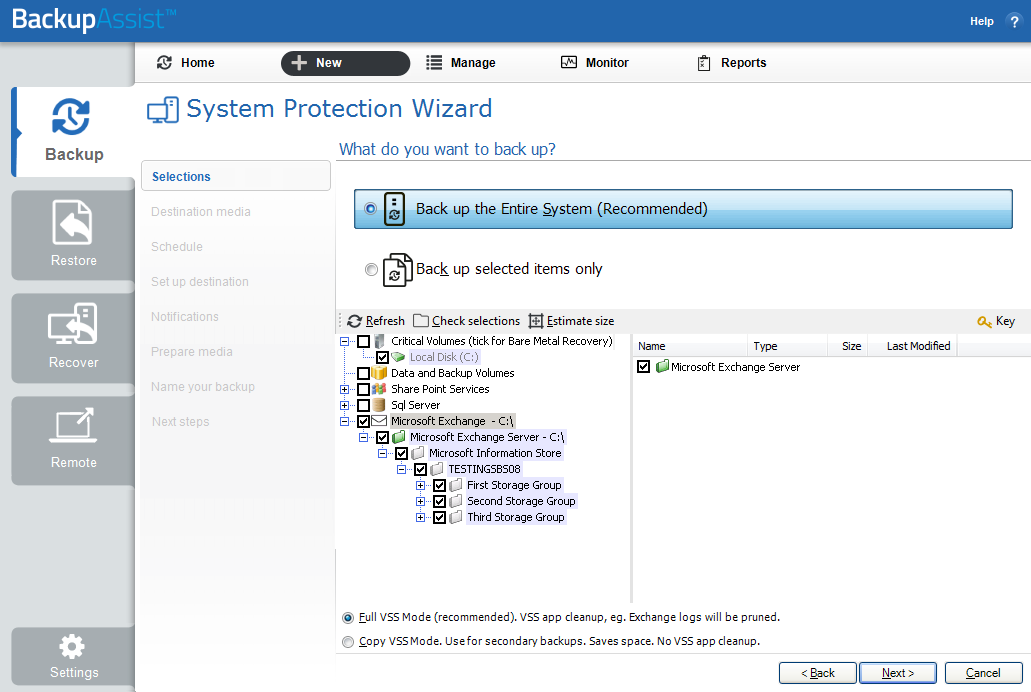
Exchange Server VSS selection
- For System Protection backups, VSS applications will be backed up as part of a Backup up the Entire System selection. In the example above, Back up selected items only, was chosen and the Exchange Server application container was selected.
- To learn how to create a bare-metal backup using System Protection (for use in a recovery), see the System Protection user guide.
- For File Protection, File Archiving and System Protection backups, the top level Microsoft Exchange and Exchange Server application containers should be selected.
4. Destination media
The destination screen is used to select the type of media that you want to back your data up to. This step's name will change to the media type selected, when you click next.
Select a device for your backup destination, and click Next.
5. Schedule
This screen is used to select when and how you would like the backup job to run, and how long you would like the backup to be retained for. A selection of pre-configured schedules, called schemes, will be displayed.
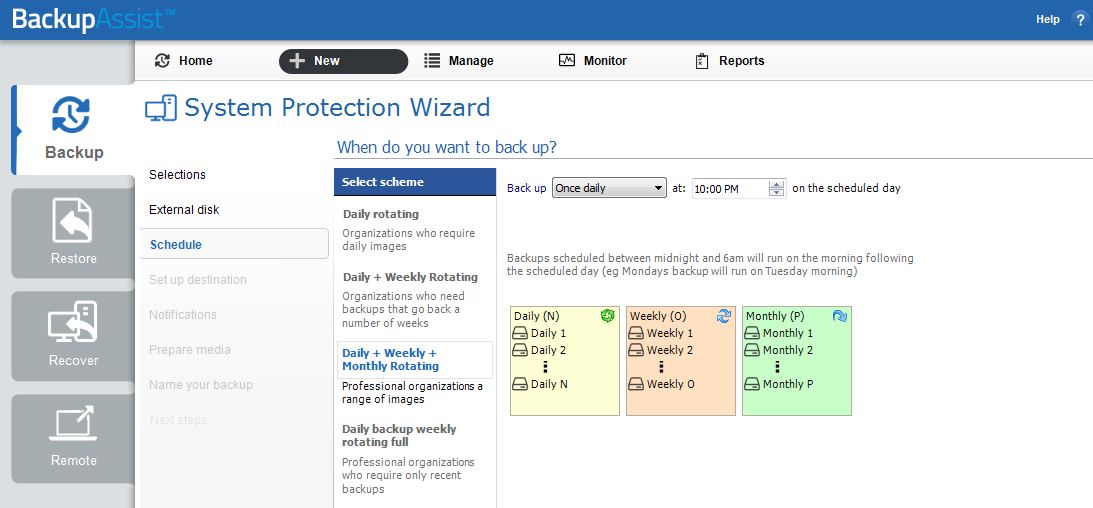
Schedule selection
- The schemes available will depend on the type of destination media selected in step 4.
- Clicking on a scheme will display information about the schedule used.
- The schedule can be customized after the backup job has been created.
Select an appropriate scheme, and click Next.
For more information about creating custom schedules, refer to the Backup tab user guide.
6. Set up destination
This screen is used to configure the location of the media selected in step 4.
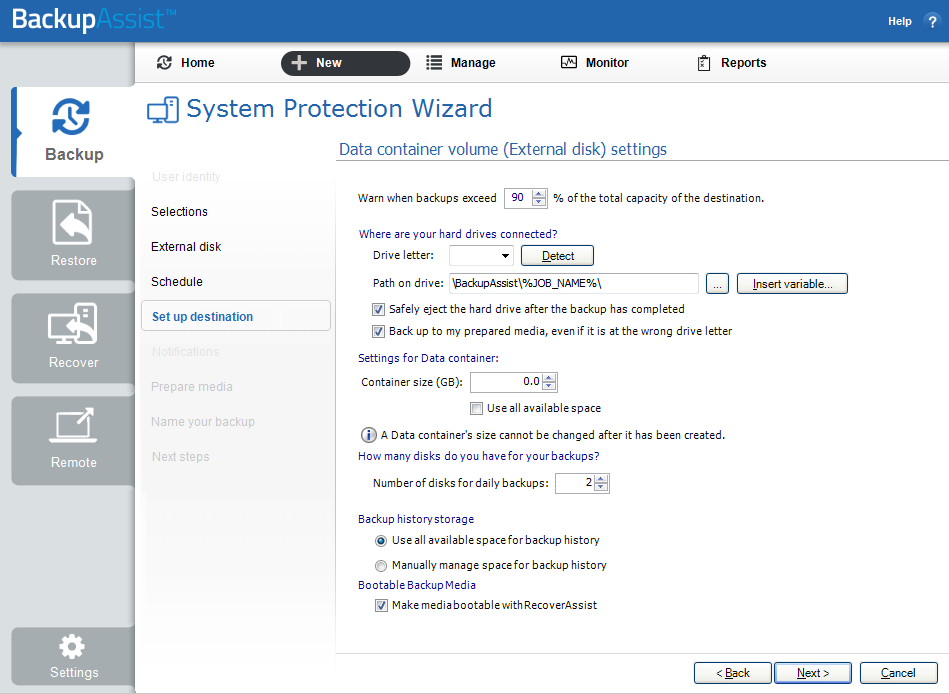
Set up destination
The options presented will change with the type of media selected.
If you are using a Local media & Local network destination, a Check destination button will be available to check your backup destination for possible problems. After the checks have been completed, the results can be viewed by selecting the Report link. If you are using Removable media destinations, these checks are performed when you select Prepare on the Prepare Media step.
Configure your backup destination, and click Next.
Mail Server: If you have not configured an SMTP mail server for BackupAssist, you will be prompted to provide those details after the backup destination step has been completed. See the BackupAssist settings section for guidance.
7. Notifications
Once a backup job has completed, BackupAssist can send an email to inform selected recipients of the result. This email notification can be enabled during the creation of a backup job, if the mail server has been configured.
To enable email notifications:
a. Select, Add an email report notification.
b. Enter recipients into the Send reports to this email address field.
c. Enter recipients into the Also send reports to this email address field. You can then select the condition under which the email should be sent, using the drop-down box.
After the backup job has been created, you can modify the notifications by adding and removing recipients, setting additional notification conditions and including print and file notification types.
To learn more about notification options, see the Backup tab user guide.
8. Prepare media
If you selected a portable media device as your backup destination, you will be given the option to prepare and label the media. The label allows BackupAssist to recognize the media and ensure that the correct media is being used on the correct day.
For example, if you put an RDX drive in on Tuesday but it was labelled Wednesday, BackupAssist will warn you that the incorrect media has been detected.
To enable media detection:
a. Select, Let BackupAssist keep track of your media.
b. Select what you would like BackupAssist to do, if the wrong media is inserted.

Prepare media
c. Select what you would like BackupAssist to do, if new or unrecognized media is inserted.
BackupAssist will display all removable media that are currently attached, along with a text field and drive designation drop-down box, which can be used to provide a label for the media.
To prepare your media:
d. Enter the name and drive designation to be used for each media device listed.
e. Select Prepare for each media device listed.
Selecting Prepare will generate a Destination Check Report. The report will advise if any problems were detected with the media.
9. Name your backup
Provide a name for your backup job, and click Finish.
Your Exchange Server (VSS) backup job has now been created.
Important: Once the backup has been created, it should be checked. You can check the backup by performing a manual test restore, or using the Backup Verification feature.
Backup verification is an automated process for testing backups. A manual restore is the only way to fully test a backup, and regular manual restores should be part of any backup solution
Exchange Server Restore
BackupAssist’s Restore tab displays two options for Exchange: Exchange Server restore and Exchange Granular restore. This section explains how to perform an Exchange Server restore using a System Protection, File Protection or File Archiving backup.
Exchange Server restore is used to restore a full Exchange Server or individual EDB storage groups. Performing these restores may require preparations and considerations that go behind the scope of the restoration of the data. The Microsoft’s Exchange Server restore resources should be consulted before planning and performing an Exchange Server restore.
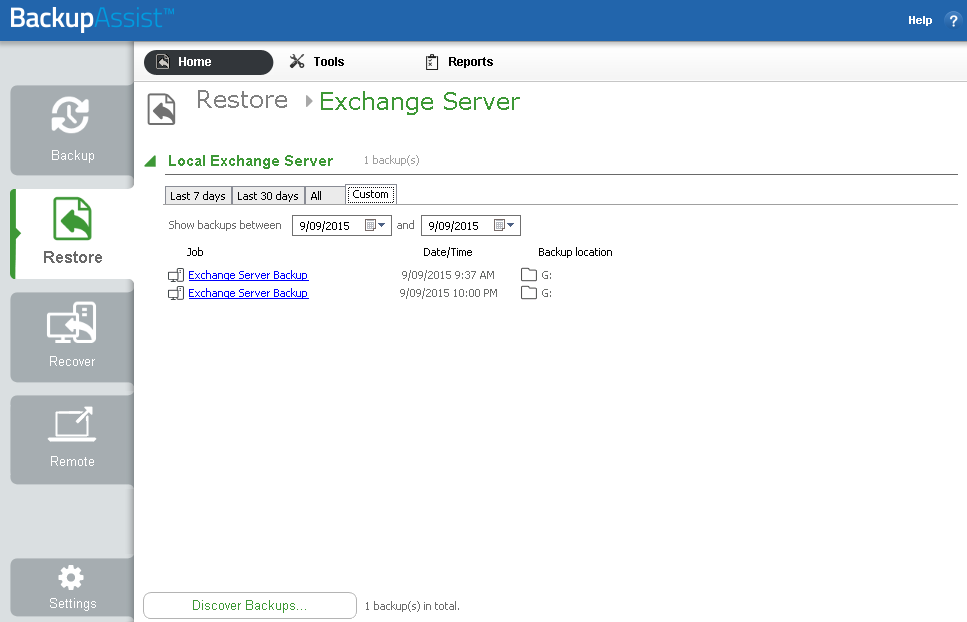
To restore an Exchange Server or EDB database, follow the steps below:
- Select the Restore tab
- Select Exchange Server
- The Last 7 days and Last 30 days tabs display the backups within those ranges.
- The Custom tab allows you to select a specific date range and display backups for that period.
- Select the backup that you want to restore from
- Select the Exchange Server or database that you want to restore
- Select Where to restore the data to
- Under Where to restore select To original location or To Specific location.
- Use the Browse button to locate and select the restore destination.
- Use the drop down box to set the overwrite rules. The overwrite rules will apply if the files being restored encounter files with the same name in the restore destination.
- Overwrite existing files - The restored files will overwrite files in the restore destination.
- Do not overwrite existing files – The restored files will not overwrite files in the restore destination. This means the files will not be restored.
- Only overwrite older files - If a source file has changed since the backup was made it will not be overwritten.
- Review the Restore NTFS security attributes option
- Review the Take ownership of restored files option
- Select Restore
- Select Done
The Restore tab has a Home page and a Tools page. The Home page is the default page and the recommended starting point for performing a restore. The Tools page should only be used by experienced administrators or users being assisted by technical support.
This will display the Exchange Server backups created by this installation of BackupAssist. It can also show backups from other machines added using the Discover Backups button.
Expand a volume to display all of the backups available for that volume. The tabs above each volume’s list of backups can be used to help locate the required backup.
Discover Backups allows you to browse for backup catalogs created by deleted jobs and other servers. Selecting those backups will add them to the list of available backups.
Clicking on a backup’s name will open the Integrated Restore Console (IRC). The Integrated Restore Console is used to select the data to be restored, where to restore it to and the restore conditions.
Use the left pane to select the Exchange Server or the databases that you want to restore. The right pane will display the contents of the folder selected in the left pane.
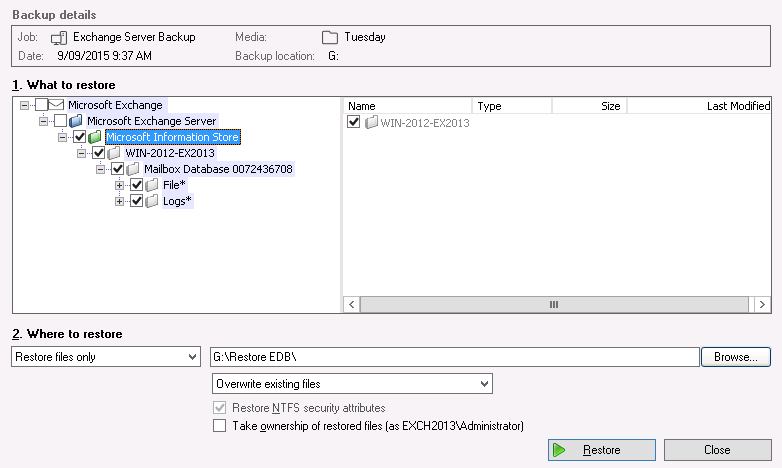
Follow these steps to select the restore destination for the host files and the restore options:
You can select:
If you select this option, the NTFS security attributes the file had when it was backed up will be retained when the file is restored. The NTFS security attributes can be viewed in the Security tab on the file’s Properties
Selecting the Take ownership of restored files tick box will give the current user ownership of the restored files. The user is shown to the right of the text box description.
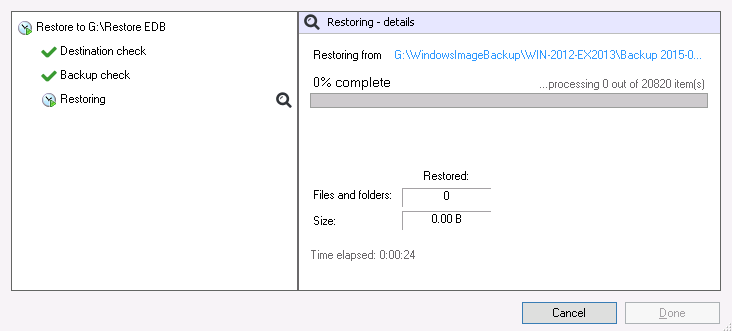
When you select the Restore button, the restore process will begin. The Integrated Restore Console will display information about the restore job and provide status updates as the job runs.
Selecting List all processed files and folders … will open notepad and display a list of the files restored, including their full path.
Encrypted backups
If your backup is encrypted, you’ll be prompted for the encryption password when the restore job tries to access the backup. It is important that you keep a copy of your password in a safe place, as we cannot assist you with opening password encrypted files if your password is lost or forgotten.
If you encrypted the backup using BitLocker, you can use the password or encryption key to unlock the drive by connecting the flash drive. BackupAssist will use the key to unlock the drive that you are restoring from. You will not be prompted to do anything other than the normal restore steps.
Once the restore has finished, selecting Done will return you to the main UI.
Your Exchange Server restore has now been completed.
Exchange Granular Restore
BackupAssist’s Restore tab displays two options for Exchange: Exchange Server restore and Exchange Granular Restore. This section explains how to perform an Exchange Granular Restore using a System Protection, File Protection or File Archiving backup.
Exchange Granular Restore will restore individual mail items from an Exchange Server database or PST file. This feature requires an Exchange Granular add-on license.
When you restore individual emails or a mailbox, the word RESTORED will appear in the Subject line of every email. This is enabled by default and can be turned off using the EGR Options menu, by selecting Options > Add RESTORED to exported item > No.
The restore Home page can display backups of Exchange databases inside Hyper-V guests. Mail items inside the guests can be restored using Exchange Granular Restore. The Hyper-V restore process is automated but the restore requires both an Exchange Granular Add-on and a Hyper-V Advanced add-on licenses.
To perform an Exchange Granular Restore, follow the steps below:
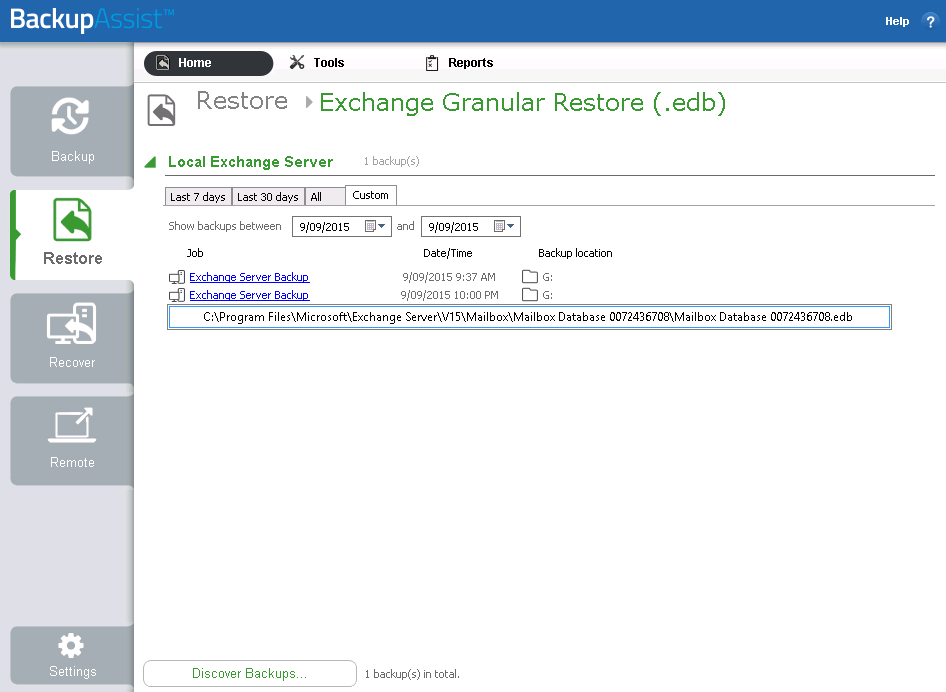
Step 1 - Locate the Exchange backup
- Select the Restore tab
- Select Exchange Granular Restore
- The Last 7 days and Last 30 days tabs can be used to display the backups within those ranges.
- The Custom tab allows you to select a specific date range and display backups for that period.
- Select the backup that you want to restore from
- Select the Exchange EDB database that you want to restore

The Restore tab has a Home page and a Tools page. The Home page is the default page and the recommended starting point for performing a restore. The Tools page should only be used by experienced administrators or users being assisted by technical support.
This will display the Exchange Server backups created by this installation of BackupAssist. It can also show backups from other machines added using the Discover Backups button.
Clicking the Exchange Server heading will display all backups available for that Exchange Server. The tabs can be used to help locate the required backup.
Discover Backups allows you to browse for backup catalogs created by deleted jobs and other servers. Selecting those backups will add them to the list of available backups.
Clicking on a backup’s name will display a drop down list of Exchange databases (EDB files) that you can restore from.
The will open the Exchange Granular Restore console, which will open the Exchange database and allow you to view the mail items inside it.
If you opened Exchange Granular Restore from the Tools menu, you can browse to, and open, an EDB, PST or OST file. You can then search the PST or OST file, and restore the selected mail items.
Step 2 - Locate the mail items to be restored
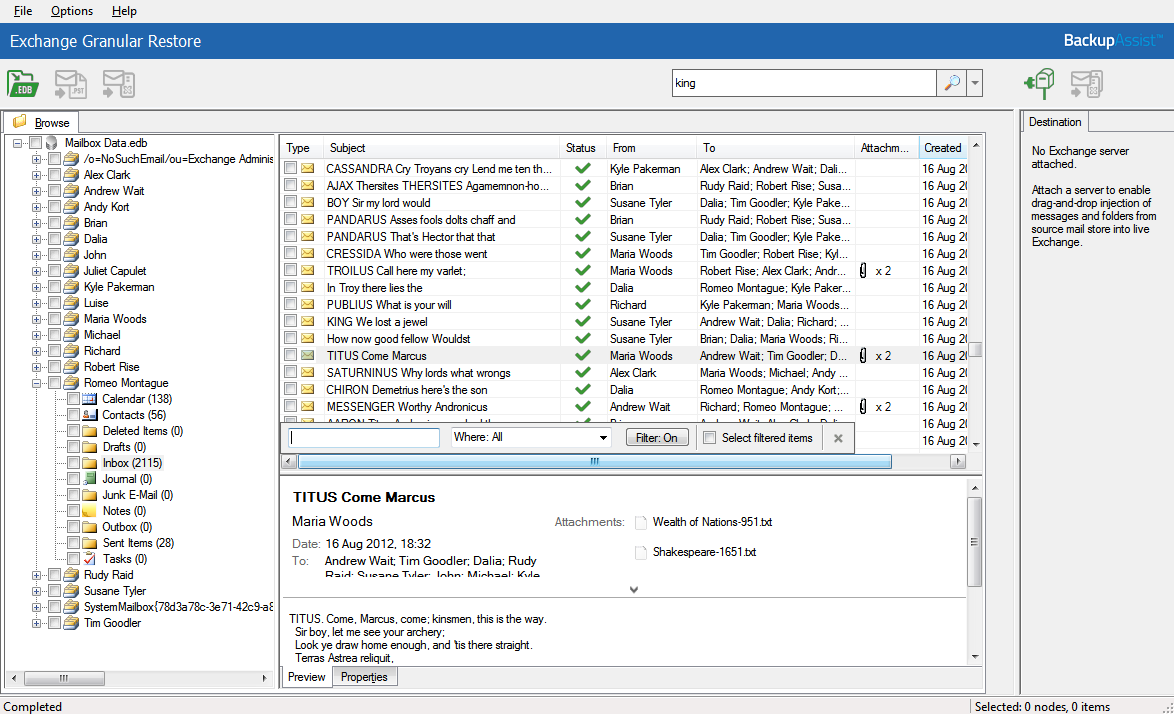
The Exchange Granular Restore (EGR) console has a Browse mail tree and a Search field to help locate, preview and select the mail items that you want to restore.
The Browse and Search options
Display filter: Press CTL+F and a Filter field will appear under the list of currently displayed mail items. Select the Subject, From, To, Attachments, Created or All filter, and enter the text to filter by.
Restore Deleted items: Display hidden deleted items, is available in the Options menu, and selecting it will give access to previously deleted mail items. This is not mail from the delete items folder but mail items that are no longer present. The database will reload when a selection is made and the deleted items will and have a flag to indicate that they are a deleted item.
- Deleted items from Exchange Server 2007 are stored in their original folders.
- Deleted items from Exchange 2010 and later are stored in the folder Deletions. These items cannot be restored to live Exchange Server database. It is recommended that these items are exported to a PST file and then imported into the live Exchange Server.
Display time: Select Display time, from the Options menu and select Local or GMT. This applies to the date in the properties tab of a mail item. The database will reload when the format is changed.
Using Browse
Browsing mailboxes
The Browse mail tree is displayed in the console’s left pane. Browsing for the items you want to restore is ideal when you know their location.
- Selecting a folder will display the individual mail items inside it, on the pane to the right.
- Selecting a mail item will preview its contents in the pane below it.
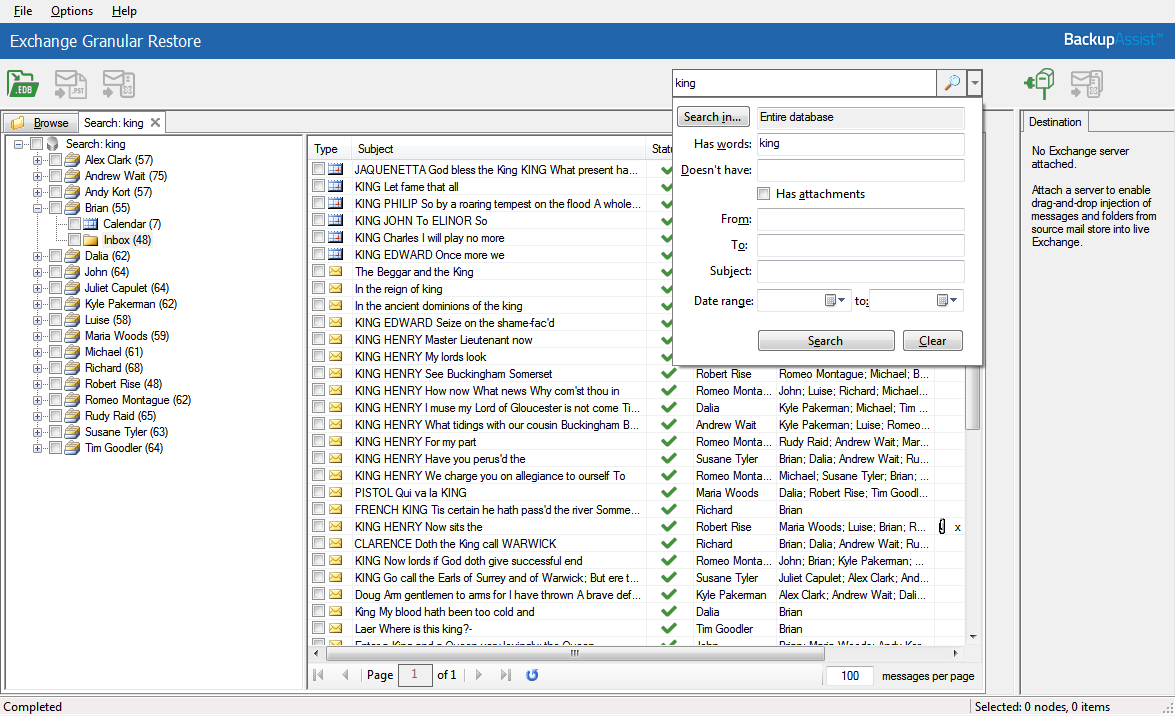
Using Search
The Search field is ideal when the location of a mail item or the number of items to restore is unknown. When a keyword search is performed, a new tab with a browse tree will open containing only the mailboxes, folders and mail items that match your search criteria. The search word must be a whole word
To perform a simple Search, enter the search word into the field, click the search icon and the Search tab will open in the console. This Search tab will contain all items in the database that contains the word you entered.
To perform an advanced Search, select the arrow by the Search field to display the advanced search options. The Search in field will default to the entire database. To search inside specific mailboxes or folders, select the Search in field and use the dialogue window to select the required containers.
The following search options are available:
- Has words, searches for mail items that have words or phrases entered into the field.
- Doesn't have, searches for items that do not have words or phrases entered into the field.
- Has attachments, will search for items with attachments.
- From, will search for keywords in the From: field.
- To, will search for keywords in the To: field.
- Subject, will search for keywords in the Subject: field.
- Date range, can be used to set a specific date range. A beginning and end dates must be set.
Searching mailboxes
The fastest way to get search results is by entering keywords into the Has Words field and clicking the Search button.
If a search does not match any items, review your search parameters and run another search.
Once you have located the mail items that you want to restore, select them using the tick box. Once you have selected an item to restore, the restore type icons in the menu will become active.
Indexing Modes
Database indexing can be disabled or cancelled via the Options menu. If indexing is disabled, a database search will not be possible. Two indexing modes are supported: Light and Full.
- Light indexing (default): Limits the searchable information to the following fields: From, To, Subject, Date range. A To field with a long recipients list and message bodies will not be indexed.
- Full indexing:Full indexing: This mode will take longer to index as it allows a search across the entire database.
Step 3 - Perform the restore
Once you have located the required mail items, there are three ways they can be restored using the Exchange Granular Restore console: Export to PST, Restore to original location and Restore to alternate location. Each of these options is explained below.
Option 1: Restore to original location
This option will restore the selected mail items back into their respective mailboxes on the original Exchange Server
To perform the restore, follow the steps below:
- Select the Restore to original location button.
- If no Exchange Server was detected, manually fill in the Server name field and click Reconnect.
- Select Restore, to begin the restore process.
- The restore can be cancelled by clicking the Cancel restore button.
- The progress window can be reopened by clicking Progress bar on the status panel.
An Exchange Server connection window will open. The domain name of the server running Exchange will be automatically detected if you are on the same domain.
It is possible to restore data to someone else’s mailbox using Exchange Impersonation. To do this, the current user credentials must have Exchange Impersonation access to the destination mailboxe.
A progress window will be displayed during the restore. The window shows the number of folders, messages and errors. You can enable and disable the progress window in the Options menu.
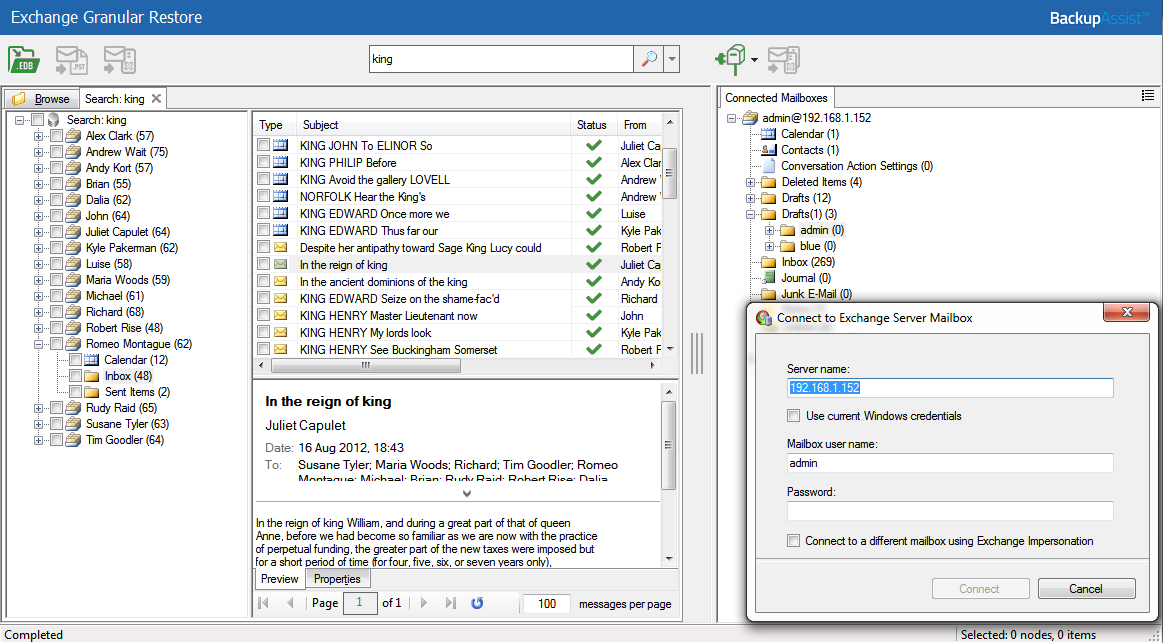
Option 2: Restore to alternate location
This option will restore the emails and mail items from the offline backup to a live Exchange database that is different to the one they were backed up from.
Restore to a different server
To perform the restore, follow the steps below:
- Select Connect to Exchange Mailbox .
- Server name - Domain name Exchange Server or IP address.
- Mailbox user name - This will identify, authenticate and open the applicable mailbox.
- Password- The password for the applicable mailbox.
- Restore the mail items
- The hierarchy of the data being dragged will be recreated inside the destination folder.
- You can create a new folder in the live mailbox by right clicking the mailbox or a folder.
- The data hierarchy will be restored automatically.
- The root of hierarchy is the closest common parent item.
The Connect to Exchange Mailbox button will open the connection dialog box, which is used to provide the Exchange Server name and the authentication details (User logon) for a specific mailbox on that server. This authentication process can be repeated for additional mailboxes.
The Restore to alternate location button will become active when a connection has been made.
Enter the following details into the connection dialog box:
If Use current Windows credentials is selected, the existing user’s Windows password will be used.
If Exchange Impersonation is selected, enter the SMTP address of the mailbox that you want to connect to. Exchange impersonation must also be configured on the Exchange Server.
Once the connection has been made, the mailbox you have authenticated to will appear as a mailbox tree in a new pane called Connected Mailboxes. You can open a preview pane for the destination mailbox tree by selecting the Show item list and preview icon (CTL+R), to the right of the Connected Mailboxes pane.
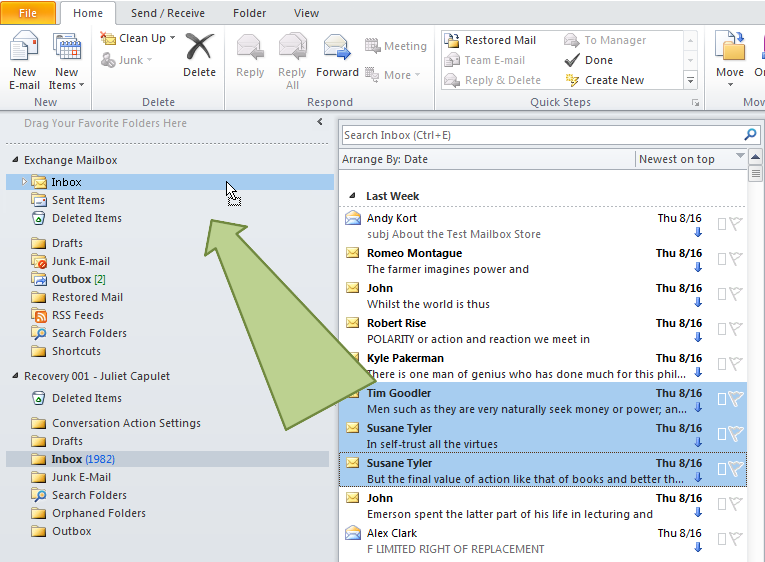
There are two ways to restore mail items to the alternate location: drag and drop and the Restore to alternate location button.
Drag and drop: Drag and drop mail items from the EDB database backup, into the live Exchange mailbox that you have connected to.
Restore to alternate location button: Click the check-box next to items that you want to restore and select the Restore to alternate location button. A dialog box will open and allow you to select a destination folder on one of the connected mailboxes. Make your destination selection and select OK to begin the restore.
Source mail items and destination folder compatibility
Not all types of mail items can be restore to all types of destinations folders. The following table shows the compatibility matrix of source mail item types and destination directories.
Item type |
*Mail folder |
Journals |
Notes |
Contacts |
Calendar |
Tasks |
Message |
Y |
Y |
Y |
Y |
Y |
Y |
Journal |
Y |
Y |
Y |
Y |
Y |
Y |
Sticky Note |
Y |
Y |
Y |
Y |
Y |
Y |
Contact |
N |
N |
N |
Y |
N |
N |
Calendar |
N |
N |
N |
N |
Y |
N |
Task |
N |
N |
N |
N |
N |
Y |
* The Mail folder includes Deleted Items, Drafts, Inbox, Junk, Outbox and Sent.
If some or all of the selected items cannot be restored (using drag and drop or clicking the Restore to alternate location button) to the destination folder, then an error message will be displayed.
Option 3: Export to PST
Export to PST will save your selected data in a PST file, which can be opened by outlook to access the mail items
- Confirm the Personal Storage Table (PST) format
- Export the selected mail items
- Select the destination
- Open the exported mail items in Outlook
- Restore the exported items to the Exchange Server.
You can choose Unicode or ANSI encoding for the PST output file using the Options menu.
The Exchange Granular Restore console exports each mailbox into a separate .pst file named: Restore NNN
With large exports, there can be more than one PST file. Additional files are created automatically when the file size limit is hit. The size limit depends on the output file encoding.
For ANSI PST files, the size limit is 1 GB. For Unicode PST files, the size limit is 10 GB. A maximum of 15,000 messages can be restored into the PST file. When this limit is reached, an additional PST file is created.
Once the mail items have been selected, they need to be exported from the database file. To export the selected mail items, click the Export button on the toolbar.
You will be asked to select a folder or create a new folder. After selecting the new or existing folder, the export will begin.
You will be shown a progress window during the export. The window shows the number of saved mailboxes, folders and messages. The export can be cancelled by clicking the Stop Export button. If you close the progress window, it can be opened again by clicking the status panel‘s progress bar.
The items selected (even if you only selected one item) will be exported as a PST file.
a. Click File > Open and choose Open Outlook Data File.
b. Browse to the PST file that was exported, then select it and click OK. The PST file will appear in Outlook as a container.
Restoring a PST file .
Items extracted from an offline Exchange mail store can be restored to a live server. Make sure you have Microsoft Outlook and access to the mailbox that you want to restore the mail items into.
a. Open the PST file that contains the exported mail items.
b. Open the mailbox that you need to import the data into.
c. Drag-and-drop the item them back into their original folders. They will be automatically synchronized with the live Exchange Server database.
Exchange Server Backup Management
Once you have created a backup job, you can modify the settings and access advanced configuration options using the management screen.
To access the backup management screen:
1. Select the BackupAssist, Backup tab.
2. Select Manage from the top menu. A list of all backup jobs will be displayed.
3. Select the backup job you want to modify, and select Edit.
4. Select the required configuration item on the left. Key configurations are described below.
To learn more about the backup management options, see the Backup tab user guide.
Manually running a backup job
All new and modified backup jobs should be manually run to ensure they work as intended.
1. Select the backup job, and select Run.
2. You will be prompted to Rerun a past backup or to Run a future backup now.
3. When the backup job starts, the screen will change to the Monitor view.
4. Once the backup has been completed, select the Report button and review the results.
When a System Protection, File Protection or File Archiving job runs, BackupAssist will automatically perform a consistency check on your Exchange Server and truncate log files to correctly back up the Exchange Information Store. If, however, the VSS backup mode is set to 'Copy' in the open files tab, the Exchange logs will not be truncated.
Files and applications
If your backup job contains a Hyper-V guest with an Exchange Server, the authentication information for the guest should be entered into the Exchange VM Detection tab.
Select the File and applications > Exchange VM Detection tab.
With these credentials, BackupAssist can detect what guests have an Exchange Server, and list the EDB file available for each guest when you perform a restore using the Exchange Granular Restore console.
The Hyper-V process is automated but the restore requires both the Exchange Granular Restore Add-on and the Hyper-V Granular Restore Add-on licenses.
Examining backup logs
Once the backup completes, you should examine the backup report to make sure your Exchange Server was backed up successfully.
1. Select Reports from the Backup tab menu and double-click the applicable report in the list.
OR
Select the Report button displayed on the Monitor screen once the backup has completed.
2. Once the report has been opened, scroll down to the Exchange Server backup report section.
For VSS application backup jobs, the report will include a VSS application backup report. When backing up Exchange databases using the VSS writers option, a section within the backup report will outline whether BackupAssist was able to backup the databases consistently. Any errors that relate to the Exchange database integrity check will be listed in this section of the report.
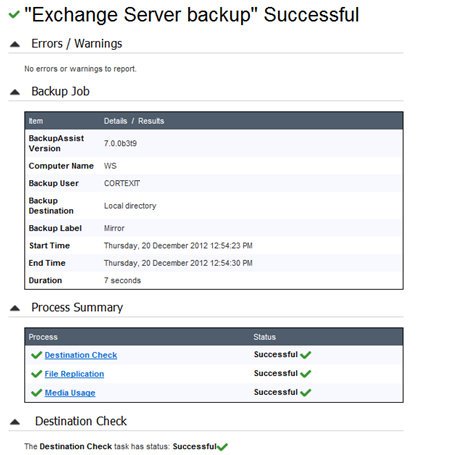
Exchange Server backup report
The Exchange System Manager will also indicate when the last full backup occurred on Exchange. This can be viewed in the general tab of the mailbox data properties.
Scheduling
Selecting Scheduling will display the Scheduling options. You can use this screen to change the default time and days of your scheme's daily backups. If you selected a scheme with archive backups (e.g. weekly, monthly), you can specify when each archive backup will run. Some backup types will have additional configuration options. The current scheme is shown, along with two pop-up menus: Select a new schedule and Customize schedule.
Select a new Schedule: This will display the pre-configured backup schemes that you chose from during the creation of your backup job. You can select a different scheme using this option.
Customize schedule: This selection can be used to modify each backup within your current schedule. The customizations available will depend on the type of backup and the type of backup media used.
For additional information on Scheduling, please refer to the user guide for the type of backup you are using (e.g. System Protection), and the Backup tab user guide.

