 Belgium
 Canada
 Germany
 Italy
Italy France
 Spain
Spain United Kingdom
Media Management
Removable Storage and Media Management With BackupAssist and other NAS DevicesContents
- Introduction
- Removable Storage Manager Tutorial
- Inserting a tape for the first time
- Preparing a tape for the first time
- Running Windows Backup (NTbackup) for the first time
- How-To Guides
Important Notice
The information and instructions contained within this document are specific to BackupAssist v3.x.x. While some of this information will be valid for other versions of BackupAssist we do not support the application of any steps or suggestions on versions other than v3.x.x
Documentation specific to BackupAssist v4 will be available very soon and we appologize for any inconvenience.
Introduction
The Microsoft Removable Storage Manager and media (tape) management is perhaps one of the most misunderstood parts of Windows. Users frequently complain that it is too complex and frustrating to understand and use.BackupAssist simplifies the media management in Windows, allowing users to simply backup their data to whatever tape is in the tape drive.
However, in certain situations it might be necessary to manually manage your tapes. This occurs most often with tapes that have been used by other software. This White Paper explains the Microsoft method for media management and gives step by step instructions on how to troubleshoot common problems.
This White Paper is divided into two halves:
- A tutorial on the Removable Storage Manager to help you understand how it all works.
- A How-To guide on performing common tasks.
Removable Storage Manager Tutorial
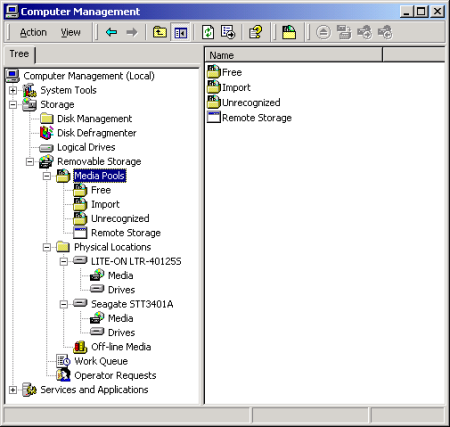
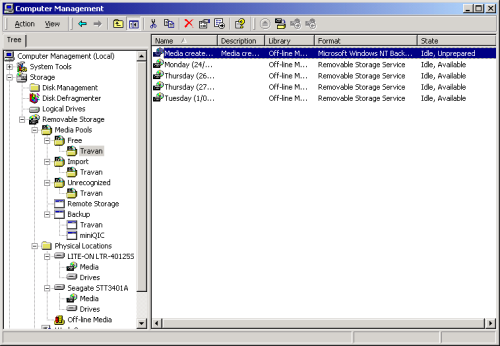
Starting with Windows 2000, the operating system maintains a database of tapes that have been used with a computer. This is known as the Windows Removable Storage Manager.When a computer is newly built, and Windows is installed, there are no tapes on record in the Windows database of media. The screenshot below shows the structure of the Removable Storage database on a newly built computer.
To see this information, go to: Control Panel > Administrative Tools > Computer Management.
As shown in the screenshot, there are 3 media pools built into the Windows Operating System :
- Free: contains tapes that are designated as free and available for use by applications such as Windows Backup and BackupAssist.
- Import: tapes that are new to this computer's database of tapes. Often when you insert a tape into the tape drive for the first time, tapes will appear here (even if they have been used in another computer or by other software before)
- Unrecognized: tapes that cannot be recognized. Either the tape is faulty, or the tape drive has malfunctioned.
Inserting a tape for the first time
When you first insert a tape, it will appear in the Import media pool as shown in the screenshot below. You can find the contents of the tape drive by finding the drive under the Physical Locations branch under Removable Storage, and clicking the Media branch. In the right hand window, you see that the tape appears in the \Import\Travan pool.
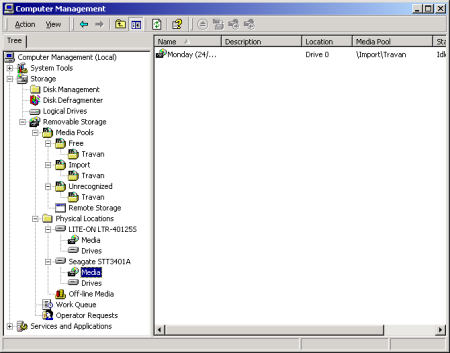
Hint: The pool will vary depending on your type of tape drive. For example, for a 4mm DDS tape drive, the pool will be \Import\4mm DDS.
Preparing a tape for the first time
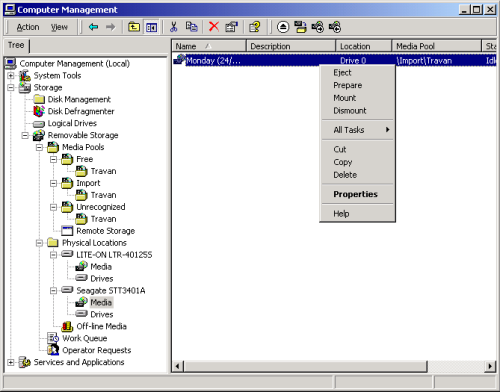
To prepare the tape in the drive, simply right click on the tape in the right hand side of the window, and select Prepare, as shown in the screenshot below.
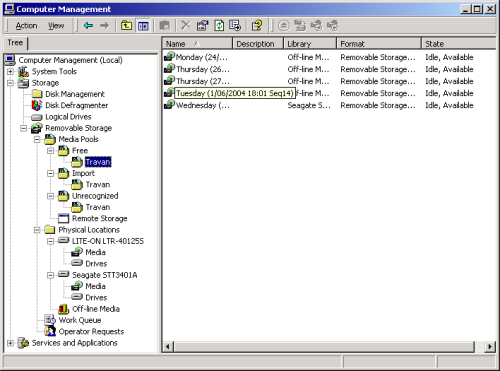
Once the tape has been prepared, you can eject it from your tape drive, and insert your next tape. Then repeat this process to prepare all of your tapes. Now that all of your tapes have been prepared, this means that they are now ready for any application to use them. Your media pool should now look like the one shown in the following screenshot.
Note: BackupAssist will automatically take care of the tape preparation process. This information is included for informational purposes only.
Running Windows Backup (NTbackup) for the first time
After you run Windows Backup and backup some data to your tape, the media pools will look different. A new pool called the Backup pool is created, and now your tape is moved into the Backup pool. This means that the tape is now registered as being used by the Windows Backup program.
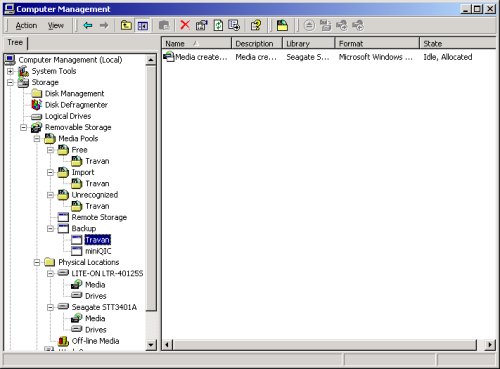
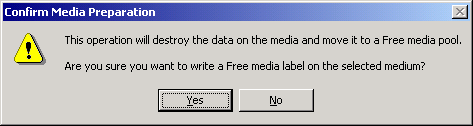
Once the backup is complete, your media pool will look like the screenshot above. The tape is now in the Idle, Allocated state. The Allocated state means that the tape is now officially designated as belonging to the Windows Backup program, and cannot be used by any other software. This is also a form of protection that prevents you from deleting the tape or erasing its contents. For example, if you now try to Prepare the tape by following the same process outlined above, you will get this message:
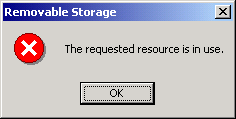
After pressing Yes, you will now receive this message. This informs you that you cannot free the tape because it is in use by another application.
How-To Guides
Manually preparing a tape that has been used by another software program
- Insert the tape into your tape drive
- View the Removable Storage Manager as explained in the tutorial above. Navigate down to your tape drive, and find your tape in the right hand window.
- Note which Media Pool it appears in.
- If it is in the Import media pool, your tape is already available. Go to step 4.
- If it is in the Unrecognised media pool, then there is a problem either with your tape or the tape drive.
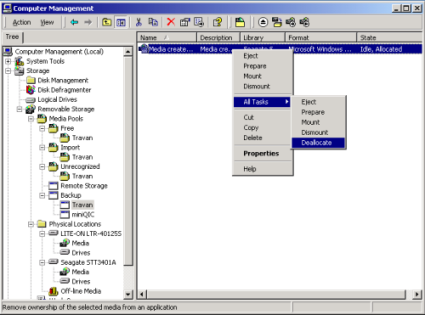
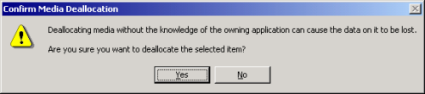
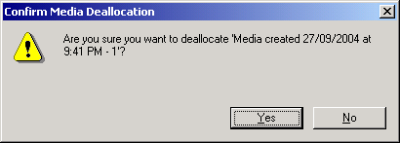
- Otherwise, it will be allocated to another program. Its state will most likely be Idle, Allocated. You firstly have to Deallocate the tape by right clicking, and selecting Deallocate, as shown in the screenshot below.
-
- You then should select Yes to the next two warning messages:
- Now your tape should go into the Idle, Available state. You can then right click on that tape and select Prepare.
How to delete a tape from the Removable Storage database
If you wish to delete a tape from the removable storage database, you should firstly find the tape in the Removable Storage database. Then follow Step 3 (immediately above) to ensure that your tape is available (ie. not allocated). You must ensure that your tape is not in the tape drive.Then once your tape is in the Available state, you can press Delete to delete it from the system.
If your tape is in the tape drive or it is in the Allocated state, then you will receive an error message like this one:

Please ensure that you Deallocate the media first.
How to overcome the 'Required Media Missing' problem in Windows Backup
Users of Windows Backup can sometimes encounter the following error message:
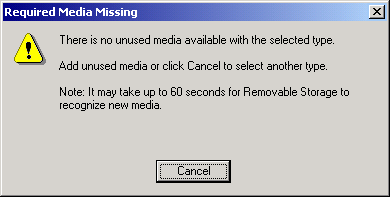
The reason for this message is not immediately apparent because there may well be a tape in the tape drive.
Looking at the Removable Storage Manager shows that the tape is in the Unprepared state. This may occur for a variety of reasons - for example, if you try to prepare a tape but the tape is not in the tape drive.
To fix this issue, insert the tape into your drive, and right click on the tape and select Prepare.

