 Belgium
 Canada
 Germany
 Italy
Italy France
 Spain
Spain United Kingdom
 Hyper-V Recovery
Microsoft Hyper-V Server allows you to create virtual machines, called guests. A guest runs an operating system and performs different roles, the same way a physical server does. The roles include providing network services, sharing resources and running applications such as Exchange. This guide explains how to perform a recovery of a Hyper-V guest.
BackupAssist has two Hyper-V guest recovery solutions. Full VM Recovery, which will recover a guest to a Hyper-V host, and Rapid VM Recovery, which will start and run a guest from its backup. This is a temporary solution that provides business continuity, until a Full VM Recovery can be performed.
Note: This beta release should not be tested in a production environment
Online User Guide
Introduction
Licensing
RecoverAssist is a standard feature included with the BackupAssist license, and requires a BackupAssist license once the initial trial period has expired.
Full VM Recovery is a standard feature that is included with the base BackupAssist license, and requires a BackupAssist license once the initial trial period has expired.
Rapid VM Recovery is part of Hyper-V Advanced add-on and requires a Hyper-V Advanced license. Contact your BackupAssist reseller or distributor for pricing information, or visit BackupAssist.com.
Requirements
Supported Backup types:
- Full VM Recovery supports System Protection, File Protection and File Archiving backups.
- Rapid VM Recovery supports System Protection backups.
- Rapid VM Recovery does not support RDX or Data Container backup destinations.
To learn more about creating backups for Hyper-V, see our Hyper-V guest backup article.
Host requirements
- The host server the guest is being recovered to must have at least 4GB of memory available – which will be used by the recovered guests.
- A guest can only be recovered to a Hyper-V Host that runs the same version of Windows Server (or higher) as the original Hyper-V host.
Recovery reference sheet
BackupAssist has a dedicated reference sheet to explain the BIOS, O/S and hardware requirements for both physical and virtual system recoveries. We recommend you review the Recovery Reference sheet.
Recovery Solutions
This section explains how the Hyper-V guest recovery solutions work and when they should be used.
Full VM Recovery
A Full VM Recovery recovers a guest to a Hyper-V host. You can recover the guest to its original location, overwriting the existing guest, or to a different location on the host. You can also recover the guest’s VHD (virtual hard drive) to a different Hyper-V host and use that VHD to create a new guest.
Rapid VM Recovery
A Rapid VM Recovery creates a guest from its backup destination. The guest is treated as a regular guest by the Hyper-V host, but the guest data is located on the backup media. The backup is not modified in this process.
A Rapid VM Recovery can be performed in just a few minutes so that the critical functions performed by the guest can be resumed with minimal interruption. This temporary solution provides business continuity until a suitable time can be found to perform a Full VM Recovery, which could take many hours. You can perform a Full VM Recovery at a time that has minimal impact on the business. For example in the evening or on the weekend.
How Rapid VM Recovery works
A rapidly recovered guest is created on the Hyper-V Host using the backups VHD(X) file. Any data changes are stored by the host in a temporary location. No data is changed in the backup. The data changes made to the rapidly recovered guest can be incorporated into the Full VM Recovery process.
Important considerations
Before rapidly recovery a VM, you should be aware of these considerations and limitation:
- While a VM is rapidly recovered, it cannot be backed up.
- While a VM is rapidly recovered, the destination it is running from cannot be used for backups.
- You can have multiple guests rapidly recovered at the same time.
- You cannot rapidly recover the same VM more than once.
- Any Hyper-V host can rapidly recover a guest using a backup that was created by another host.
- If you want to retain any data changes that occurred during the rapid recovery, you must perform a Full VM Recovery using the host that was used for the Rapid VM recovery.
When to use Rapid VM Recovery
There are many reasons why a Hyper-V guest may require a recovery. For example, the guest’s VHD may have been corrupted or deleted, the guest could be infected with a virus or ransomware, or you may want to move the guest to another Hyper-V Server.
Full VM Recovery is ideal for a guest that is not business critical and the time taken to perform the recovery is available.
Rapid VM Recovery is ideal for a guest that provides essential functions, such as a Domain Controller or an Exchange Server, and will have a significant impact if it became unavailable.
Starting a recovery
Full VM and Rapid VM recoveries can be initiated using the Recover tab or the Hyper-V tab.
From the Recover tab
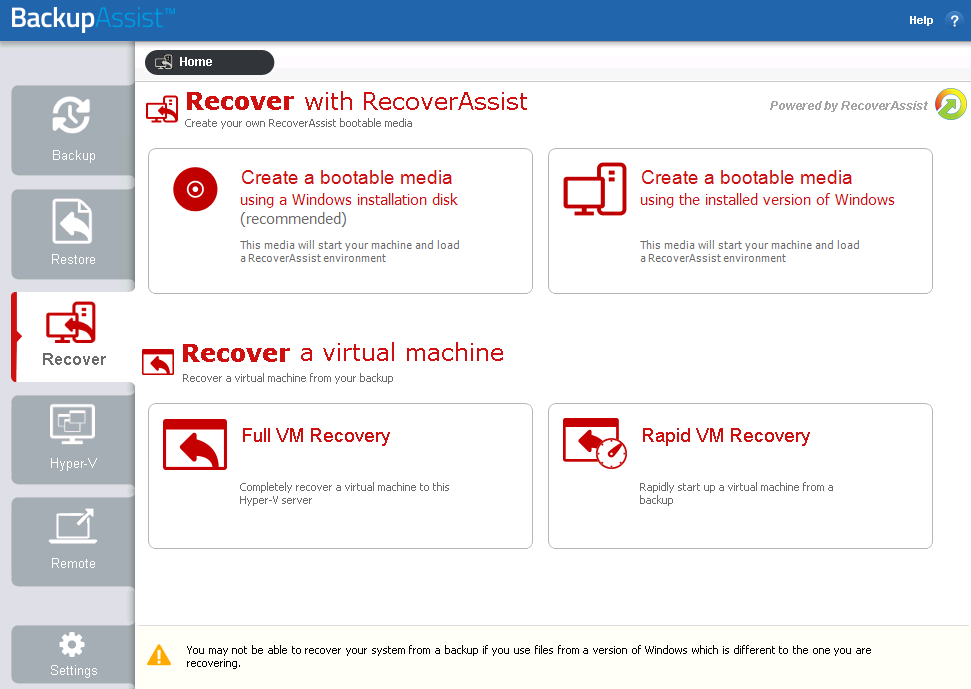
Recover tab
The Recover tab displays BackupAssist’s recovery tools.
The top two options are used to make bootable media for physical systems. The bottom two options are forFull VM Recovery and Rapid VM Recovery. This is the starting point used in this Hyper-V recovery guide.
From the Hyper-V tab
When you install BackupAssist on a Server with the Hyper-V role installed, a Hyper-V tab will appear.
The tab displays all guests on the server and provides a centralized location from which the guests can be monitored. The Hyper-V Tab’s menu has Full VM Recovery and Rapid VM Recovery buttons.
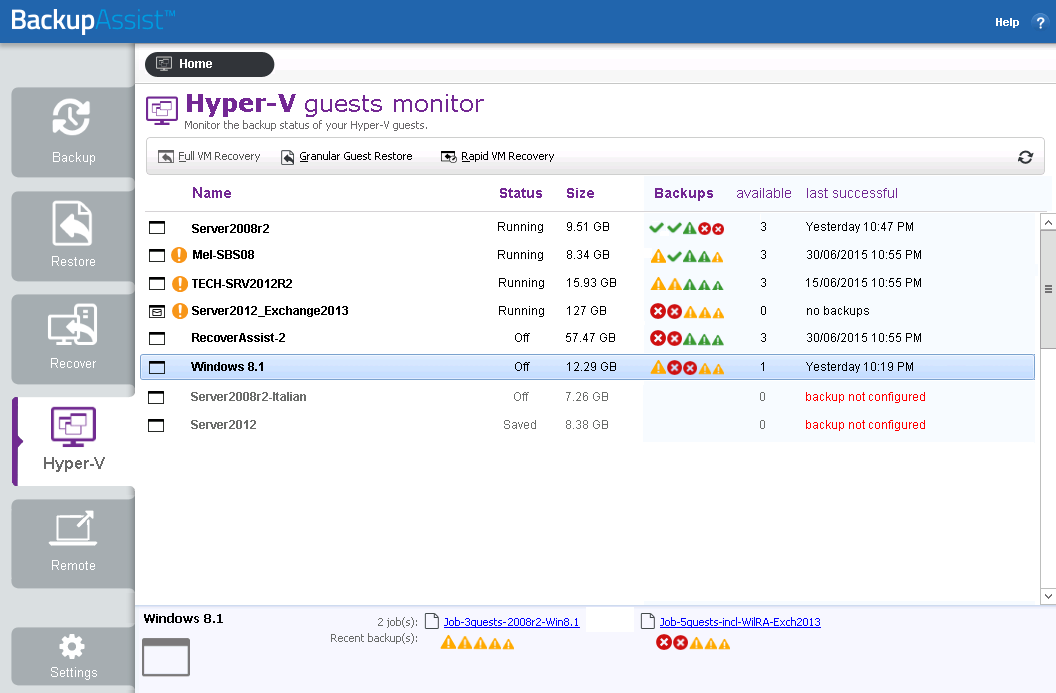
Hyper-V tab
The Full VM Recovery button will take you directly into the Full VM Recovery process with the highlighted guest already selected.
The Rapid VM Recovery button will start a Rapid VM Recovery of the selected guest.
Full VM Recovery
A Full VM Recovery uses a VSS backup of a guest to recover that guest to a Hyper-V host. This will return the guest and its operating system, applications, data and services, to a previous working state.
There are two ways to perform a Full VM Recovery:
Recover the guest to its original location
This will overwrite the existing guest and replace it with the recovered guest. The existing guest will shut down if a recovery starts.
Recover the guest VHD to another location
This will recover the Hyper-V guest to another location. The recovered VHD(X) file can then be used to create a new guest. This method can be used if you do not want to overwrite an existing guest, or if you want to recover the guest to another Hyper-V host.
To perform a Full VM Recovery, follow the steps below:
- Select BackupAssist’s Recovertab.
- Select Full VM Recovery.
- Click on the guest that you want to recover
- The Last 7 days and Last 30 days tabs display the backups within those ranges.
- The Custom tab allows you to select a specific date range and display backups for that period.
- Select the backup that you want to recover from.
- Use the What to recover pane to select the guest that you want to recover.
- Use the How to recover drop down box to make one of the following a selections:
- Recover guest into the Hyper-V – this will recover the guest to its original location.
- Export guest files – this will copy the guest's files to a selected location. Use the Browse button to select the location and select the Overwrite conditions that should apply. Once the guest’s files have been recovered, you can use them to create a new guest, for example on another host
- Select the Recover button and the recovery process will begin.
- Complete the recovery, based on the How to Recover selection made.
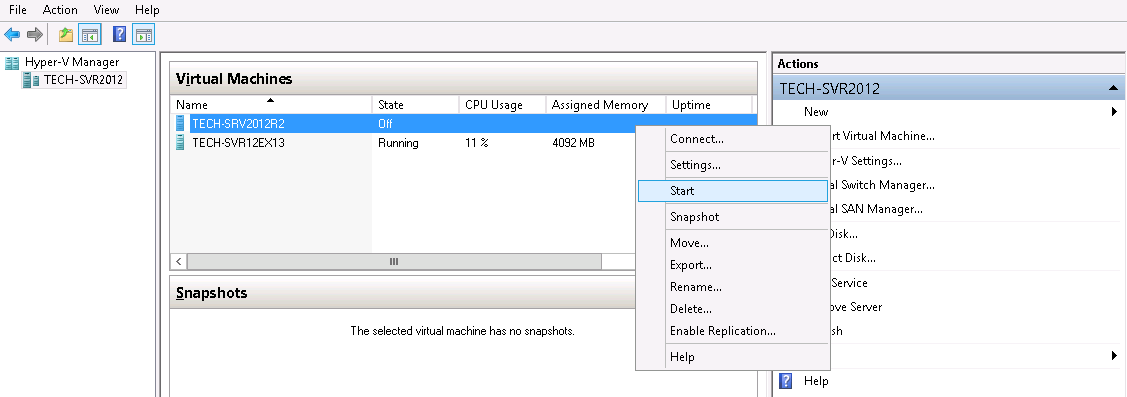
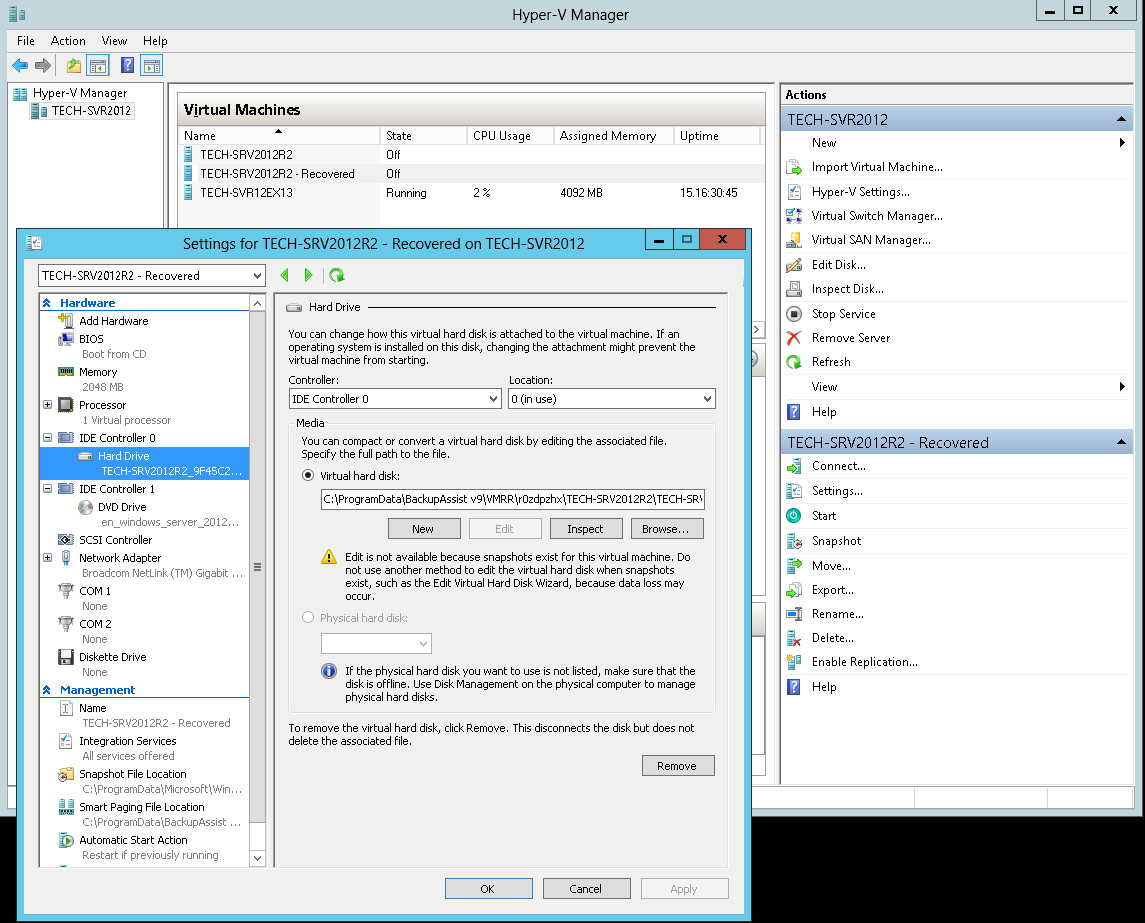
If you selected Recover guest into Hyper-V, you will need to open the Hyper-V Manager and start the guest. Right click the guest and select Start, as shown in the screen shot below.
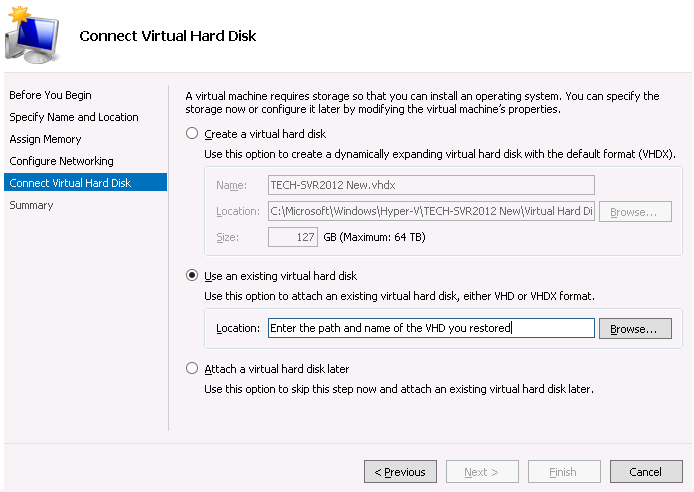
If you selected Export guest files, you can create the new guest. When you create the new guest, select the recovered VHD in the Connect Virtual Hard Disk step, as shown in the screen shot below.
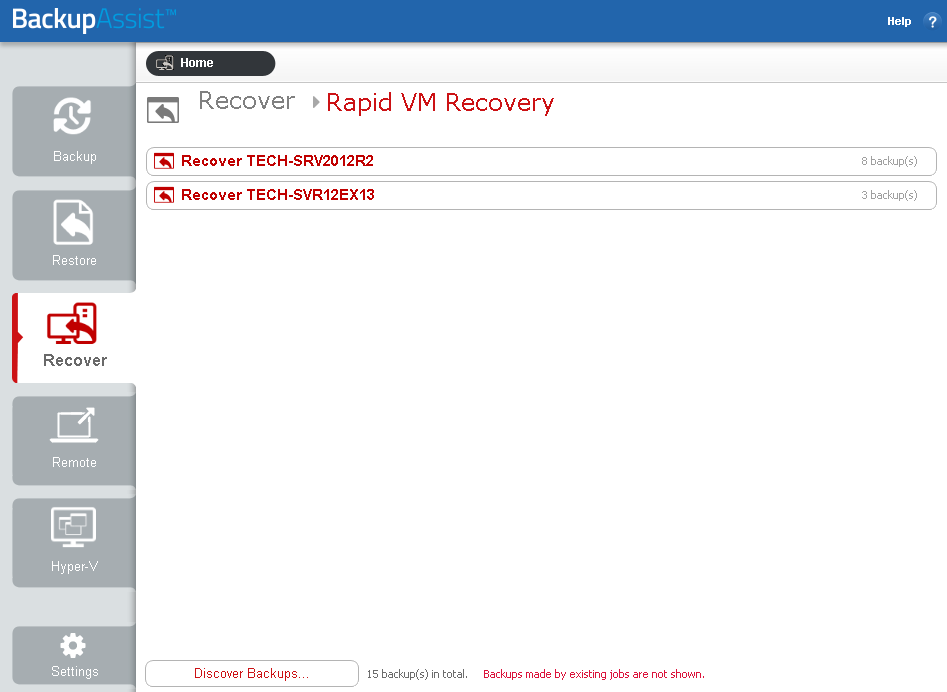
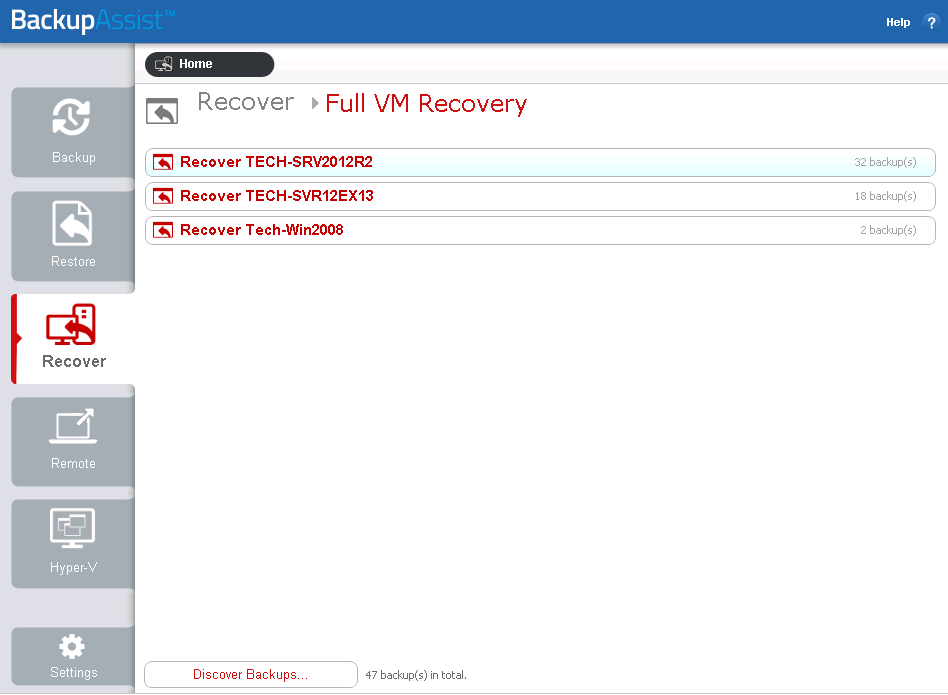
The Full VM Recovery screen will open and display the guests backed up by this installation of BackupAssist. It can also show guests backed up from other machines added using the Discover Backups button.
Discover Backups allows you to browse for backup catalogs created by deleted jobs and other servers. Selecting those backups will add them to the list of available backups.
If you have a non-VSS guest backup, use the Restore tab’s Hyper-V Host Files option to restore the guest VHD to the host, and use the VHD to create a new guest.
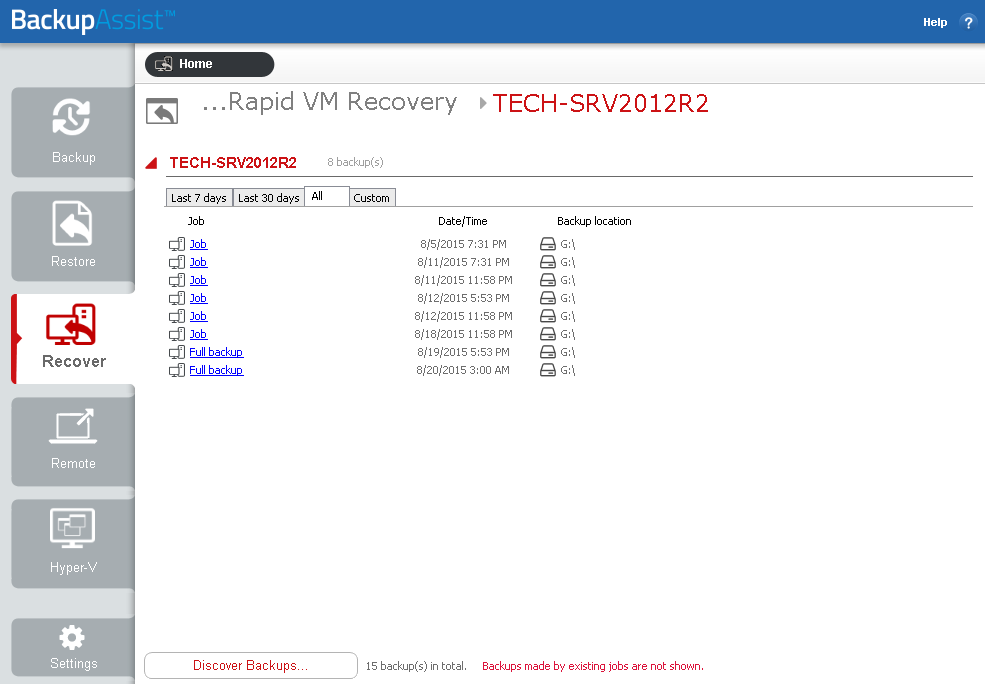
The screen will reload and display all available backups of that guest. The tabs above the list can be used to help locate the backup required.
This will open the Full VM Recovery console.
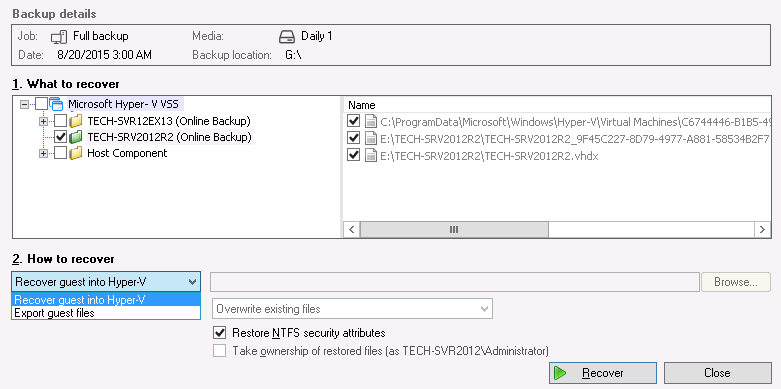
Important: For a best practice implementation, we recommended configuring guests with VHD and configuration files on the same volume. To do this, the volume where the guest is to be stored should be selected in both the Specify Name and Location step as well as Connect Virtual Hard disk step.
Rapid VM Recovery
A Rapid VM Recovery is the process of creating a new guest from its backup. This temporary solution provides business continuity until the backup can be used to perform a Full VM Recovery.
As noted in the recovery solution’s section, you can have multiple guests rapidly recovered at the same time. You cannot rapidly recover the same VM more than once.
To perform a Rapid VM Recovery, follow the steps below:
- Select BackupAssist’s Recover tab
- Select Rapid VM Recovery.
- Click on the guest that you want to recover.
- The Last 7 days and Last 30 days tabs display the backups within those ranges.
- The Custom tab allows you to select a specific date range and display backups for that period.
- Select the backup that you want to use for the Rapid VM Recovery.
A message will ask you to confirm that you want to perform a Rapid VM Recovery.
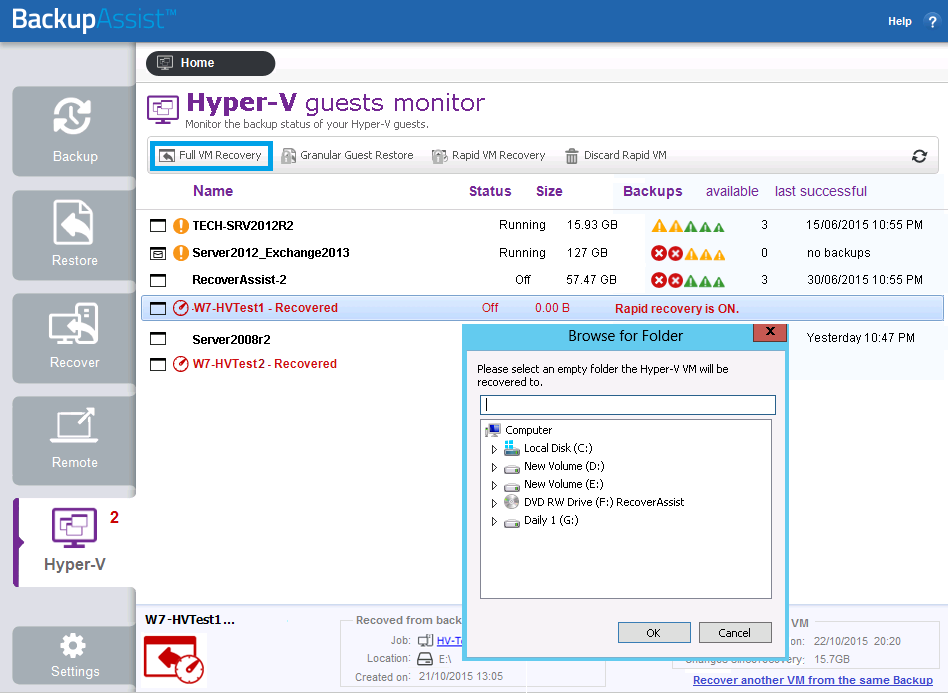
- Select a location to store data changes for the rapidly recovered VM.
- Review the guest's configurations
- Open Windows Hyper-V Manager
- Select the guest
- Select Settings from the Action menu
- Review the settings, especially the Memory, Hard Drive and Network Adapter settings.
- Start the rapidly recovered guest.
- Open Windows Hyper-V Manager
- Select the guest
- Select Start from the Action menu
The Full VM Recovery screen will open and display the guests backed up by this installation of BackupAssist. It can also show guests backed up from other machines added using the Discover Backups button.
Discover Backups allows you to browse for backup catalogs created by deleted jobs and other servers. Selecting those backups will add them to the list of available backups.
The screen will reload and display all available backups of that guest. The tabs above the list can be used to help locate the backup required
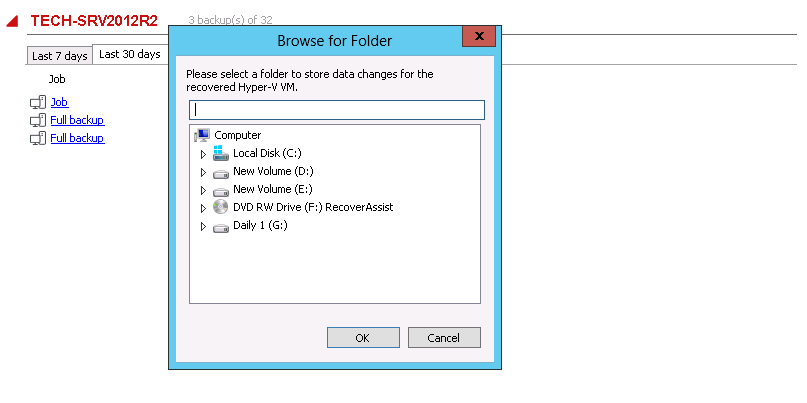
While the rapidly recovered VM is running, the Hyper-V host will store and manage changes to the data. Select a folder on a local host drive that can be used to store this data.
After you confirm the message, another message will advise that the guest has been rapidly recovered and what name it will use in the Hyper-V Manager.
The configurations used for the guest, are the configurations that guest had when it was backed up. These configurations should be reviewed, especially if the host has changed since the backup was made or if you are recovering to a different host.
To review the guest’s configurations:
Check that the guest has the appropriate configurations for the host, and that it has the required resources to run. Make any required changes.
To start the guest:
The Hyper-V guest is now rapidly recovered.
Rapidly Recovered VM management
The Rapidly Recovered VM can be viewed in the Hyper-V tab. The Hyper-V tab is used to stop and discard a Rapidly Recovered VM and to perform a Full VM Recovery of the Rapidly Recovered VM.
Performing a full recovery of a Rapidly Recovered VM
This will turn the Rapidly Recovered VM into a fully recovered VM. It will copy the VHD from the backup to the Hyper-V host and reconfigure the VM to point to that VHD. Any data that changed while the VM was rapidly recovered will be included in the VHD.
Considerations:
- Before starting, ensure there is enough space on the host to recover the guest.
- This process will perform a full recovery to the rapidly recovered guest, not to the original guest.
To perform the full recovery:
- Select the Hyper-V tab
- Select the Rapidly Recovered VM
- Select the Full VM Recovery button
- Select OK to the confirmation message to start the full recovery.
- Select a permanent storage location for the recovered VM, and create a folder in this location to recover the data to. For example, select a location where you store the other guests on the host.
- Select OK and the Full VM Recovery process will begin.
The VM’s virtual disks and configuration files will be recovered to this location. The full recovery results in a clean copy of the guest data that includes all changes accumulated while the rapidly recovered guest was running.
A progress bar will appear while the recovery is in progress, and a confirmation message will appear once the recovery has been completed.
Discarding a Rapidly Recovered VM
This will stop the rapidly recovered guest, discard any changes made to the guest’s data since it was rapidly recovered, and remove the guest instance from the Hyper-V Manager.
To discard the Rapidly Recovered VM:
- Select the Hyper-V tab
- Select the Rapidly Recovered VM
- Select the Discard Rapid VM button
When you select Discard the Rapid VM, you will be prompted to confirm that you want to delete the VM data.
After the Rapidly Recovered VM has been discarded, you still have the option to perform a Full VM Recovery using the backup.

