BackupAssist’s suite of backup types includes System Protection, our recommended backup type for Windows servers. This article looks at the requirements and advantages of different backup destinations for System Protection backups.
System Protection backs your data up to an image file that provides the following advantages.
- It can be used to restore individual files, folders and VSS applications.
- It can be used to create a bare-metal backup for a recovery.
- It can back up data incrementally and support multiple restore points.
- It can be used with our Hyper-V Granular add-on to restore files from a hyper-v guest.
For these reasons, we recommended System Protection. It is, however, important that you chose the right backup destination for two important reasons:
- The destination must support image backups.
- The destination type determines whether you can have multiple restore points.
A destination’s ability to support multiple restore points
System Protection creates a full backup when it first runs. If the data selection and destination do not change, subsequent backups will be incremental. A limitation of image backups is that each of these incremental backups overwrites the data that changed, so you can only restore data from the previous backup. System Protection overcomes this limitation by using VSS snapshots, which are stored on the backup destination to maintain copies of the data that is overwritten each time a backup job runs. When a restore is performed, the image backup and these VSS snapshots can be used to provide a restore point for each backup job.
To maintain these multiple restore points, the destination must support VSS snapshots – and to do that – the destination must be seen as a local device by the computer that you are backing up.
So let’s take a look at the destinations available for System Protection, and which ones support VSS.
Available Destinations

The destinations listed below support VSS snapshots and therefore multiple restore points.
- Local hard drives
- iSCSI targets that can appear to your computer as a local (not mapped) drives
- External disks that are directly attached – you can remove these disks as part of your media rotation, as long as they are presented as a local drive when they are attached.
- Data containers – these are .vhd files that your image backups are stored inside of at the backup destination. During the backup process, the .vhd file is mounted as a local drive within Windows and the backup is written into the .vhd file . The advantage of this is that the .vhd can be stored on a device which isn’t usually detected as local to Windows (such as RDX drives, NAS devices or network locations). This allows support for VSS snapshots and the ability to maintain multiple restore points.
Data containers are enabled by ticking the Data container box on the destination selection screen.
To learn more about Data containers, see our article here
A destination’s ability to support an image backup
Destination’s format
Local drives, external drives and iSCSI targets (destinations) must be formatted with NTFS or ReFS to support VSS snapshots.
System Protection cannot use incremental reading to enable fast incremental backups if the data source is a ReFS formatted drive. Incremental reading helps System Protection work out what data has changed when it performs a backup, and makes the backup job run faster. This is enabled in the BackupAssist Setting tab >Windows Settings > Enable image tracking.
Destination’s capacity
If your System Protection backup is using VSS snapshots to support multiple restore points, then the amount of storage required will grow as data changes. For this reason, the capacity of the backup destination should be at least 2.5 times larger than the amount of data being backed up. If there is other data on the drive, then the free space needs to be at least 2.5 times larger than the data you’re backing up.
This allows room for the snapshot to maintain copies of data that has changed. As the extra space for these copies runs out, the oldest copies (restore points) will be deleted. This capacity will allow for multiple restore points.
Destination’s sector size
System Protection uses Windows imaging technology to create image backups. Therefore, the version of Windows you are using affects the disk sector size supported by your image backups.
- Windows Server 2008 / 2008R2 and SBS 2008 / 2011 require 512 byte sector disks.
- Windows Server 2012 and later can use either 512 byte sector or 4k sector size disks.
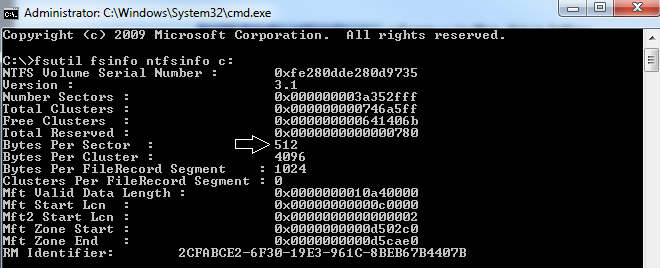
This consideration is important for large capacity devices because vendors often set the sector size to 4k (4096 bytes), because it provides better density and reliability. It is important to check the sector size of your storage device, and if the vendor has tools that allow the device to support 512 bytes.
For example, 3 TB drives by Seagate, Western Digital, or Iomega are often formatted as 4096 bytes (4k). Western Digital does offer a format utility to emulate the 512byte sector size on their drives.
To check your disk’s sector size, run the following command in an elevated command prompt: fsutil fsinfo ntfsinfo x: where x is the drive letter.
We hope this article has helped shine a light on the destination considerations for System Protection backups. You can read more about System Protection backups here, and our article on how these backups work here.
Destination’s shadow copy storage
The space on the disk used by the VSS snapshot to store data that has changed is called the volume shadow copy storage. In the same way that you need to ensure that you have enough space on the disk that you are backing up to, you should also be mindful of the amount of disk space specifically allocated to the shadow copy storage.
When the amount of disk space allocated to the shadow copy storage reaches its limit, it will delete the oldest data to make room for new data. If the amount of space reserved is set too low, or at 100%, then problems can occur. For this reason, you should set the disk space allocated to your shadow copy storage to a size that allows for it to grow as data changes and is added.
Shadow copy storage – disk allocation considerations:
- The amount of data to backup
- How often the backup job runs
- How much data changes between each backup
- The size of the backup disk(s)
For example, if a full backup is currently 500 GB and the backup disk is 2TB, then setting the shadow copy storage to 50% (1TB), would allow the full backup to grow to twice its current size.
You can view the amount of space reserved for the shadow copy storage by running the command vssadmin list shadowstorage at an elevated command prompt.
You can change the amount of disk space allocated to the shadow copy storage in GB or as a percentage of the disk, using the following commands:
vssadmin Resize ShadowStorage /For=X: /On=X: /Maxsize=XX%
vssadmin Resize ShadowStorage /For=X: /On=X: /Maxsize=XXGB
This will resize the limit to XX size for drive X:
To see more VSS admin commands, please refer to this Microsoft VSS admin resource.