Cloud Backup
Cloud Backup is a BackupAssist add-on that allows you to back up data to Microsoft Azure Blob Storage, Amazon S3, Wasabi, Backblaze, and any S3 Compatible cloud storage - including private cloud implementation platforms such as MinIO. Cloud Backup is a best practice cyber-resilience solution and is a recommended backup type for all servers and workstations.
Backups in the cloud can be protected from malicious actors through the use of Immutable Cloud Storage. Visit the Immutable Cloud Backup page for more information.
This page covers:
- Cloud backup tutorial videos — Videos of a cloud backup to Microsoft Azure and to Amazon AWS.
- Advantages of cloud storage — Scalability, affordability, flexibility, security, availability and efficiency.
- Cloud Backup resilience — How BackupAssist retries an interrupted upload operation, and the outcomes.
- Creating cloud storage — How to create cloud storage for Amazon S3, Microsoft Azure and S3 compatible providers, before you run a Cloud Backup job.
- Creating a cloud backup job — The Set up destination step, and its settings for Amazon S3, Microsoft Azure and S3 compatible destinations.
- Cloud Backup restores — Restoring from a Cloud Backup, and the password you will be prompted to enter.
- Bare Metal Recovery with Cloud Backups — Downloading a backup for Bare Metal Recovery or VM Instant Boot.
Cloud backup tutorial videos
How to perform a cloud backup to Microsoft Azure
How to perform a cloud backup to Amazon AWS
Advantages of cloud storage
Cloud backups provide convenient backup destinations with the following advantages:
- Scalability – your storage will scale with your needs and the total storage available can be increased by updating your subscription package.
- Affordability – you do not need to purchase or maintain storage devices or storage servers.
- Flexibility – from v12.1.0 onwards, you can carry out files and application restores as well as Bare Metal recovery with cloud backups.
- Security – your data is encrypted to prevent unauthorized access to your backups.
- Availability – cloud computing uses data centers that have a better level of availability than could be achieved with your own local servers.
- Efficiency – Cloud Backup uses deduplication and compression to reduce the amount of data that needs to be transferred to the cloud each time a backup runs.
Cloud Backup resilience
Cloud Backup backs up files in chunks and keeps track of what files have been sent to the cloud destination. This means if the backup jobs is interrupted, for example due to a network or internet outage, the backup job would retry the interrupted upload operation.
BackupAssist will retry several times to complete the interrupted upload operation.
Retry Cloud Backup operation outcomes:
- If the subsequent retry of the operation succeeds, the backup will complete successfully.
- If the backup job cannot resume, it will not create a backup and the job will fail.
- If the backup job can resume after skipping data chunks that could not be backed up, the backup job will continue without those files and add a warning to the backup report to advise what files were not backed up.
Note
If you manually cancel a Cloud Backup job in BackupAssist, the next time that job runs (either manually or scheduled), the backup job will not re-upload the chunks that have already been uploaded previously.
Cloud Backup FAQ
For answers to the most common questions about Cloud Backup, see Cloud Backup FAQ.
Cloud seeding
Cloud seeding (sending the first cloud backup to your cloud provider on a drive) is not part of BackupAssist Classic from v15. It was offered in previous versions, but the lack of usage (due to improvements in bandwidth speeds) and changing procedures by cloud providers have meant it has become unfeasible for us to continue offering this feature.
Creating cloud storage
Before you can run a Cloud Backup job, you need to have a cloud destination set up. The following sections explain how to create cloud storage for Amazon S3, Microsoft Azure, and any S3 compatible providers and devices.
How to create Microsoft Azure cloud storage
To create Azure cloud storage, go to https://azure.microsoft.com/ and create an Azure account and a storage account. The Cloud Backup job will create a container (called a blob) inside this storage account for the backup job to use.
Creating a storage account
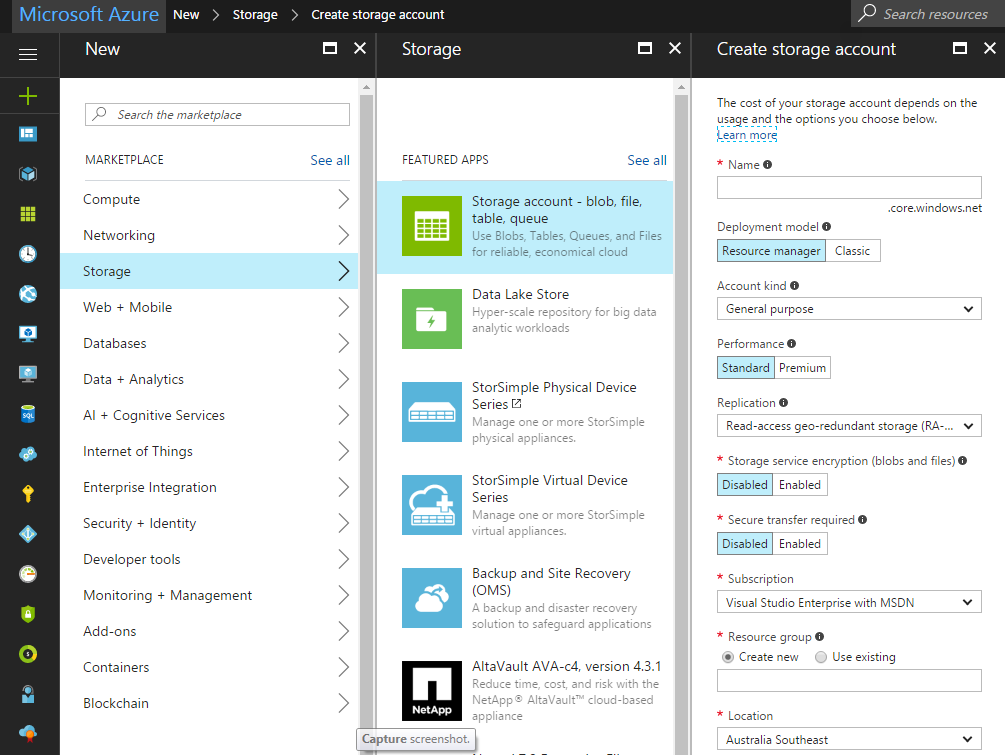
- Log into your Azure account and go to the Portal, if you are on the default home page.
- Select + New from the top left.
- Select the Storage Account option next to the green icon.
- Enter the storage account details in the fields provided. The existing selections are defaults and the options selected can effect the cost. For Account kind enter Blob storage. Once the Resource group has been create, it will appear in your list of resources after you refresh the UI.
You can have multiple storage accounts in your Azure account.
How to get Azure connection strings
When backing up to a Microsoft Azure container, a connection string is used by the backup job to access the storage account. The connection string is entered in the Set up destination step when creating the backup job.
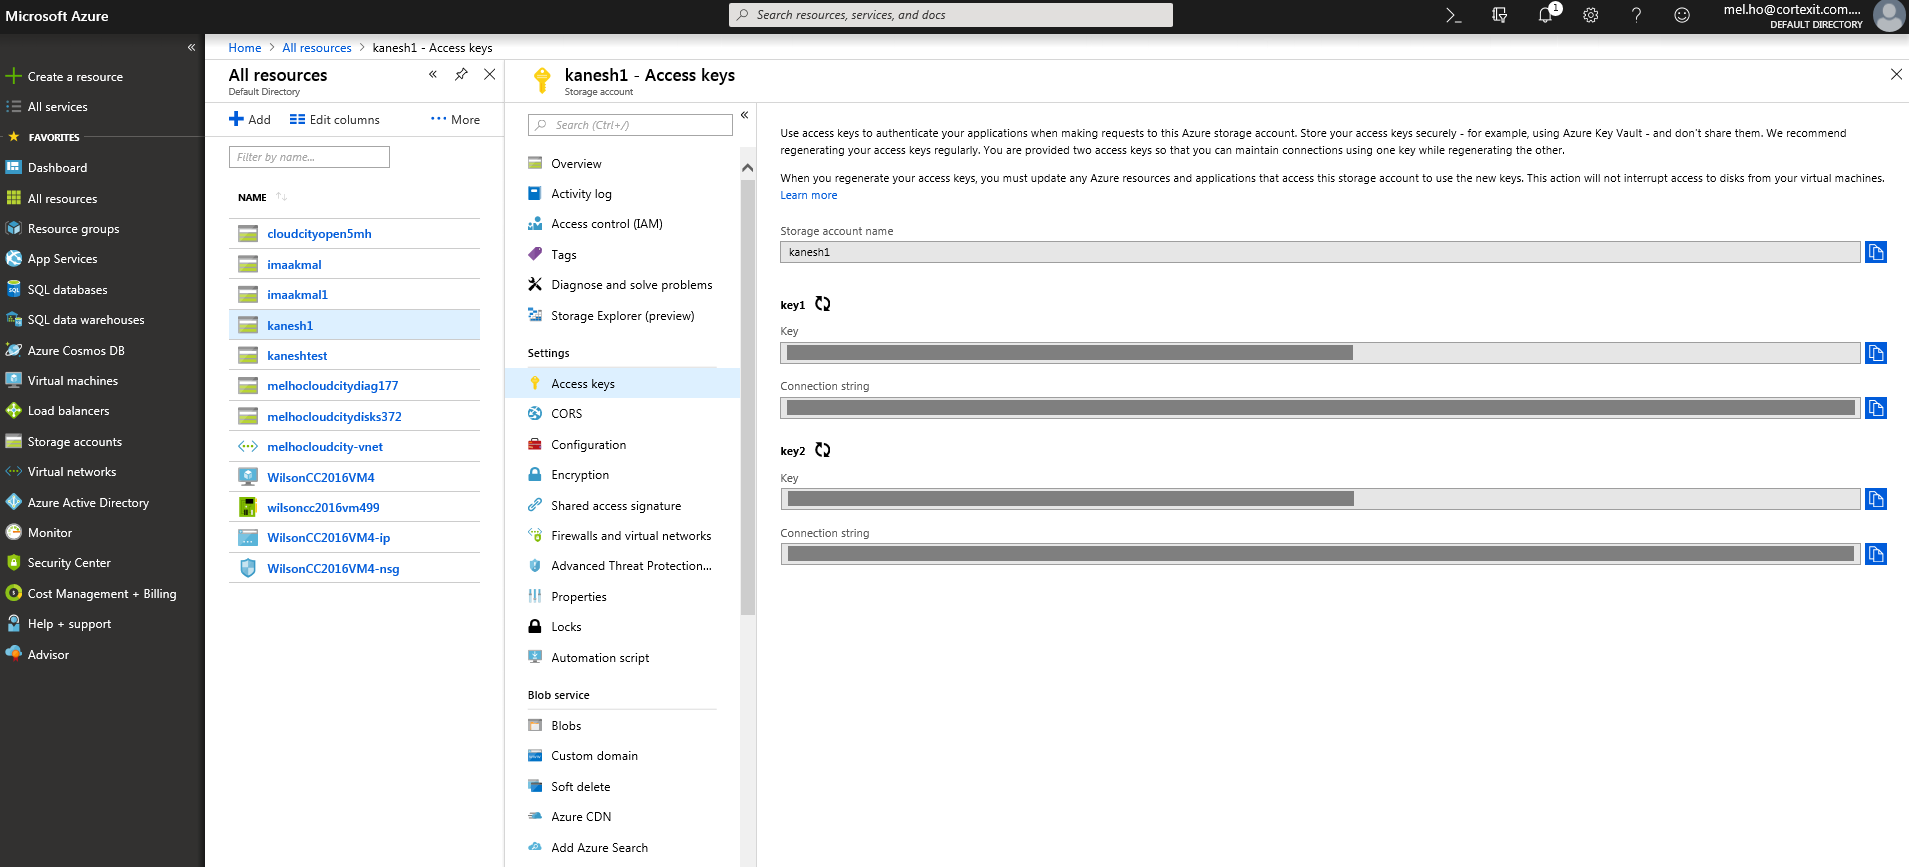
To locate the connection string:
-
Log into the Azure portal.
-
Select the Storage account from the Resources list.
-
Select Access keys from the list of Settings.
The dashboard will display the Keys and Connection strings for the selected storage account.
-
Using the copy button, select a Connection string from one of the key sections. E.g. under Key1.
-
Paste the connection string into the field provided.
To learn more, see the Microsoft documentation, About Azure storage accounts.
Warning
We recommended letting BackupAssist manage the space in the cloud backup container. This means not enabling (or turn off ) any space management or life-cycle tasks on your cloud backup containers. Leaving these tasks enabled will lead to parts of the backup’s data being permanently deleted, and result in the backups being incomplete and unusable in a recovery situation.
How to create Amazon S3 cloud storage
To create Amazon S3 cloud storage, go to https://aws.amazon.com/ and create an AWS account and an IAM (identity access management) account. The Cloud Backup job will create a container (called a bucket) for the backup job to use.
Creating an IAM account
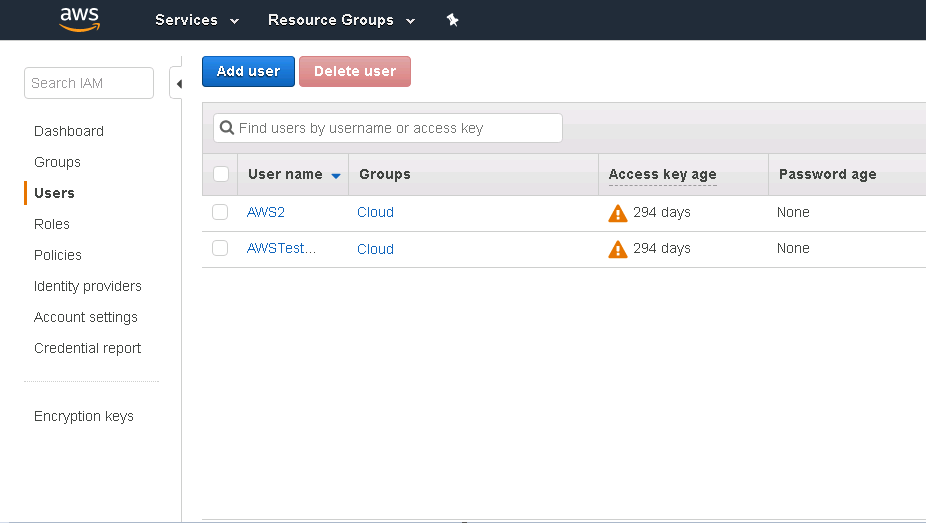
- Log into the AWS web console.
- Select Services.
- Select IAM from the Security, Identity & Compliance.
- Select Users from the right menu.
- Select Add user.
- Fill in the fields using the AWS documentation for guidance.
- When prompted, select the Programmatic access AWS access type.
- When defining access on the Set permissions page, the IAM user account will need sufficient access for the backup job to change data at the cloud storage destination. You can give the account the PowerUserAccess policy, or create you own custom policy with more restricted access.
- When you create the account, an Access Key ID and Secret Access Key will be created. In this step, select the Download csv link to download a csv file containing the access keys. You will need to enter these keys when you create the backup job. Do not lose this csv file and keep it in a safe place.
You can create multiple IAM accounts within your Amazon AWS account, and use different IAM accounts for different backup jobs.To learn more, see the Amazon documentation, Creating an IAM User in Your AWS Account.
How to get Amazon AWS storage keys
The Access Key ID and Secret Access Key are downloaded to a csv file when you create the IAM user account that the back job will use. Open this csv file when you create the backup job.
To learn more, see the Amazon guide here
Warning
We recommended letting BackupAssist manage the space in the cloud backup container. This means not enabling (or turn off ) any space management or life-cycle tasks on your cloud backup containers. Leaving these tasks enabled will lead to parts of the backup’s data being permanently deleted, and result in the backups being incomplete and unusable in a recovery situation.
How to create S3-compatible cloud storage
An S3-compatible destination can be set up as a private cloud using server software like MinIO, or you can use a 3rd party cloud storage service like Wasabi. The server software or 3rd party service is used to create your cloud storage, and the settings used in BackupAssist are the same as those used for Amazon S3, except you will have an endpoint URL instead of a region.
To learn more about the options available, see the following resources:
- Wasabi storage guide
- Using BackupAssist with QNAP NAS and Zenko
- Using BackupAssist with a Synology NAS & MinIO
- Using BackupAssist with Windows & MinIO
Warning
We recommended letting BackupAssist manage the space in the cloud backup container. This means not enabling (or turn off ) any space management or life-cycle tasks on your cloud backup containers. Leaving these tasks enabled will lead to parts of the backup’s data being permanently deleted, and result in the backups being incomplete and unusable in a recovery situation.
Creating a cloud backup job
The following steps explain how to configure the Cloud destination settings within the backup job wizard when creating a System and Volume Backup or a File and Application Backup. Follow the steps in those pages for the end to end creation of a backulp job.
After selecting a cloud destination in the Destination media wizard step, and configuring the the schedule, you will be presented with the Set up destination step:
Set up destination.
This step configures the cloud backup destination selected in an earlier step. There are different settings for Amazon S3, Microsoft Azure and S3 compatible destinations (such as Wasabi and BackBlaze).
Warning
We recommended letting BackupAssist manage the space in the cloud backup container. This means not enabling (or turn off ) any space management or life-cycle tasks on your cloud backup containers. Leaving these tasks enabled will lead to parts of the backup’s data being permanently deleted, and result in the backups being incomplete and unusable in a recovery situation.
Note
If you like to create an immutable cloud backup, follow the additional instructions in cloud-immutability.
Amazon S3 bucket settings
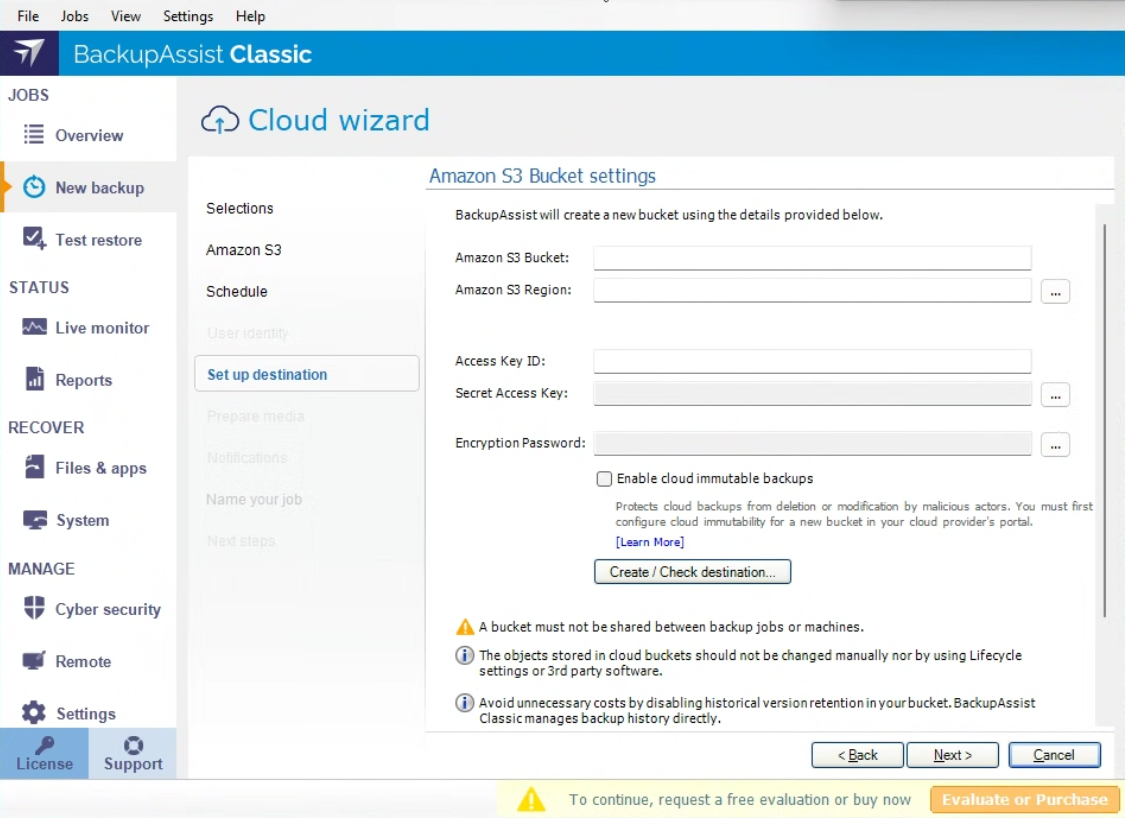
Fill in the S3 Bucket settings including the bucket name, and your Access Key ID and Secret Access Key.
-
Amazon S3 bucket
Enter a name for your S3 bucket. BackupAssist will use this name to create the bucket. Provide a different name for each job, because a different bucket must be used by each backup job. This name must follow the conventions explained in Amazon's naming guide.
-
Amazon S3 Region
Select the region for the data center where you want your cloud storage to be based.
-
Access Key ID & Secret Access Key
For this step, you will need to open the csv file that you saved when you created the IAM user account that this job will use. This csv file contains the Access Key ID and Secret Access key.
Copy these keys from the csv file to the fields provided.
Note
The secret access key can only be retrieved when it is created, and must be securely stored for security reason.
-
Encryption Password
Cloud Backup uses encryption to protect your data. Enter and confirm an encryption password. This password will be needed if you perform a restore.
Note
It is important that you keep a copy of your password in a safe place, as we cannot retrieve passwords if they are lost or forgotten.
Note
If you like to create an immutable cloud backup, follow the additional instructions in cloud-immutability.
-
Check destination
Select the Check destination button. This important step uses the information provided to test the connection to the cloud destination, and then creates the cloud container that the backup job will use.
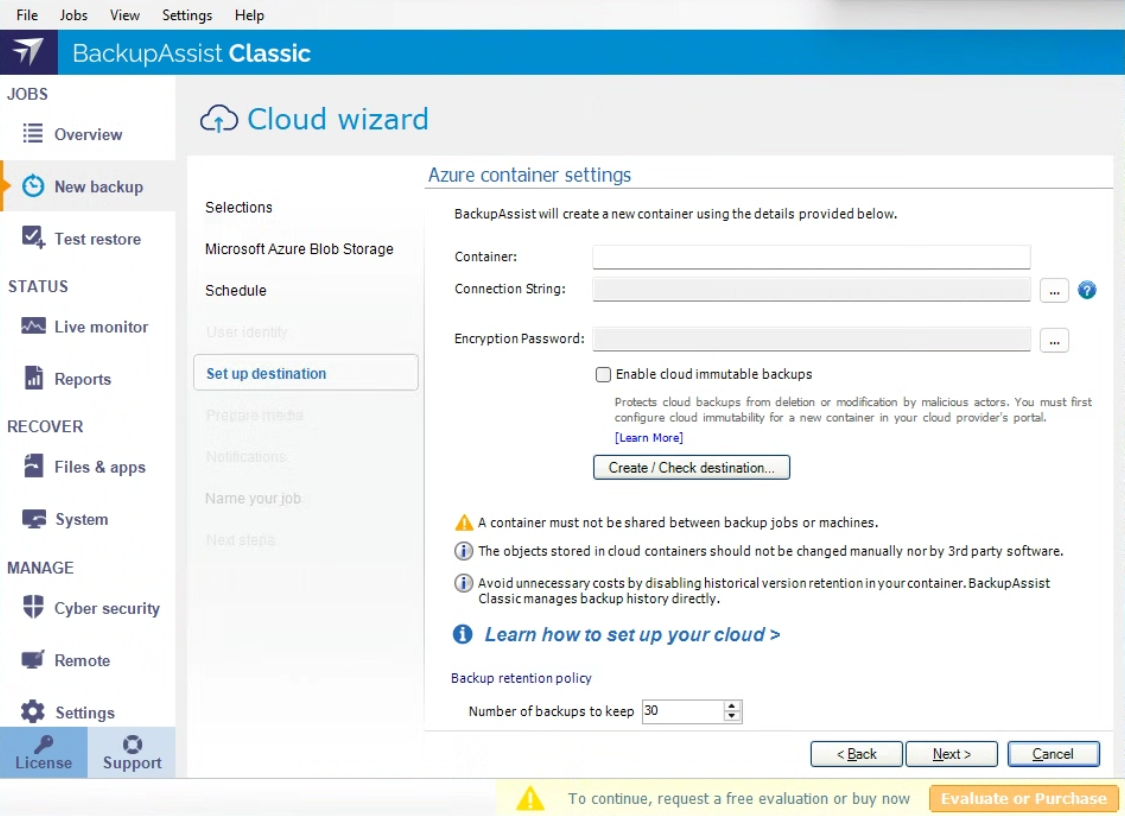
Azure container settings
Fill in the Azure container settings including the container name and connection string.
-
Container
Enter a name for your Azure container. BackupAssist will use this name to create the container. Provide a different name for each job, as a different container must be used by each backup job. This name must follow the conventions explained in the "Container Names" section in Microsoft's naming guide.
-
Connection string
Log into the Azure portal and, select the Storage account from the Resources list and select Access keys from the list of Settings. Under each key will be a Connection string. Use the copy button to select a Connection string from one of the key sections and Paste it into the field provided on BackupAssist's Set up destination screen.
To learn more, see How to create Microsoft Azure cloud storage or the Azure website.
-
Encryption Password
Cloud Backup uses encryption to protect your data. Enter and confirm an encryption password. This password will be needed if you perform a restore.
Note
It is important that you keep a copy of your password in a safe place, as we cannot retrieve passwords if they are lost or forgotten.
Note
If you like to create an immutable cloud backup, follow the additional instructions in cloud-immutability.
-
Check destination
Select the Check destination button. This important step uses the information provided to test the connection to the cloud destination, and then creates the cloud container (bucket) that the backup job will use.
If you select Storage accounts from main menu and then name of the account you used, and then select Blobs on the right pane, you will see a blob inside the Storage account with the container name you specified.
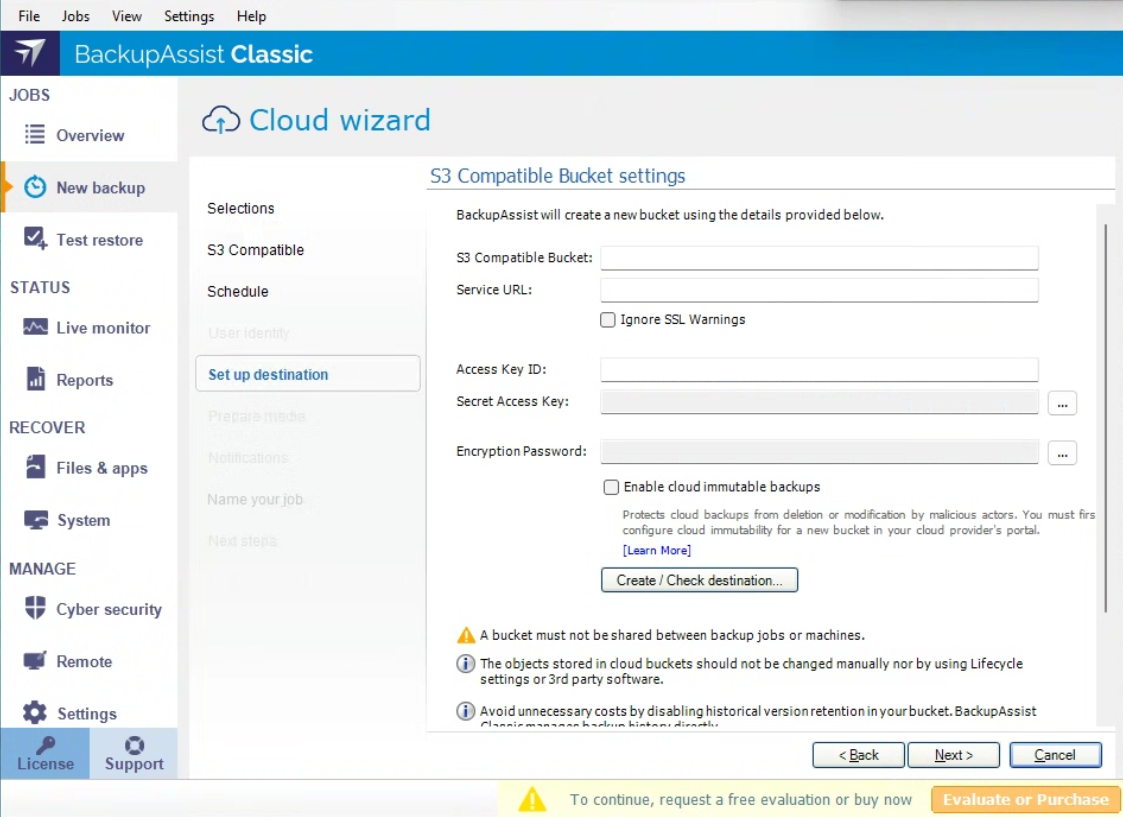
S3 Compatible (incl. Wasabi and Backblaze) bucket settings
Fill in the S3 Compatible Bucket settings including the bucket name, and your Access Key ID and Secret Access Key.
-
S3 Compatible bucket
Enter a name for your S3 bucket. BackupAssist will use this name to create the bucket. Provide a different name for each job because each job will use its own bucket. This name needs to be unique and can only use lower-case characters, numbers, periods and dashes.
-
Service Url
This is the URL endpoint that BackupAssist will use to access the cloud storage. If you are using an S3-compatible service provider, the URL will be available from your provider and may be region-specific. If you set up your own S3-compatible storage, you may have configured this URL when creating the storage, or you may need to refer to the product documentation.
-
Ignore SSL warnings
Select this option if you are using an https URL for a private cloud destination with self-signed certificates, rather than a trusted certificate. For example, when using a NAS device, this option will allow you to back up to the device in spite of any SSL errors.
Note
This option is not intended for use with public cloud provider destinations.
-
Access Key ID & Secret Access Key
Enter the keys for the IAM account that you want BackupAssist to use for this job. Please refer to the relevant service provider's documentation or the S3 server software to extract these keys.
-
Encryption Password
Cloud Backup uses encryption to protect your data. Enter and confirm an encryption password. This password will be needed if you perform a restore.
Note
It is important that you keep a copy of your password in a safe place, as we cannot retrieve passwords if they are lost or forgotten.
Note
If you like to create an immutable cloud backup, follow the additional instructions in cloud-immutability.
-
Check destination
Select the Check destination button. This important step uses the information provided to test the connection to the cloud destination, and then creates the cloud container that the backup job will use.
Cloud Backup restores
Perform a restore from a Cloud Backup as you would for any other backup type. Simply select the Files& Apps tab, select the required restore option and follow the steps. To learn more, see Files & Apps tab
When performing a restore from a Cloud Backup, you will be prompted to enter the password used to encrypt the backup when you select the Restore button.
Bare Metal Recovery with Cloud Backups
Perform a Bare Metal Recovery or VM Instant Boot from a Cloud Backup by selecting the System tab Home menu and selecting Download BMR backup. Once the download of the BMR capable backup is complete, a set of VHDX backup files are created and can be used to carry out BMR or VM Instant Boot.Files & Apps tab